Repair Wooden Frames - Epoxy Resin

Joined
10 Jan 2017
Messages
1,821
Reaction score
279
Location
Derbyshire
Country
United Kingdom
I’ve recently moved into a new house. Built 1906 it’s in need of sympathetic repair work.

I’ve cleaned out all the gutters which were blocked up and causing damp, repointed some ground floor brickwork with lime mortar, had a rear chimney stack taken down (breasts had been removed with no support!) and have a few more jobs.

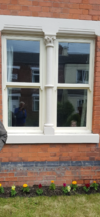
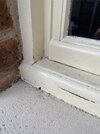
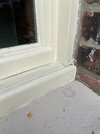
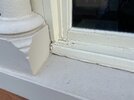
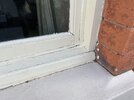
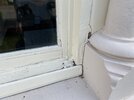
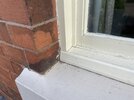
I’m concerned with the wooden windows. Many of them are rotten at the bottom — mainly the cills and the bottom ~1 inch of the frame. You can see it in my picture (my Dad is in the reflection, I’m much younger and poorer!) If I press these areas they are like sponges.

They probably need replacement, but I can’t afford it, so I want to repair them to at least get us through a few winters. I had initially looked at chopping out the rot and splicing in hardwood, filling and painting however I’ve since learnt about epoxy resin repairs.

Does anybody know if this could work or have any advice?
 

Attachments

  • IMG_0528.png
    IMG_0528.png
    1.7 MB · Views: 47
Sponsored Links
Something like timbabuild a two part epoxy is widely used in wooden window repair. You can let in new timber and cover the join with resin for larger areas of repair, as it sands down, or use it on its own for smaller jobs.
 
Timbabuild make two different epoxies. One cures in 1 hour, the other in 4 hours.

The 1 hour is primarily used for smaller gaps and splicing in timber. I have however used the 4 hour for splicing in as well.

Timbabuild used to be my brand of choice. I used to be able to get it via a mate that had a trade account at Reddiseals for £25 inc VAT per and a min of £100 for free delivery. He has since retired- now it will cost £48 incl per tube (subject to a min order of £95 for free delivery).

I have since discovered a company set up by people that used to work for the company that makes Timbabuild. They charge £25 incl with free delivery. The products are pretty much identical and thus far seem to perform in the same way.


A downside to using either brand is the need to buy the dedicated gun. They Oxera charge £32. However, Oxera do sell pots that you can mix manually- I have never used them though but it might be prudent to ask them for advice.
 
Sponsored Links
Thanks a lot for the advice and pointers. Never worked with the stuff so had no idea on what brands to go for. Sounds like the resin will be good to use for this work. Is it better than the Ronseal wood filler?

The first two images show the average level of rot on most windows — it seems to be limited to the moulded timber section on the front, and parts of the sill and bottoms of the frames. I’m confident with chopping that out and replacing with timber of a similar size and profile.

The last four images show the worst window, which is letting water in the house. I’m trying to source a joiner for that, as it’s not within my skill set.
 

Attachments

  • IMG_0531.jpeg
    IMG_0531.jpeg
    340.1 KB · Views: 33
  • IMG_0532.jpeg
    IMG_0532.jpeg
    295.4 KB · Views: 38
  • IMG_0533.jpeg
    IMG_0533.jpeg
    257 KB · Views: 32
  • IMG_0534.jpeg
    IMG_0534.jpeg
    317.4 KB · Views: 29
  • IMG_0535.jpeg
    IMG_0535.jpeg
    230.4 KB · Views: 30
  • IMG_0536.jpeg
    IMG_0536.jpeg
    311.6 KB · Views: 35
Amazon have the ERC10 for £41 inc del. It seems fairly widely available at around the £29 price though.

Good spot- Builder Depot sells it for £30


And only charge £31 for the gun.

The Dulux Decorator Centre is even cheaper,but the gun is a couple of quid more expensive.

 
Ronseal wood filler is a polyester resin filler (AKA 2K filler/ 2 pack filler)- same stuff as car body filler. It is a good product but it lacks flexibility. It is not suitable for splicing in timber. That said, even after splicing in timber, I occasionally, first prime the area and use 2 pack as the final face filler (for aesthetic reasons).

Epoxy resin fillers are incredibly sticky. They are more difficult to sand than 2 pack fillers, so I try not to massively over fill with them, hence the 2 pack for the final finish if required.

The 1 hour resin, the more flexible of the two is easier to sand (than the 4 hour). The 4 hour however can be used in cases where the area is load bearing- that said, it is not often that you cannot splice in timber.

plywood door.jpg

The above is a photo of a door I had to deal with last week. I was surprised to discover that it is plywood. I removed the rotten sections until the area was pretty much uniform in depth. Applied Tetrosil wood hardener (thanks to @jobandknock for the tip), and then spliced in 12mm ply. Previously, I used to use the expensive Timbabuild epoxy wood hardener but found that any that touched previously painted surfaces would stay tacky for days.

BTW, ideally, you will remove all loose timber. No wood hardener will make timber that can be scraped away with your fingernail hard enough to "glue" to. I use an oscillating saw and chisels, some other people use die grinders. I do not own the latter.

To minimise sanding in awkward areas, you can use off cuts of perspex or off cuts of timber wrapped in polythene. They can be pulled away after the product has cured- it works with two pack fillers as well.

sill-before.jpgsill-after.jpg

By way of an example, I used 2 pack filler to straighten the underside of the following sill. I wrapped poly dustsheet around a length of timber and then clamped the timber to the sill. Once the filler had cured, I removed the clamps, and pulled away the poly.

Another tip- use offcuts of laminate flooring to mix the epoxy. After mixing, each will stay sticky for days, meaning that you can rotate them. If you get the stuff on your fingers, decorators' wipes will remove the stickiness.

If you don't want to pay £30+ for a gun, RepairCare sell a tube that will work with a standard skeleton gun, but it works out really expensive per millilitre.

Oh, and if using Timbabuild or Oxera, extrude the first 5cm that comes out in to a bin bag. For some reason the white catalyst(?) comes out faster when you first use the tube. You only need to do that once (per tube).

Another potentially important afterthought- the Oxera uses nut oils and has a nut allergy warning for when working with the product. Timbabuild doesn't, as far as I am aware.
 
Ronseal wood filler is a polyester resin filler (AKA 2K filler/ 2 pack filler)- same stuff as car body filler. It is a good product but it lacks flexibility. It is not suitable for splicing in timber. That said, even after splicing in timber, I occasionally, first prime the area and use 2 pack as the final face filler (for aesthetic reasons).

Epoxy resin fillers are incredibly sticky. They are more difficult to sand than 2 pack fillers, so I try not to massively over fill with them, hence the 2 pack for the final finish if required.

The 1 hour resin, the more flexible of the two is easier to sand (than the 4 hour). The 4 hour however can be used in cases where the area is load bearing- that said, it is not often that you cannot splice in timber.

View attachment 347161

The above is a photo of a door I had to deal with last week. I was surprised to discover that it is plywood. I removed the rotten sections until the area was pretty much uniform in depth. Applied Tetrosil wood hardener (thanks to @jobandknock for the tip), and then spliced in 12mm ply. Previously, I used to use the expensive Timbabuild epoxy wood hardener but found that any that touched previously painted surfaces would stay tacky for days.

BTW, ideally, you will remove all loose timber. No wood hardener will make timber that can be scraped away with your fingernail hard enough to "glue" to. I use an oscillating saw and chisels, some other people use die grinders. I do not own the latter.

To minimise sanding in awkward areas, you can use off cuts of perspex or off cuts of timber wrapped in polythene. They can be pulled away after the product has cured- it works with two pack fillers as well.

View attachment 347163View attachment 347164

By way of an example, I used 2 pack filler to straighten the underside of the following sill. I wrapped poly dustsheet around a length of timber and then clamped the timber to the sill. Once the filler had cured, I removed the clamps, and pulled away the poly.

Another tip- use offcuts of laminate flooring to mix the epoxy. After mixing, each will stay sticky for days, meaning that you can rotate them. If you get the stuff on your fingers, decorators' wipes will remove the stickiness.

If you don't want to pay £30+ for a gun, RepairCare sell a tube that will work with a standard skeleton gun, but it works out really expensive per millilitre.

Oh, and if using Timbabuild or Oxera, extrude the first 5cm that comes out in to a bin bag. For some reason the white catalyst(?) comes out faster when you first use the tube. You only need to do that once (per tube).

Another potentially important afterthought- the Oxera uses nut oils and has a nut allergy warning for when working with the product. Timbabuild doesn't, as far as I am aware.

Enjoyed reading that, really, thanks a lot for an informative post (especially tips profiling and mixing the filler). I have used body filler a few times so I think that’s why I was drawn to Ronseal. I need to go and weigh up costs, sources of supplies.

In terms of splicing the timber in, my approach (and I hope I’m correct) was to cut back to solid timber and notch in the new stuff with glue and screws. Alternatively I could just butt join the old and new timber with glue, then again screw together.
 
Your lower sashes do not open. Yup, cut back to new timber, but you do not need to use screws the epoxy resin will lock the new timber in place.
 
Your lower sashes do not open. Yup, cut back to new timber, but you do not need to use screws the epoxy resin will lock the new timber in place.
They’re faux-sash windows (only the top half opens outwards by hanging on a couple of hinges).

If the epoxy negates the need for screws I’ll avoid them altogether. Again, think I had my wood filler head on.
 
They’re faux-sash windows (only the top half opens outwards by hanging on a couple of hinges).

If the epoxy negates the need for screws I’ll avoid them altogether. Again, think I had my wood filler head on.

Screws not required. And no need to worry about screws rusting further down the line.
 
BTW, if you need body filler, the cheapest quality filler that I can recommend is Upol Easy 1. 3.5L is available at Halfords for £25- they won't deliver it though. The Ronseal stuff is, at a minimum, 3 times more expensive. The Ronseal is slightly easier to sand, but doesn't feather out as well as the Upol.

That said, are you really going to need 3.5L of filler. As a professional decorator, I only purchase about 4/5 tubs per year.
 

DIYnot Local

Staff member

If you need to find a tradesperson to get your job done, please try our local search below, or if you are doing it yourself you can find suppliers local to you.

Select the supplier or trade you require, enter your location to begin your search.


Are you a trade or supplier? You can create your listing free at DIYnot Local

 
Sponsored Links
Back
Top