Pointing brick

Joined
2 Feb 2024
Messages
75
Reaction score
2
Country
United Kingdom
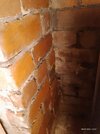
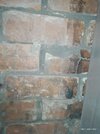
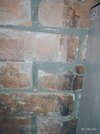
Hi. Looking into possibility of keeping the exposed brick on this fireplace. Appreciate it's 100 year old and always going to look rustic but what's people's thoughts on best way to try and restore it back to best it can be. I've given the side part a good scrape and wire brush but not sure on best way to repoint It or what style of painting to use and best way to go about it
Would really appreciate any advice cheers
 

Attachments

  • IMG_20250209_162248_808.jpg
    IMG_20250209_162248_808.jpg
    436.8 KB · Views: 57
  • IMG_20250209_162311_136.jpg
    IMG_20250209_162311_136.jpg
    401 KB · Views: 58
The bricks look good. You can point any holes in the mortar with new mortar mix, and paint them with an emulsion paint suitable for masonry. Will be fine behind the wood burner
 
The bricks look good. You can point any holes in the mortar with new mortar mix, and paint them with an emulsion paint suitable for masonry. Will be fine behind the wood burner
Cheers for the reply. Was hoping to make it look decent enough to leave them unpainted.just not sure on best way to repoint as obviously the joints are a little uneven with some corners missing etc. have pointed uniform brick before and scrapped joints with a bit of pipe but this is a lot less uniform so not sure on best way to approach it
 
To get it neat, I would get an SDS drill and chisels, and small hammer and chisels, carefully chip away some mortar and scrape it all back a bit, dust off and prime, and repoint with fresh mortar so it's all uniform in finish and colour
 
If the mortar is soft, I use a mortar router bit in a cordless drill, it seems less aggressive than chiselling. If it's larger section I use a router bit in a grinder, with a Irwin dust extractor. If the mortar is hard, SDS chiselling or grinder disk with extraction. You could play around with mortar dye to get whatever colour you want.
 
I wouldn't use a power chisel or grinder if you want it to be decorative. It's only a tiny number of bricks, you want quality not quantity.

Get one of these...


This is designed to slide and chip along the joint, whereas a standard chisel (manual or SDS) will smash into it if you use it face-on, or will take the corners off the bricks if you use it along the courses.

Carefully chip back to perhaps 25mm depth.

You may need brick acid for some of the faces, if they've been smeared.

Thoroughly clean, vacuum and wash then point. Get some nice liquid plasticiser so your mix is fluffy and creamy rather than wet.
Thanks for the reply. The current motor is fairly soft and I can get it out without too much risk of damaging the brick. I'm just not sure how to finish the pointing to make it look best. Ie should I try to finish flush with brick faces or leave it set back. Trowell finish or wipe/brush it. There are some quite uneven areas and some areas of missing brick so just not sure on best approach
 

Attachments

  • IMG_20250211_075830_620.jpg
    IMG_20250211_075830_620.jpg
    266 KB · Views: 31
  • IMG_20250211_075814_004.jpg
    IMG_20250211_075814_004.jpg
    320 KB · Views: 31
I'd use lime mortar as it deals with heat better. For that brickwork I'd use a flush joint hit with a churn brush when it's green hard.
 
The old bucket handle is the best, possibly only, choice for someone like us who hasn't done training or an apprenticeship.


Anything more ambitious will probably just end up looking like a mess.

It needs to be neat. It's a lot more demanding than a house wall,where the odd line that's a bit messy will just vanish into the overall scene. You need every joint to be spot-on, as neat as bathroom tile grouting.

I like the look after scrubbing it with a bath sponge the morning after. You expose the sand in the mortar, making it look like it's been there years rather than like freshly squeezed toothpaste. Plus you'll be able to rub away the odd brick stain.
 
Actually it looks like your bed depth is VERY variable. So it will be difficult or impossible to make it look good with standard bucket handle pointing. In this case flush may be more appropriate. But it will never look good, as it hasn't been built well - it was clearly intended to be covered from day one.
 

DIYnot Local

Staff member

If you need to find a tradesperson to get your job done, please try our local search below, or if you are doing it yourself you can find suppliers local to you.

Select the supplier or trade you require, enter your location to begin your search.


Are you a trade or supplier? You can create your listing free at DIYnot Local

 
Back
Top