2 gang switch, dimmer replacement, odd behaviour (?) / new build house

Joined
2 Aug 2023
Messages
9
Reaction score
1
Country
United Kingdom
Hi,

I have never come across this before, so I hope you can give me some direction here. I can normally swap switches and sockets without changing any configuration, but it didn't quite work out this time around. I always mark cables and take photos.

I have 2 lights in the main bedroom upstairs with a standard on/off switch (no other switch in the bedroom). I put on dimmable led bulbs, and I wanted to install a dimmer switch (2G). Didn't quite go according to plan.

First thing I noticed is that when the bedroom switch is disconnected, other bedroom and toilet lights don't work. Somehow, entire first floor lights depend on the bedroom switch. Is this normal?? I found this a bit strange.

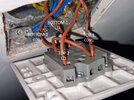
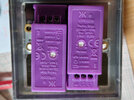
Secondly, please see a photo of the original switch setup (untouched). I put lines on the cables to ensure I can revert back (and I had to). For ease, I noted them as Top1, Top2, and Bottom1, Bottom 2. I would really appreciate it if you can let me know what the correct configuration is on the new dimmer switch. I tried replicating the same setup (although I wasn't sure about the L11 L12 L21 L22, which didn't correspond with the simpler L1 L2) but it either didn't turn any lights at all, or it turned on/off other rooms lights (I left them switched on).

I hope I explained this correctly, but if you require any clarification please let me know.

Thank you very much in advance!
 

Attachments

  • 2gang-switch.jpg
    2gang-switch.jpg
    306.9 KB · Views: 90
  • dimmer-switch.jpg
    dimmer-switch.jpg
    326.8 KB · Views: 73
Sponsored Links
Bottom 2 and Top 1 are the supply, and should be connected to L1 on each dimmer, including the link between them.
Without the link, lights in other rooms will not work.

Bottom 1 and Top 2 are the connections to each light, connect to the wavy line terminal on each dimmer.

L2 terminals on the dimmers are not used.
 
As flameport posted first, For clarity and minimise confusion, ignore this......

Com1 === SwigglyLine Left Dimmer
L11 === L1 Left Dimmer

Com2 === SwigglyLine Right Dimmer
L21 === L1 Right Dimmer

Jumper wire between Com1 and Com2 === Jumper wire between Swiggly Line left Dimmer and. Swiggly lIne Right Dimmer


...and use this which is updated to match flameport as he answered first:

Com1 === L1 Left Dimmer (live - in this case coming into room)
L11 === SwigglyLine Left Dimmer (switched live going to a light)

Com2 === L1 Right Dimmer (live - in this case going off to also power switch in next room)
L21 === SwigglyLine Right Dimmer (switched live going to a light)

Jumper wire between Com1 and Com2 === Jumper wire between L1 Right Dimmer and L1 left dimmer (this is to join live coming from Fuse box, to two swiches via jumper wire, and then off to the light switch in next room).


The wire coming into Com1 is likely to be live coming from the Fuse box (probably via other light switches).
It then goes out (Via jumper wire) from Com2 to the next room and its light switch to power the lights in that room.
(Note that this might be reversed, with live coming into Com2 and out via jumper wire and Com1 to next room).

NOTE as your new switch is a metal face plate it has to have a ground/earth wire to the metal plate (grub screw on left).

Sfk
 
Last edited:
Bottom 2 and Top 1 are the supply, and should be connected to L1 on each dimmer, including the link between them.
Without the link, lights in other rooms will not work.

Bottom 1 and Top 2 are the connections to each light, connect to the wavy line terminal on each dimmer.

L2 terminals on the dimmers are not used.
Just to double check.. On the old switch, Bottom 2 and Top 1 are connected to COM2 and COM1 respectively. But you are saying on the dimmer switch they should be connected to L1 and linked. And Bottom 1 and Top 2 are connected to COMs, although they were on L11 and L21. Not sure if this makes any difference, but just wanted to make sure I understand correctly as they appear to be the other way around (I guess that makes no difference). Thank you for taking the time to explain!
 
Sponsored Links
For clarity and minimise confusion, ignore this......

Com1 === SwigglyLine Left Dimmer
L11 === L1 Left Dimmer

Com2 === SwigglyLine Right Dimmer
L21 === L1 Right Dimmer

Jumper wire between Com1 and Com2 === Jumper wire between Swiggly Line left Dimmer and. Swiggly lIne Right Dimmer


And use this which is updated to match flameport as he answered first....

L11 === SwigglyLine Left Dimmer
Com1 === L1 Left Dimmer

L21 === SwigglyLine Right Dimmer
Com2 === L1 Right Dimmer

Jumper wire between Com1 and Com2 === Jumper wire between Swiggly Line left Dimmer and. Swiggly lIne Right Dimmer


The wire coming into Com1 is likely live from the Fuse box.
It then goes out (Via jumper wire) from Com2 to the next room and its light switch to power the lights in that room.
(Note that this might be reversed, with live coming into Com2 and out via jumper wire and Com1 to next room).

NOTE as your new switch is a metal face plate it has to have a ground/earth wire to the metal plate (grub screw on left).

Sfk
Thanks for the further explanation, I think I'm clear now. I will try again in the morning and report back. Many thanks!
 
Sorry, took me a bit to update my text using phone to match flameport. Text now is correct in that it is critical that the wires currently on Com1 and Com2 are always the ones joined with a jumper as these are all permanent live.
 
Last edited:
Could I also ask that you put some brown tape or brown sleeve on the wires currently in L11 and L21. (Or at a push use your pen to write a, say, 1cm long black band on both).

Removed: This is because this shows that these two wires are after a switch (or a dimmer) and are hence known as switched live.

This is only a suggestion to remind you later if the wires get tangled that these two wires are after the switch (or the dimmer) and are the switched live wires.

Thx Sfk.
 
Last edited:
Could I also ask that you put some black/brown tape or black/brown sleeve on the wires currently in L11 and L21. (Or at a push use your pen to put a 1cm long black band on both).
Is that a recognised practice which the next person might know?
I have never seen it stated; I might do it for myself when disconnecting.

I would think such sleeving/marking would better denote which are the permanent lines.

Why black and 1cm?

This is because this shows that these two wires are after a switch (or a dimmer) and are hence known as switched live.
Is that not shown, to people who know what they are doing, by the switched lives being the single wires in the terminals; any such person looking at -
1708601098804.png

would instantly know which wire is which -

and would people who do not know what they are doing know about the method of sleeving/marking?


Also - for the OP the terminals for each switch are not top and bottom but left and right.
 
  • Like
Reactions: SFK
Is that a recognised practice which the next person might know?
I have never seen it stated; I might do it for myself when disconnecting.
Happy to be corrected as I am only a DIYer (likely I should have said that at top) so no idea if recognised.
I have tended (perhaps incorrectly) to put a sleeve of some sort (normally brown) on the switched live of ceiling roses, whether the wire is brown or blue, etc.

In this case was simply wanting OP to mark the wires going to the Lights before they were pulled from the old switch as this forum often seems to see a confused tangle of wiring after the fact. Hence did not care if sleeved or marked. And 1cm is arbitrary and based around OP having a black pen.
I would think such sleeving/marking would better denote which are the permanent lines.
Good to know for my knowledge and wording edited above.

Thanks SFK.
 
Last edited:
Just to confirm, I tried again and as expected, it worked this time. Many thanks!
 
  • Like
Reactions: SFK

DIYnot Local

Staff member

If you need to find a tradesperson to get your job done, please try our local search below, or if you are doing it yourself you can find suppliers local to you.

Select the supplier or trade you require, enter your location to begin your search.


Are you a trade or supplier? You can create your listing free at DIYnot Local

 
Sponsored Links
Back
Top