
You are using an out of date browser. It may not display this or other websites correctly.
You should upgrade or use an alternative browser.
You should upgrade or use an alternative browser.
3rd Gen nest install wiring help
- Thread starter Aszaria
- Start date
-
- Tags
- drayton help needed nest
Sponsored Links
If you are happy with the Nest Heatlink being installed in the same location as the old Drayton, then you can try and connect...I was just wondering if I could install 3rd Gen Nest without new wiring?
The Black wire and Blue (oversleeved black) in Drayton N to Heatlink N
Red wire in Drayton L to Healink L
Add the link wire between Heatlink L and terminal 2 (Heating Com)
Red wire in Drayton terminal 3 to Heatlink terminal 3
Lastly, you have a Blue wire in Drayton terminal 2 - this is a little unusual and I don't know what it may connect to at the other end.
However, attaching it to Heatlink terminal 1 will be functionally identical to the existing controller - hopefully no harm should come of it!
If you intend to use terminals T1 and T2 to power the Nest thermostat, the Heatlink earth terminal should also be connected.
Sponsored Links
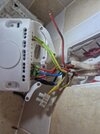
Ahhh, you didn't mention an external thermostat, but I should have thought to ask!Here is the old thermostat, got a random number 3 cable there.
View attachment 355484
It looks like the Blue (oversleeved black) wire to the thermostat comes from Drayton N and the red wire to thermostat L comes from Drayton terminal 3.
If you want to remove the existing thermostat and reutilise those wires for the 12V supply to the Nest, we need to find where that yellow wire goes - I think it joins with another wire in a separate terminal block behind the Drayton - is that correct?
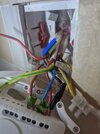
I know the Nest terminals are tight, but we could really do with seeing less copper showing on the wires!How does this look?
- Joined
- 20 Dec 2020
- Messages
- 14
- Reaction score
- 4
- Country

Ahhh, you didn't mention an external thermostat, but I should have thought to ask!
It looks like the Blue (oversleeved black) wire to the thermostat comes from Drayton N and the red wire to thermostat L comes from Drayton terminal 3.
If you want to remove the existing thermostat and reutilise those wires for the 12V supply to the Nest, we need to find where that yellow wire goes - I think it joins with another wire in a separate terminal block behind the Drayton - is that correct?
View attachment 355489
I know the Nest terminals are tight, but we could really do with seeing less copper showing on the wires!
I should of mentioned originally what I was doing. Not your fault. You've been great.
I was getting it working rough and ready and then going to tidy, you're completely about the copper.
Seems you're right about it being connected via that unit
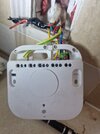
Here is the full wire set:
Attachments
I don't know if you can confirm, but this appears to be the thermostat cable...Seems you're right about it being connected via that unit
Does the red wire connect to terminal 3, and is the blue (over sleeved black) in the N terminal?
- Joined
- 20 Dec 2020
- Messages
- 14
- Reaction score
- 4
- Country
I don't know if you can confirm, but this is the thermostat cable...
View attachment 355494
Does the red wire connect to terminal 3, and is the blue (over-sleeved black) in the N terminal?
It seems you're right. Terminal 3 red cable belongs to the highlighted possible thermostat cable and the blue (black sleeve) is housed in terminal N comes from that cable, too.
The thermostat cable combines its yellow with the below cable, the blue from that cable is housed in terminal 1.
Attachments
Ok, perfect!It seems you're right. Terminal 3 red cable belongs to the highlighted possible thermostat cable and the blue (black sleeve) is housed in terminal N comes from that cable, too.
")
This should help tidy up the wiring a bit.
The blue (oversleeved black) from that cable can be removed from N.
The red can be removed from terminal 3.
The yellow in the separate terminal block (from the other cable) can then be connected to terminal 3 of the Heatlink, in place of the red.
Apart from the earth wire, that should leave all the wires from the thermostat cable decommissioned.
- Joined
- 20 Dec 2020
- Messages
- 14
- Reaction score
- 4
- Country
Ok, perfect!
This should help tidy up the wiring a bit.
The blue (oversleeved black) from that cable can be removed from N.
The red can be removed from terminal 3.
The yellow in the separate terminal block (from the other cable) can then be connected to terminal 3 of the Heatlink, in place of the red.
Apart from the earth wire, that should leave all the wires from the thermostat cable decommissioned.
Great, that's definitely a lot more tidy!
I'm now on to the thermostat, and I have figured it out. I don't need cable 3 anymore and will decommission it and then insert N & L, easy!
Thanks for your help. Would of been a mare without it!
Attachments
It's possibly an opportune moment to test the system before moving on to the thermostat wiring. (With the cables safe and power restored) Try using the manual override button on the Heatlink - hopefully the boiler should fire.Great, that's definitely a lot more tidy!
...and hopefully you don't really mean N & L, when talking about connecting up the thermostat to T1 and T2 - 230V AC and 12V DC don't like to mix!
- Joined
- 20 Dec 2020
- Messages
- 14
- Reaction score
- 4
- Country
It's possibly an opportune moment to test the system before moving on to the thermostat wiring. (With the cables safe and power restored) Try using the manual override button on the Heatlink - hopefully the boiler should fire.
...and hopefully you don't really mean N & L, when talking about connecting up the thermostat to T1 and T2 - 230V AC and 12V DC don't like to mix!
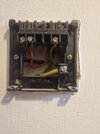
I turned the boiler back on from the isolator and did a manual mode check and all was working well.
When I was referring to N & L I was referring to the below picture N & L slots.
On second thoughts though you said the cable was now decommissioned?
Attachments
Last edited:
Brilliant, well doneI turned the boiler back on front he isolator and did a manual mode check and all was working well
If all the wires from the thermostat cable have been disconnected as suggested earlier, then you have the choice; you could remove the cable and old thermostat backplate completely; or if you were happy with the position of the old stat, you could reuse this cable to power the new Nest thermostat, i.e. use the red wire in that cable to connect terminals T1 and the blue for T2.On second thoughts though you said the cable was now decommissioned and I should just place the cable 3?
- Joined
- 20 Dec 2020
- Messages
- 14
- Reaction score
- 4
- Country
Just to say thanks. All up and running. You've been so helpful.Brilliant, well done
If all the wires from the thermostat cable have been disconnected as suggested earlier, then you have the choice; you could remove the cable and old thermostat backplate completely; or if you were happy with the position of the old stat, you could reuse this cable to power the new Nest thermostat, i.e. use the red wire in that cable to connect terminals T1 and the blue for T2.
That's great to hear - glad you got it sorted.Just to say thanks. All up and running. You've been so helpful.
Best to do so now, rather than waiting until the depths of winter!
Thanks for letting us know the outcome
DIYnot Local
Staff member
If you need to find a tradesperson to get your job done, please try our local search below, or if you are doing it yourself you can find suppliers local to you.
Select the supplier or trade you require, enter your location to begin your search.
Please select a service and enter a location to continue...
Are you a trade or supplier? You can create your listing free at DIYnot Local
Sponsored Links
Similar threads
- Replies
- 8
- Views
- 2K
- Replies
- 7
- Views
- 11K
- Replies
- 13
- Views
- 2K
- Replies
- 11
- Views
- 4K