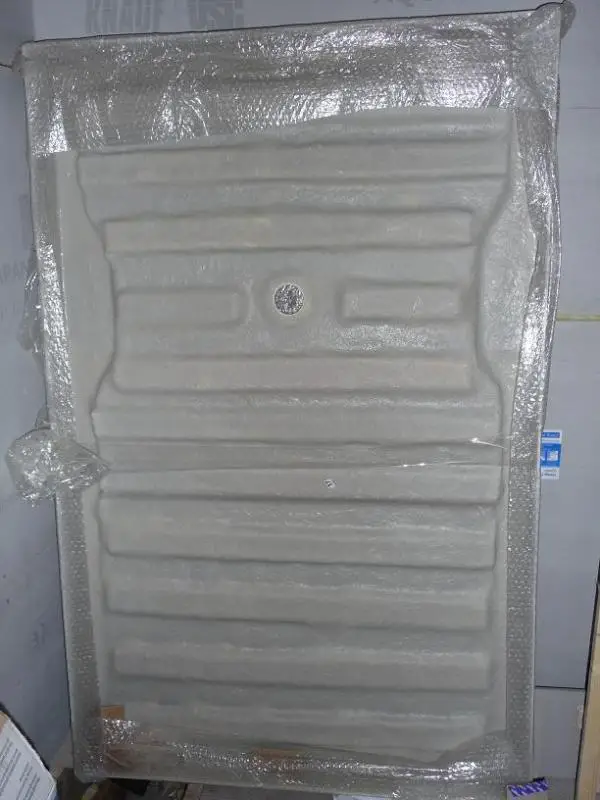
Acrylic Shower Tray Install

Joined
24 Dec 2005
Messages
106
Reaction score
0
Location
Newcastle upon Tyne
Country
United Kingdom
Hello everyone,

We bought a shower tray and enclosure last year and are finally getting around to installing it. The problem i'm having is that the instructions are next to useless when it comes to installing the tray.

The tray itself is acrylic so I want to do my best to ensure it doesn't move/leak given the limitations of that material. The tray measure 900mm x 1400mm and you can see the underside of it in the linked picture.


So my question is - how would anyone suggest installing this? I have the joists of the wooden floor running in such a way that I could place it at floor level(ish).

Would anyone use mortar to install this? Expanding foam? nothing at all - just install and glue to the walls?

Any help/advice would be greatly appreciated!

Thanks for taking the time to read this.

Chris
 
Sponsored Links
[So my question is - how would anyone suggest installing this? I have the joists of the wooden floor running in such a way that I could place it at floor level(ish).

Err.. don`t, I wouldn`t , and no self respecting plumber will. Truth is fellah they are shat, big time, they will split and crack and leak resin ones are fairly cheap now, no one has bought an acrylic shower tray since ``Reg Varney`` in ``On the Buses``. :cry:

I thought they were discontinued. They should be.
 
Are you sure it's acrilyc? Looks a little like fibreglass...
 
Sponsored Links
Err.. don`t, I wouldn`t , and no self respecting plumber will. Truth is fellah they are shat, big time, they will split and crack and leak resin ones are fairly cheap now, no one has bought an acrylic shower tray since ``Reg Varney`` in ``On the Buses``. :cry:

I thought they were discontinued. They should be.

It is part of a walk-in enclosure which has a tower part so as such I don't think i could change it for a resin one (would have to drill holes through any new one i got too to supply the tower).

I'm just looking to make the best out of a seemingly bad situation instead of throwing away £600.

Thanks,

Chris
 
I would look at reinforcing the bottom of the tray, possibly by sticking a piece of marine ply to the underside with a cut out for the waster area. You could then use battens to the level of the rim. This could then be stuck down to a firm level base of more ply.

alternative would be to bed the whole thing on pug but it would be difficult to guarantee a support across the whole base.

Mike

Thanks Mike.

I think that there are already reinforcing pieces in the design of the tray and it does seem quite sturdy. Maybe I could run plywood underneath as you suggest and secure into these?

Could you explain what pug is and how it is made up? I'm assuming it's a mortar mix of some kind?

Thanks,

Chris
 
Sorry pug is just sand and cement mortar also known as muck and all sorts of other pseudonyms.

I'd be inclined to gripfill or similar to the bottom of the tray rather than risk driving a screw too far and damaging the surface.

Mike
 
Sorry pug is just sand and cement mortar also known as muck and all sorts of other pseudonyms.

I'd be inclined to gripfill or similar to the bottom of the tray rather than risk driving a screw too far and damaging the surface.

Mike

Thanks again for that Mike,

What kind of ratio is normally used for bedding shower trays? 5:1 or something like that? Also, what type of sand?

I'm thinking that using plywood stuck to the base and then bedding that on the mortar could be a good way to go in this situation. I could reduce the amount of muck required by adding additional plywood and then end up with a solid-ish base? :confused:

Chris
 
I've always a similar mix to bricklaying 4:1 using building sand. It wouldn't hurt to PVA the bottom of the tray an the floor and incorporate some into the mix but make sure you clean any off the side of the tray before it sets.

Any method of fixing which gives the maximum support for the base of the tray is going to give the longest lasting result.

Mike
 
Err.. don`t, I wouldn`t , and no self respecting plumber will. Truth is fellah they are shat, big time, they will split and crack and leak resin ones are fairly cheap now, no one has bought an acrylic shower tray since ``Reg Varney`` in ``On the Buses``. :cry:

I thought they were discontinued. They should be.

It is part of a walk-in enclosure which has a tower part so as such I don't think i could change it for a resin one (would have to drill holes through any new one i got too to supply the tower).

I'm just looking to make the best out of a seemingly bad situation instead of throwing away £600.

Thanks,

Chris

I had an acrylic tray that cracked in service, but it was a foam filled one with no reinforcement. It was avocado. :eek: They don't make 'em like that anymore.

What brand is the tray/enclosure? You may be able to find more information on-line.
 

DIYnot Local

Staff member

If you need to find a tradesperson to get your job done, please try our local search below, or if you are doing it yourself you can find suppliers local to you.

Select the supplier or trade you require, enter your location to begin your search.


Are you a trade or supplier? You can create your listing free at DIYnot Local

 
Sponsored Links
Back
Top