[b]best way 2 tile and seal bath[/b]

Joined
15 Jul 2006
Messages
3
Reaction score
0
Location
Leicester
Country
United Kingdom
fitting a new steel bath and wanted 2 know from you good people the best way 2 seal and tile around the new bath im just not sure how 2 do it and i dont want 2 find out later it leaks that wud b a disater!

_________________________________
lynda, moderator, please note forum rule 5
 
Sponsored Links
1. If the floor is at all loose or wobbly, then screw it down.
2. Install the bath.
3. If the bath has feet that can be screwed down, then screw them down.
4. Make the bath level.
5. Tile the walls above the bath, with the bottom edge of the bottom tile being no more than 2mm above the deck.
6. Grout the tiles above the bath.
7. Fill the bath with water, and leave it full.
8. Apply top quality mildew resistant sanitary silicone sealant to the gap you left beween the bottom tiles and the bath deck.
9. Wait for 24 hours, then empty the bath.
10. Stand back in amazement at your handiwork.

BTW, if you don't know how to do step 3 without struggling, then just ask. ;)
 
Sort of as Softus says but add this between Nos 4 and 5 and get rid of 7 you will not regret it no splitting of silicone when 2 adults share :D

What you really want to do is make a frame which is fixed to the wall so that there is no downward movement.

Make up the bath and fit the legs so that the panel will fit under.
Offer the bath up and mark on the wall below the rim, try a bit of spare timber this will give a good guide to size required. Get down to a good quality builders merchants and buy 1" X 2" par batten or what ever size you need, fix timber to the wall and put uprights in every 2ft offer bath back in and if necessary remove some of the timber to let the legs of the bath in so the bath rim is tight to the wall. Fit the taps waste etc. Throw the silly brackets away that they supply for fixing the bath to the wall and invent some new ones you should have a fair bit of timber left use this.
Bath will feel and be nice and solid.

If you feel really adventurous carpentry wise make a nice little scollop in the batten where the tap unions will be close to the timber for future maintenance.

Regards Clive
 
I can't see the benefit of a frame with a steel bath, but feel free.

On no account should you omit step 7.
 
Sponsored Links
that helps alot but im still not sure how 2 seal it do i need 2 use 1 of those sealing strips under the last of tiles? or will sealing it with silcone do the trick? and also ive been told that cutting the bah into the wall is a good idea?
 
Silicone is the way to go those sealing strips look a bit naff get someone in to do the mastic if you are not sure or havent much practice it is such a silly little thing but can make such a difference to the finished job.

only let the bath into the wall if you have to i.e. if the wall is a little out of square and you think once tiled there could be a slight gap causing uneven mastic joints.

Softus was right don't omit 7 if you decide not to use the framing, if you do use a frame then there is little point as the frame will hold the bath in position.
 
Those plastic strips are very dodgy. The rubber tip that runs along the front edge hardens after a few years and often discolours too. The mitres are a weak spot and the ends look ugly. You can buy pre made mitres and end caps, but they collect crap, look crap and age very quickly. If you have no confidence in neatly siliconing the corners and edges, then yes, use those strips. But profesionals don't.

What you want to trying and achieve is getting the tiles to sit on the top flat of the bath. Not on the curved off edge. This is where water can collect. A lot of plastic baths have a long radius curved off edge. This need to be chased into the wall, especially if you have thinner tiles. I often bed the bath in with fix and seal.

Also, do you have plaster board walls??
 
That's the one.

Don't forget most importantly to set hight via bath panel for final floor level.

Only yesterday I had to cut the bottom of side and front panel because the numpty who fixed the bath didn't get it right by 5mm. You wait 'till he gets back off sick, lucky for him he broke his ankle or he'd be dead.
 
ididdidi said:
...don't omit 7 if you decide not to use the framing, if you do use a frame then there is little point as the frame will hold the bath in position.
In my experience, even with a frame in place the bath will move a small amount when filled with water and/or a human body. No matter how small the amount, it's still worth doing in order to reduce to a minimum the forces that will tend to separate the silicone from the bath surface and/or the underside of the lowest tiles.
 
I had to reseal the edge of my bath recently as whoever originally installed it had used one of those strips and mould had grown underneath it. I was a novice at sealing but with a bit of advice it was easier than i thought. I used Unibond bathroom sealant which comes in a spray can. The most important thing to do is place two strips of masking tape, one along the bath edge and the other along the tile edge that you are sealing. You should do this about 3-4mm away from the gap between the two. Then apply the sealant along the gap. Using a wet finger run along the sealant straight away BEFORE IT GETS TACKY! Then as soon as you have done this remove the strips of masking tape. This should leave you with a very straight edge to your sealant both top and bottom. Good luck.
 
We always fill the bath. It doesnt hurt and who's to say there isnt a bit of movement in the floor too?
 
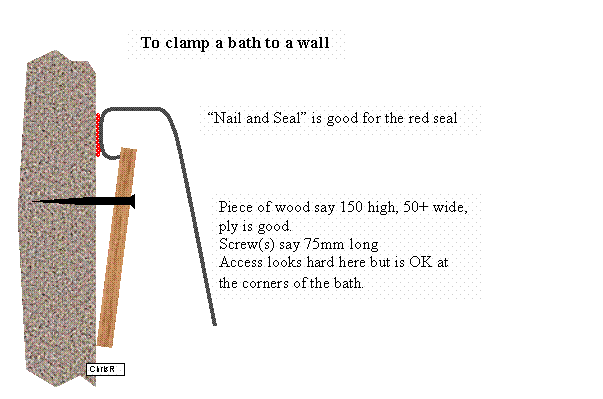
One way ...
Toclampabathtoawall.gif
 
grrinc cheers alot the diagram really helps! i feel confident enough now thanks 2 every1 whos has helped with this queri cant thanks u lot enough!!!

regards amit
 

With a view to chasing the bath into a dry-lined plaster wall, I assume care must be taken not to chase too far otherwise the plasterboard may break away? I assume also, that the bath should be attached to the wall via a wall batten as the plasterboard would not be strong enough?
 

DIYnot Local

Staff member

If you need to find a tradesperson to get your job done, please try our local search below, or if you are doing it yourself you can find suppliers local to you.

Select the supplier or trade you require, enter your location to begin your search.


Are you a trade or supplier? You can create your listing free at DIYnot Local

 
Sponsored Links
Back
Top