Best way to route pipes for shower tray

Joined
30 Jun 2024
Messages
66
Reaction score
1
Country
United Kingdom
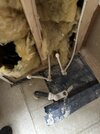
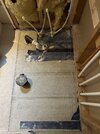
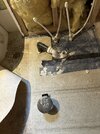
I’ve removed my bathtub and currently have the hot and cold water pipes coming out of the floor. I’m planning to install a shower tray and a thermostatic shower. However, I’m unsure what to do with the exposed pipes.

Should I cut into the floor and move the pipes behind the wall, or would it be better to build the shower tray on a frame and route the pipes behind the wall above the floor?
 

Attachments

  • IMG_8656.jpeg
    IMG_8656.jpeg
    223 KB · Views: 58
Sponsored Links
Remove the Tee's and connect with straight couplers, redirect under the floor and then up into the frame's cavity.
 
Remove the Tee's and connect with straight couplers, redirect under the floor and then up into the frame's cavity.
Thanks! I assume wooden batten joists would be sufficient to secure the chipboard after cutting it?
 
If there's nothing under that section of P5 Board then it can be strengthened with a piece of baton underneath if the tray edge is to sit on it, ideally as a noggin in between the joists. If the tray is sitting on P5 and the edges of the tray will be in between the joist then add extra support noggins underneath to stop the P5 from deflecting where the tray edges will sit.

I would also tank the space - any water onto P5 will cause all sorts of nasty issues.
 
Sponsored Links
If there's nothing under that section of P5 Board then it can be strengthened with a piece of baton underneath if the tray edge is to sit on it, ideally as a noggin in between the joists. If the tray is sitting on P5 and the edges of the tray will be in between the joist then add extra support noggins underneath to stop the P5 from deflecting where the tray edges will sit.

I would also tank the space - any water onto P5 will cause all sorts of nasty issues.
To tank it - could I just lay some tile backer board?
 
Moving the pipes behind the wall is usually the best option for a neat and professional look. This involves cutting into the floor, extending the pipes up behind the wall, and then patching the wall. It’s more work but keeps the pipes hidden and protected. On the other hand, you could build a raised frame for the shower tray, which would let you run the pipes above the floor and behind the wall. This way is easier and avoids cutting the floor, but the shower tray will sit higher, which might not look as nice. Either way, make sure to turn off the water supply before you start, secure the pipes properly, and test for leaks before finishing the wall. If you’re unsure, it’s a good idea to get a professional plumber to help.
Yes, it would be nicer to have the shower tray lower, such as by cutting into the floor. However, securing the chipboard again can be a headache.

Would it be better to keep the pipes above the ground for easier access in case of leaks?
 
No matter what you do, don't lay the tray directly onto P5, it's will need a more substantial surface as in ply or OSB3.

The important thing to consider here is if the tray edge seal did become compromised, the water will head down, if it then gets to that chipboard and it's not seen then over time the chipboard will break down and the tray will move/drop. Seen it and repaired it countless times.

That why you want to get the pipework under the floor and then up though the wall baton and into that wall space. Then that wall is sheeted to the floor and then the wall and floor wet space is fully tanked to make it water proof. Of course where the trap will be there will always be hole, if the waste run is up out of the floor but there's nothing that can be done about that so ideally that's kept to the centre or outside centre edge.

To tank it - could I just lay some tile backer board
'Fraid not - unless it was then subsequently sealed to the wall/floor/each other at all the edges
 
Believe you me, it makes no difference - once the plinth and shower tray is fitted then unless you have the pipes routed to the outside of the plinth, then the tray would need to be lifted to get to any connections and even then it would be a mare to work on, unless the plinth was quite high to get to the fittings properly. Closing the floor back up shouldn't be an issue, it gets done all the time.

If they're under the floor then at least the ceiling underneath could be opened to repair without having to rip the shower out - much less pain to make good with just a piece of plasterboard.
What would be the best way to cut the chipboard? It’s either 2 small sections or one large piece.

I’d need to cut one section to move the hot/cold pipes and another to move the waste as it’s located in the middle of the tray, or one large section for both.
 

Attachments

  • IMG_8693.jpeg
    IMG_8693.jpeg
    499.6 KB · Views: 24
Look down the board for the current nails/screws. I presume the line to the left is already a cut line? What way are the joists running? If the line towards the bottom also has screws in it then that would suggest it's on a joist too. Alternatively that could be a T& G joint line. You want to cut it to the middle of a joist so both side of the board can be screwed back down.

Do you have a multi tool/circular saw? If the latter then set it to 1mm deeper than the board (18 or 22mm) and cut down the centre of the screw/nail line, multi tool blade, piece of tape to the same depth and cut.
The line to the left marks the edge of the old vinyl flooring. I’ve attached another picture with the vinyl lifted for a better view. If the joists are aligned like they are on the floor above, they should be running parallel to the pipes, from the trap to the wall (if that makes sense). The chipboard flooring is tongue and groove, as I discovered when cutting into it in another room.

I have both a circular saw and a multi-tool, so I’ll use these to get the job done.
 

Attachments

  • IMG_8695.jpeg
    IMG_8695.jpeg
    520.1 KB · Views: 28
Ah OK, it looked like a floor cut line.

So what you need to do is find the nails/screws that were used to secure the flooring down. That'll mark where the joists are - draw a straight median line through the line of nails/screws and cut along that - you should hopefully be hitting roughly the middle of the joist doing that. If the joists are running North to South in the pic then you need to find the centres left and right, top and bottom won't matter so much.

I'd lift a section the size of the tray to do the pipework and add in supports under the floor whist you're there, as suggested earlier. How big is the tray?
Yes that makes sense. The tray is 1400 x 760mm.
 
Last edited:
The tray is 1400 x 760mm.
Yes, if it's that large a tray then I'd be adding support under that floor. As suggested especially where the outside edge of the tray will land to stabilise the P5. Consider a supplementary board (WBP Ply/OSB3) on top too to add resilience.
 
Yes, if it's that large a tray then I'd be adding support under that floor. As suggested especially where the outside edge of the tray will land to stabilise the P5. Consider a supplementary board (WBP Ply/OSB3) on top too to add resilience.
Could I lay ply/OSB and screw into the chipboard to secure? Or use some sort of adhesive?
 

DIYnot Local

Staff member

If you need to find a tradesperson to get your job done, please try our local search below, or if you are doing it yourself you can find suppliers local to you.

Select the supplier or trade you require, enter your location to begin your search.


Are you a trade or supplier? You can create your listing free at DIYnot Local

 
Sponsored Links
Back
Top