Breaking Up Shower Tray

Joined
13 May 2018
Messages
92
Reaction score
2
Location
Manchester, UK
Country
United Kingdom
I posted here the other day: https://www.diynot.com/diy/threads/shower-tray-not-level-start-again.642940/#post-5937307

At the time, I believed my fitter had installed my shower tray badly which meant the enclosure could not be properly installed but on closer inspection, I think the tray itself is warped.

tray.pngbottom-left-2.pngbottom-left.pngright-side.pngtop-left-to-bottom-right.pngtop-right-to-bottom-left-2.pngtop-right-to-bottom-left.pngtop-side.png

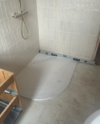
Effectively, the tray is to my eye level along its straight sides (slight deviation from level along the top edge but it's only a few mm out of alignment here) and its two diagonals but not the the spirit level is placed along the curved side. See image names on the thumbnails.

I reported the issue to Kudos so I'm hoping they agree. If they do, they'll refund the £270 I paid for this tray and I can purchase another. In terms of removing it, will a hammer and masonry chisel do a decent job of breaking this up without wrecking everything else? I believe it's cement beneath the shower tray surface..

Wall tiles will be fairly easy to replace and we have loads spare but I want to preserve the floor and underfloor heating.
 

Attachments

  • tray.png
    tray.png
    554.8 KB · Views: 49
To work out how to remove it rather depends on how it was fixed down. I'm just a DIYer admittedly, but reverse engineering is much easier if you have an overall understanding of what you face. There are so many ways to fix shower trays down and some removals will be easier than others.

Trouble is, once you yourself start the process, you sort of take ownership of the overall problem, which lets the fitter off the hook. The tray should really have been checked properly prior to installation or even better, on delivery.

We've had issues like this with all sorts of products. Only last week a basin arrived and I came to fit it only to realise the waste cut off on the under side of the ceramic was off by about 15 degrees, went straight back.
 
To work out how to remove it rather depends on how it was fixed down. I'm just a DIYer admittedly, but reverse engineering is much easier if you have an overall understanding of what you face. There are so many ways to fix shower trays down and some removals will be easier than others.
Spoke to the fitter. The tray sits on a bed of tile adhesive, which sits on a cement board, which sits on the floor boards. The surrounding tiles sit on a screed that was poured AFTER the tray was installed.
Trouble is, once you yourself start the process, you sort of take ownership of the overall problem, which lets the fitter off the hook. The tray should really have been checked properly prior to installation or even better, on delivery.
Sorry if I wasn't clear. The fitter is happy to remove and replace. I won't be doing the work. In fairness to him, I supplied the tray and neither of us thought to check the level on that curve which was evidently a bit of an oversight.

The existing (hinged door) enclosure will look like a total bodge if it goes in so I was considering a sliding door that might better hide the issue but there's no guarantees that we'll even be able to install it so I think it's better we just bit the bullet and replace the tray (inspecting it more thoroughly when it arrives)
 
The other thought to this, which originally raised its head because the enclosure didn't sit correctly if I remember rightly?

Have the walls/tiles been checked too? Are they square/vertical?

Lifting the tray should be a case of wood support and a crowbar and lever it up. Given the adhesive is relatively new then hopefully it'll lift ok.
 
The other thought to this, which originally raised its head because the enclosure didn't sit correctly if I remember rightly?
That's correct, in a nutshell the enclosure exposed the 'ramp' effect on the curved edge.
Have the walls/tiles been checked too? Are they square/vertical?
Yes, the wall tiles are rustic so they themselves aren't totally level but multiple readings in multiple locations on the floor and walls showed the bubble of multiple spirit levels to be level within the markings on the device.
Lifting the tray should be a case of wood support and a crowbar and lever it up. Given the adhesive is relatively new then hopefully it'll lift ok.
We're going to replace the tray entirely on the assumption that it is actually warped and breaking it up should minimise damage to the wall/floor tiles.
 
breaking it up should minimise damage to the wall/floor tiles.

You'll need to be careful, how would you be breaking up the tray? Only way I could see to break that up where it is, is to hit it with a lump hammer? That will send that impact down into the floor, as long as you don't mind the risk of breaking up what's below it?

I will be honest though, if the tray is out of level along the curved edge and that is shown in the pic bottom left , then I would suggest by the level's bubble that it isn't really that much out that the adjustment in the enclosure frame couldn't take up TBH.

I'm sorry to say but I don't think Kudos, or any manufacturer for that matter, will accept liability once the tray is down. In fact most are quite specific in their installation docs that once the tray's fitted then it's over to the customer, (edit) no harm in asking though.

1740223598452.png
 
Last edited:
Depending on the tray material, I'd probably be looking at using an SDS with a chisel for this. I'd carefully drill a bunch of holes to make it into swiss cheese and then the SDS with a chisel to carefully break it up. If its plastic, I'd weaken it with a good plunge saw that had the depth set appropriately just to score it, then try to snap it out. As I say I'm not a professional although my wife tells me I'm good at demolitions.....:unsure:

I hope it goes well.
 
Yeah, I've watched some videos and think an SDS with chisel will make reasonably short work of it. It's "acrylic-capped ABS over resin-bonded stone filler".

If Kudos say no, I'll take it up with the credit card company. If they also say no, then I'll just chalk it up to experience.

The new tray is en-route anyway and will be more thoroughly inspected before/during/after installation this time.

If the holes drilled are strategic you can control, to an extent, the manner in which it will break up, minimising damage to the surround.

It'll work out, generally these things just take a bit of time. Pain in the arse but worth it in the end.
 
Before you take a hammer to the old tray, measure and assess the new one that arrives. If it's the same shape, your demolition will be for nothing
 
New tray was measured to be level, old tray was drilled and smashed up with minimal damage to the tiles, floor or underfloor heating which came close to the edge of the tray.

The new tray went in but 2x tiles were badly chipped in the process, these were subsequently replaced and after grouting everything looked great.

The new enclosure has been reinstalled without issue.
 

DIYnot Local

Staff member

If you need to find a tradesperson to get your job done, please try our local search below, or if you are doing it yourself you can find suppliers local to you.

Select the supplier or trade you require, enter your location to begin your search.


Are you a trade or supplier? You can create your listing free at DIYnot Local

 
Back
Top