Can't get bath side panel off

Joined
26 Jun 2007
Messages
32
Reaction score
1
Country
United Kingdom
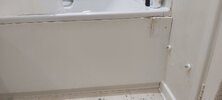
Don't know if this is the best place to post. Need to remove the bath side panel to investigate what looks like a slow leak from the bath, at the taps end. Just spent an age, trying to remove the side panel. Obstructing cabinet unit removed (fixings visible). Upper right shows some swelling & blackness due to slight water run over, the panel is MDF with a plastic veneer. Can yank the right hand side to and fro, have been for an hour or so, but just won't budge more than an inch if that at right bottom. No screws etc I can see. Is it glued in? Needs smashing out? Ideas please.

P.S. the hole to upper right was me trying to use a screw to pull it out.
 

Attachments

  • Side Panel.jpg
    Side Panel.jpg
    58.9 KB · Views: 374
Sponsored Links
If there’s definitely no screws, might just be tight. If you can leverage it out the bottom first it might help.
 
They are usually - top under the bath lip first, then pushed in tight at the bottom. Removing them, is the reverse procedure. You will need to remove that fixing on the side wall, but I would try levering the panel up first...

A bit of something like floorboard, sat on a block, one end under the lip, and press down. Ease the panel out, as you lower it
 
Sponsored Links
Am still trying, have to stop now and carry on tomorrow. The leak isn't huge, could be just silicone sealant failing around bath edge even leading to drips when showering, but need to expose what's below the bath to know. A magnet couldn't find any screws. I wonder if it was a too tight fit then hammered home, plus a bit of MDF swelling in the damp conditions? Will try again tomorrow and update, thanks for replies so far.
 
OK, back as promised. I finally got the panel off, it wasn't even attached in anyway I could see, it must just have been far too tight and rammed in yonks ago. Screwing some self-tapping screws along the lower area, and gripping them with pliers, allowed me to repeatedly yank the panel lower edge until it eventually came loose with a bit of a bang. Thanks for the suggestions. The smallest steps can take the greatest time.

Now the more regular plumbing problem causing the slow leak. In the pics, you can see water dripping when the cold tap is run, where the white U-bend trap meets the black sink strainer (or whatever it's called) from the bath. I notice some crusty looking old yellow sealant, Boss White perhaps? Anyway, other than replacing the rubber seal at the top of the trap, what do you knowledgeable plumbing people recommend? PTFE tape of the black threads, Boss White again? Saturate the threads with Fernox LS-X type silicone?

These kind of fittings stay unseen for years then make themselves known with costly damage to ceilings below, so I'm just after your best advice so this doesn't return.

Bath Trap#1.jpg
Bath Trap#2.jpg
Bath Trap#3.jpg
 
Don't bother trying to patch up something that has failed. They are cheap enough so replace the bath waste and the trap. Shouldn't need any sealant between waste and trap. Firm hand tight should do it.
I sometimes use a thin smear of LSX either side of the rubber between underside of bath and waste.
As Andy says, signs of water running down wall so check silicone.
 
Yes I noticed the black corner, though it didn't seem to be the cause of this leak. I will silicone that wall behind the taps and then replace the whole trap unit, I have one I think I got a few of years back but never used.

I have a spare bath waste too. It seems a cheap plastic thing, much like the black one pictured. Is that just the way of modern stuff, cheap & cheerful, or are any stronger/better than others?
 
Use a McAlpine waste and trap. Any should fit but if they are from the same manufacturer, there should be a better chance of a perfect match. I would throw away the stuff that's been kicking around the shed for years and buy new. Cheap enough.
 
Just one question before I get round to changing the waste & trap. There's a worrying variety of opinions about fitting the waste and the sealants you may or may not use. Many plumbers etc seem to put silicone or Fernox on every surface of waste, gasket, even discarding the foam washer under the metal portion and using silicone there too. Others deride silicone and use Plumbers Mait, which again others view as an old timers' product and a mistake. Whilst I think McAlpine say use no sealant at all. Disconcerting for a DIYer just wanting to get the job right.

Given this is the sort of hidden joint no one wants to go wrong a little while in the future, what are you opinions?
 
Just to answer my own question, as I had to get on with job today, and was surprised to find the underside of the bath completely fibreglassed. I'm more used to sinks (bare steel else enamel) and have seen pics online of fibreglass coated baths but always with an exposed metal area to mate the waste. There wasn't one, so I didn't dare rely on the bare rubber washer alone mating against such an uneven surface. So I had to slather Fernox LS-Z liberally down there. Also did so above, under the chrome strainer, although correct me if wrong, but does that seal only stop water bypassing the plug if the bath is full? The lower black plastic/washer assembly being the real seal, if I'm not mistaken?

Bath underside.jpg
 
You're correct in that the main seal is made between the underside of the bath and the waste using a rubber washer.
Quite normal though to find rough fibreglass at the mating surface hence the need for a smear of sealant on the washer. As for silicone vs plumber's mait, if used correctly, both will do the job so its a matter of personal preference
 
Well that's a relief! I almost wondered if someone should have taken a file to the lower edge to expose bare metal, but glad I didn't try that now. On fitting the new trap, seemingly identical to the old one, I noticed that the hole in the floor hadn't been cut quite right, forcing the rising pipe slightly off true and against the floorboard. Combined with the rubbing movement as people get in and out of the bath, I wondered if this had slowly strained the joint? Obviously I enlarged the hole for the new one. The seal on the old trap was part disintegrated, as expected.

Now I just have to deal with the ceiling. It looks like the leak was long term & slow, and I need to decide if it's simply stained (and can be filled then painted) or if the plasterboard has sagged down a bit and needs cutting out & replacing, or perhaps some very careful sanding.
 
Just a postscript question. The new drain and trap was all leak free, and I replaced all the silicone seal around the bath top figuring that if the taps end had started to seep (hence black mould on corner wall) then the rest of the silicone was probably not much better. All worked well in the end. Then I noticed that there was a very slight leak around where the taps pass through the bath, so leakage from button assembly which diverts water up to shower when lifted (curable?), was finding its way under the bath. Again probably long standing, but had been falling unnoticed on the boarding not through the hole onto the plasterboard as the original leak had. Anyway, fixed with some Fernox LS-X.

But reading about bath installations, I found a lot of stuff saying that you really need a timber frame both sides else the bath (acrylic, 6mm thick on exposed upper edge) will flex and slowly stress the siliconing. I attach a pic of what others say is a very standard bath with metal frame support. Excuse the junk under from chasing leaks on and off for a while.

How worthwhile would it be to add any wooden props or frame anywhere I can reach, to stabilise near & far sides?

Bath underneath.jpg
 

DIYnot Local

Staff member

If you need to find a tradesperson to get your job done, please try our local search below, or if you are doing it yourself you can find suppliers local to you.

Select the supplier or trade you require, enter your location to begin your search.


Are you a trade or supplier? You can create your listing free at DIYnot Local

 
Sponsored Links
Back
Top