Creaking heating pipes

Joined
11 Jan 2013
Messages
6,924
Reaction score
1,642
Location
Durham
Country
United Kingdom
Or how to prevent them...

Got a couple of long (10m) 22mm copper flow and return running from front to back of the house between the 1st floor joists (running parallel with them). Where the 15mm Ts come off I'll leave plenty of space in the notches- what is the best way of 'securing' the 22s between the joists so they don't creak and groan? (At the moment I'm thinking 50 x 25 noggins each 1500mm or so with big notches in them and just rest the (insulated) 22s in the notches rather than using the usual very tight plastic clips). Any thoughts?

PS Using copper due to solid fuel heat source so not allowed plastic. Plus I like copper :)
 
Sponsored Links
just rest the (insulated) 22s in the notches rather than using the usual very tight plastic clips

pipes that are securely fixed with tight fixings will exert forces on the fixings cause them to creak. Pipes that are held loosely in place and can expand and contract without exerting any forces on the fixings are almost certain to not create creaking noises.
 
Put an expansion loop in?

Nozzle
Aah, not thought of that. Think I need to find a different reference guide- the one I've just checked tells me I need 2' x 4' loop as a minimum. Which would be tricky....... more research :)
 
Sponsored Links
just rest the (insulated) 22s in the notches rather than using the usual very tight plastic clips

pipes that are securely fixed with tight fixings will exert forces on the fixings cause them to creak. Pipes that are held loosely in place and can expand and contract without exerting any forces on the fixings are almost certain to not create creaking noises.
This is kind of what I was thinking- issue comes at the ends where 15mm runs come off and fix to the radiators, can't really leave the rads floating loose :)
 
Given that the rad end of the 15mm run is fixed then the other end of the run has to be free to move. This means the 22mm it T's into must be free to move when the 15mm expands and contracts and pushes or pulls on the 22mm.
 
Given that the rad end of the 15mm run is fixed then the other end of the run has to be free to move. This means the 22mm it T's into must be free to move when the 15mm expands and contracts and pushes or pulls on the 22mm.
Indeed- I can easily allow for a bit of lateral deflection (with my loose fitting 22mm dropped into noggins sketch) to absorb the push from the 15mm, where the fun could start is with the linear expansion of the 22mm pushing the T (and attached 15mm, radiator etc) along the joist direction. Just seen some cute things here http://www.interflex.co.uk/Downloads/Copper Ended CU6 Stainless Steel Expansion Joints.pdf, wonder how much they are :). Must do the sums and see what I need to play with- 16.8 x 10^-6 m/m/degree C.

EDIT Sums done- 13mm more or less for the long run, def worth suppressing that either with the posh things above or a couple of loops (not quite the size I found in the first reference site I looked at ) :)
 
Last edited:
OR...... now here's a thought, you could fit it to a really good standard without leaving pipes swinging in the air.

Fit rubber lined clips and jobs a guddun!

Costs more but is a more professional job and looks the dogs danglies too.

If you really like copper then splash out on some munsen rings too it will add to the dogs danglies look of the install on visible pipework.

It all comes down to cost as of how good a job you expect and receive.

Jon
Ahhh, good plan, best of both worlds. And munsen rings where the 28mm copper goes up the wall from the woodburner are already on, also fancying a U boat pressure gauge or 2 somewhere to get the proper steampunk/gothic look :)
 
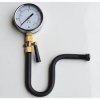
If you really want the steampunk/goth/industrial look the get yourself some "U" shape pressure gauge syphons

syphon.jpg

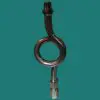
and some brass 3/8th isolation valves

valve.jpg

Will look awesome with the gauges and provide the function of not shocking the gauges when a pump starts and destroying them.

Jon
 
My sister will so slap me when she sees the finished setup (she's more of a minimalist) :)

With a solid fuel heat source and a minimalist look they will work really well as they add a subtle feature and also perform a valuable function.
Not sure a 6" diameter gauge could ever be called subtle......... thinking temp gauge for woodburner output, another one for thermal store and pressure gauge somewhere (or maybe 2- one for the woodburner and one for the thermal store). Nice row of 3 (4) in lovingly polished brass :)
 

DIYnot Local

Staff member

If you need to find a tradesperson to get your job done, please try our local search below, or if you are doing it yourself you can find suppliers local to you.

Select the supplier or trade you require, enter your location to begin your search.


Are you a trade or supplier? You can create your listing free at DIYnot Local

 
Sponsored Links
Back
Top