Crosswater 3 way thermostatic valve- 90 mins to run a bath

Joined
16 Jun 2006
Messages
11,254
Reaction score
2,546
Location
London
Country
United Kingdom
Hi all, my mum has the same crosswater thermostatic valve that I have. Mine is mains water pressure, hers is on a gravity fed system. Over time, the pressure on hers has been dropping off (substantially).

It looks like the following (but with slightly different tap heads).


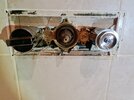
I isolated the supplies and removed the face plate.

I undid the "nut" that holds the thermostatic valve in place, and then realised that I don't know how to remove the valve....
crosswater.jpg

I guess that it pulls forward, but didn't want to force it.


The two screws either side of the thermostatic valve, what to they do? I removed one (screw only), then put it back. It now weeps very slightly. I guess that they adjust the flow to the twisty valve next to them. After removing and replacing the first screw I twisted the one on the other side, by less than a quarter turn, that one now weeps too.

On the balance of probability, if I drop the thermostatic valve in a bucket of limescale remover, is it likely to restore the previous pressure? BTW, the pressure was never brilliant. I suspect that she needs a pump- but that is another post.

Tnx.
 
Sponsored Links
Aren't the small screws to isolate the supply to the respective valves? EDIT maybe for high and low pressure settings . If the supply pipes are ok must be time for a complete replacement as 90 minutes is a lot of limescale grit etc.
 
Last edited:
Aren't the small screws to isolate the supply to the respective valves? EDIT maybe for high and low pressure settings . If the supply pipes are ok must be time for a complete replacement as 90 minutes is a lot of limescale grit etc.

A complete replacement?

Hopefully you mean the thermostatic valve rather than the whole unit?
 
Sponsored Links
My first suspicion would be clogging up of the filters. On most of these valve (but I can't guarantee it) there is a gauze filter and a non-return valve under the brass covers either side of the central cartridge. I'd be tempted (with the water off), to remove these and clean the gauze and the non-return valve in lime-scale remover such as Kilrock. They are probably sealed into their housings with O rings. Clean these and apply a little silicone grease before refitting.
 
My first suspicion would be clogging up of the filters. On most of these valve (but I can't guarantee it) there is a gauze filter and a non-return valve under the brass covers either side of the central cartridge. I'd be tempted (with the water off), to remove these and clean the gauze and the non-return valve in lime-scale remover such as Kilrock. They are probably sealed into their housings with O rings. Clean these and apply a little silicone grease before refitting.

It is 15+ years since I fitted mine. I don't recall filters running in to the thermostatic valve. The brass body didn't have a non return valve (that I could see).

The valve on the far right is the pull out shower head. The two way valve on the left hand side deals with the fixed shower head and the bath filler.
 
If they are the same as the Kai internals then first stop would be the check valves and the filters, should be behind those screws either side of the thermostatic valve. Water off and unscrew, there may be check/NRV valves behind them then the filters. Though I did think that all these valve were meant to be mains fed as they need to have a min inlet pressure to ensure they can run as TMV3 valves?

It may be an idea to send a pick to crosswater and see if they can identify the valve as they have great support and their documentation is excellent and that will be of great help to stripping down the valve.

Top man many thanks.

Will email them.
 
Spoke to a nice fellow at the Crosswater tech.

He recommended taking out the thermostatic valve and and leaving it in vinegar for a few hours.

Additionally, he recommended removing the disks either side of the thermostatic valve (as per @Madrab 's post). He said they they sell a dedicated tool to remove the disks, but that needle nose pliers should suffice.

I tried using needle nose pliers, turning the disks anti-clockwise. The pliers started distorting, and the disk would not budge. I then tried clockwise and anti-clockwise. Still no luck.

I then tried to remove the thermostatic valve (after first removing the flange) it would not budge. I tried to grab it with adjustable pliers, a redundant spline broke off, so I left it as is.

Help will be gratefully appreciated.
 
Get a new cartridge then pull out old one with pump grips I had same valve it's very prone to limescale blockage on the screens. I manged to get a cartridge out of crosswater free of charge.

 
Last edited:
Get a new cartridge then pull out old one with pump valves. I had same valve it's very prone to limescale blockage on the screens. I manged to get a cartridge out of crosswater free of charge.


Thanks for the reply. I don't expect a freebie. It is at least 8 years old.

Pump valves, do you mean locking valves that clamp on to the valve (similar to mole grips)?

I am now resigned to the idea of a new th valve. If I break the old valve, I can fit the new one, if not the old one can be used as a spare, after sitting in the vingar.

Did you manage to loosen the filter plates either side of the thermostatic valve?
 

DIYnot Local

Staff member

If you need to find a tradesperson to get your job done, please try our local search below, or if you are doing it yourself you can find suppliers local to you.

Select the supplier or trade you require, enter your location to begin your search.


Are you a trade or supplier? You can create your listing free at DIYnot Local

 
Sponsored Links
Back
Top