- Joined
- 15 Nov 2019
- Messages
- 7
- Reaction score
- 0
- Country

Hello,
I am posting here to get advice about dirty water marks that are appearing on my new rendering when it rains.
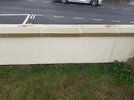
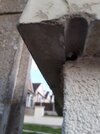
Recently, I had my boundary walls and the front elevation of my bungalow rendered. I was happy with the job but, every time it rains, the water makes vertical marks on the rendering when it runs down against the walls. Those marks start about underneath the joints between the coping stones, and they can go all the way down to the ground - as you can see from the photo.
It is worth noting, however, that the problem doesn’t happen under every joint and that there is sometimes a slight offset between the joint and the vertical line underneath. Also, on the other side of the wall - not shown on the photo -, the water makes a vertical line that is close to the middle between two joints.
All the marks disappear in a few days after a rainy day, and they come back at the next rain.
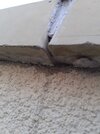
I thought the problem was happening because the joints between the coping stones were not waterproof, so I coated those joints with a waterproof layer, but that didn’t change anything.
So, my questions are:
-Do these dripping marks indicate a problem that is more serious than just the cosmetic issue?
-Why is water dripping from specific points at the top of the walls, not from everywhere along the walls?
-If I need to do something about this problem, what can I do without causing any collateral damage?
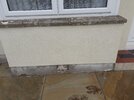
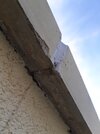
As you can see on the second photo, the same dripping problem is also happening on my bungalow’s front wall, below my windowsill which is cracked and hasn’t been painted yet.
I am posting here to get advice about dirty water marks that are appearing on my new rendering when it rains.
Recently, I had my boundary walls and the front elevation of my bungalow rendered. I was happy with the job but, every time it rains, the water makes vertical marks on the rendering when it runs down against the walls. Those marks start about underneath the joints between the coping stones, and they can go all the way down to the ground - as you can see from the photo.
It is worth noting, however, that the problem doesn’t happen under every joint and that there is sometimes a slight offset between the joint and the vertical line underneath. Also, on the other side of the wall - not shown on the photo -, the water makes a vertical line that is close to the middle between two joints.
All the marks disappear in a few days after a rainy day, and they come back at the next rain.
I thought the problem was happening because the joints between the coping stones were not waterproof, so I coated those joints with a waterproof layer, but that didn’t change anything.
So, my questions are:
-Do these dripping marks indicate a problem that is more serious than just the cosmetic issue?
-Why is water dripping from specific points at the top of the walls, not from everywhere along the walls?
-If I need to do something about this problem, what can I do without causing any collateral damage?
As you can see on the second photo, the same dripping problem is also happening on my bungalow’s front wall, below my windowsill which is cracked and hasn’t been painted yet.