Note: The thermostat connection on your boiler quite possibly runs at lethal voltages, although that's not always the case. You should consult a qualified electrician before attempting any projects like this. Unlike the prototype described here, you should at least put the thing into some kind of enclosure and arrange the high and low voltages to be in distinct areas. The three (or 2) core cable between your boiler and themostat needs to (AFAIK) follow all the requirements of any other house wiring (safe zones and other considerations). I'm posting this here in case the low-voltage side of things is of interest. Stay safe!

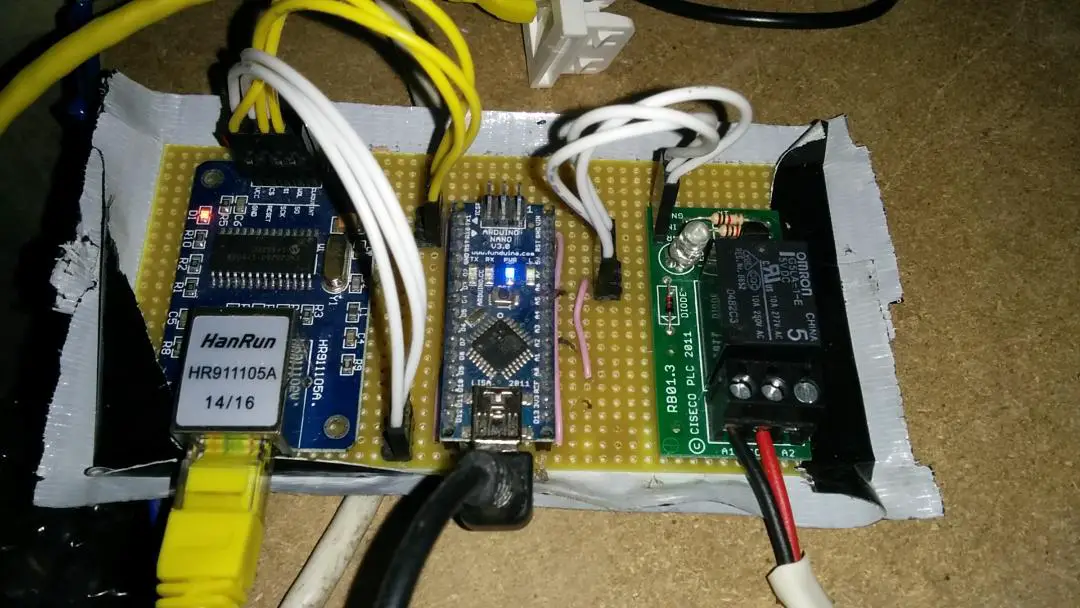
For my controller I used the following components:
Arduino Nano v3.0
Cost: £3.20
ENC28J60 Ethernet LAN module
Cost: £1.82
Omron 5v relay module or equivalent
Cost: £0.99
I already had an old mains -> USB -> mini-b adapter from some defunct equipment, but you can also get these from ebay.
In addition, you need either:
Some interconnecting Dupont jumper wires, like these.
== OR ==
Connect it together using solder, stripboard and board stand-offs/glue gun.
In the picture I've used Multicomp crimps, Various different housings, and a Multicomp ratchet. But for this project that's probably overkill.
I looked at the following guide for connecting the ENC28J60 module to an Arduino:
http://www.instructables.com/id/Add-Ethernet-to-any-Arduino-project-for-less-than-/
But that's for the Arduino Uno. If you want dirt-cheap you can save money (and space) with a Nano.
I used Arduino IDE version 1.8.2. The Ethercard library is used to talk to the ethernet module. For connecting the ENC28J60 to the Nano I just used the defaults expected by Ethercard (see the readme).
If you google for Arduino Nano pinouts one of the first hits is this diagram.
Each pin has umpteen names, but the numbers in purple are the ones the github page is talking about.
The relay module has only three connections, 5v, GND and control. The control goes to pin A2 (digital IO pin 16 in my source below).
To keep things simple I just connected the ethernet controller in series with a room thermostat, as I already had that, and it seemed pointless to rip it out and put in a temperature sensor, LCD display and program in hysteresis and so on (although it would surely be fun).
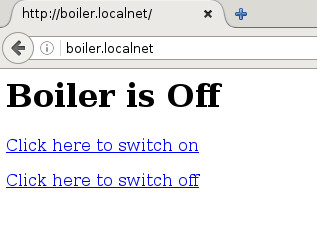
So my web interface is just a simple on/off switch:

Yeah, I know, I'll improve on it later, early days and so on.
Finally here is the code:

For my controller I used the following components:
Arduino Nano v3.0
Cost: £3.20
ENC28J60 Ethernet LAN module
Cost: £1.82
Omron 5v relay module or equivalent
Cost: £0.99
I already had an old mains -> USB -> mini-b adapter from some defunct equipment, but you can also get these from ebay.
In addition, you need either:
Some interconnecting Dupont jumper wires, like these.
== OR ==
Connect it together using solder, stripboard and board stand-offs/glue gun.
In the picture I've used Multicomp crimps, Various different housings, and a Multicomp ratchet. But for this project that's probably overkill.
I looked at the following guide for connecting the ENC28J60 module to an Arduino:
http://www.instructables.com/id/Add-Ethernet-to-any-Arduino-project-for-less-than-/
But that's for the Arduino Uno. If you want dirt-cheap you can save money (and space) with a Nano.
I used Arduino IDE version 1.8.2. The Ethercard library is used to talk to the ethernet module. For connecting the ENC28J60 to the Nano I just used the defaults expected by Ethercard (see the readme).
If you google for Arduino Nano pinouts one of the first hits is this diagram.
Each pin has umpteen names, but the numbers in purple are the ones the github page is talking about.
The relay module has only three connections, 5v, GND and control. The control goes to pin A2 (digital IO pin 16 in my source below).
To keep things simple I just connected the ethernet controller in series with a room thermostat, as I already had that, and it seemed pointless to rip it out and put in a temperature sensor, LCD display and program in hysteresis and so on (although it would surely be fun).
So my web interface is just a simple on/off switch:

Yeah, I know, I'll improve on it later, early days and so on.
Finally here is the code:
Code:
#include <enc28j60.h>
#include <EtherCard.h>
#include <net.h>


// ethernet interface mac address, must be unique on the LAN
static byte mymac[] = { 0x00,0x81,0x1e,0x76,0x17,0x68 };
static byte myip[] = { 172,17,0,15 };
static byte relay_state = 0;  // initial state off
#define BOILER_PIN  16


static void BoilerOn()
{
  relay_state = 1;
  digitalWrite(BOILER_PIN, HIGH);
}

static void BoilerOff()
{
  relay_state = 0;
  digitalWrite(BOILER_PIN, LOW);
}


byte Ethernet::buffer[500];
BufferFiller bfill;

void setup () {
  Serial.begin(9600);
  if (ether.begin(sizeof Ethernet::buffer, mymac) == 0)
    Serial.println( "Failed to access Ethernet controller");

  if (!ether.dhcpSetup())
    Serial.println("DHCP failed");

  // set boiler pin to output
  pinMode(BOILER_PIN, OUTPUT);

}


static word homePage() {
  bfill = ether.tcpOffset();
  bfill.emit_p(PSTR(
    "HTTP/1.0 200 OK\r\n"
    "Content-Type: text/html\r\n"
    "Pragma: no-cache\r\n"
    "\r\n"
    "<h1>Boiler is $S</h1>"
    "<p><a href='/on'>Click here to switch on</a></p>"
    "<p><a href='/off'>Click here to switch off</a></p>"
    ), relay_state?"On":"Off");
  return bfill.position();
}


static word onPage() {
  BoilerOn();
  bfill = ether.tcpOffset();
  bfill.emit_p(PSTR(
    "HTTP/1.0 200 OK\r\n"
    "Content-Type: text/html\r\n"
    "Pragma: no-cache\r\n"
    "\r\n"
    "<h1>Boiler is now on</h1>"
    ) );
  return bfill.position();
}


static word offPage() {
  BoilerOff();
  bfill = ether.tcpOffset();
  bfill.emit_p(PSTR(
    "HTTP/1.0 200 OK\r\n"
    "Content-Type: text/html\r\n"
    "Pragma: no-cache\r\n"
    "\r\n"
    "<h1>Boiler is now off</h1>"
    ) );
  return bfill.position();
}


void loop () {

  word len = ether.packetReceive();
  word pos = ether.packetLoop(len);

  if (pos)  // check if valid tcp data is received
  {
    if(strncmp((char *)Ethernet::buffer + pos, "GET /on", 7) == 0)
    {
      ether.httpServerReply(onPage());
    }
    else if(strncmp((char *)Ethernet::buffer + pos, "GET /off", 8) == 0)
    {
      ether.httpServerReply(offPage());
    }
    else if(strncmp((char *)Ethernet::buffer + pos, "GET /", 5) == 0)
    {
      ether.httpServerReply(homePage()); // send web page data
    }
  }
}
Last edited:
Links in this post may contain affiliate links for which DIYnot may be compensated.


