Fitting Q

Joined
10 Dec 2008
Messages
863
Reaction score
17
Location
Jersey Marine
Country
United Kingdom
I wish to fit a wooden cover ‘sides and roof’ over an outdoor isolator …
making in effetc a small open back ‘shed’ is easy, and I can make it out of same material as wooden shed the isolator is fixed to.

My question is …. i often come across items which have a round probe fitting on the item you are push fitting into surfaces mounted sockets.
Just saw some today .. on back of pads that are pushed into place.
The plastic ‘probe’ is slightly larger diameter but split lengthways … so pushes in and ‘locks”

Aybody know what these are called ?

I can photo if description mot clear.

Often used to hold trim panels in place on boats or caravans
 
Last edited:
Sponsored Links
From the description the only thing I can think of are those push connectors that they use for car interior panel fixing.

I can photo if description mot clear.
As @foxhole says, clear as mud. Maybe you could provide a photo of what you are fixing to
 
Sponsored Links
Do you mean this kind of thing


Like the others, I too am confused. I guess that the isolator is IP rated, so just want to make it less visible?

Edit- why not just buy some rare earth magnets and glue them to the shed and timber shroud?
 
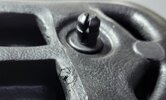
Here is a typical example .... a headrest pad .... the 'male' portion on the pad, plugs into female sockets on the panel.
 

Attachments

  • fitting.jpg
    fitting.jpg
    231.3 KB · Views: 55
Do you mean this kind of thing


Like the others, I too am confused. I guess that the isolator is IP rated, so just want to make it less visible?

Edit- why not just buy some rare earth magnets and glue them to the shed and timber shroud?
Those items are a bit too light weight ....
Problem with magnets is rust (esp of steel it sticks to)
Plastic (nylon) inserts pretty bomb proof.
 
It's just to aesthetically hide the isolator ... its IP65 rated so no worries on protecting it.

The magnets might be a better option then, easier to lift off and put back on. Those nylon fittings are probably more likely to fail the more you pull the cover off. You can purchase suitably sized round magnets, drill a hole to accept then and then epoxy them in.

If you go for the nylon car fittings, you need to find a way of gluing in the female part without the glue occupying the space required by the male connector.

Alternatively you could use cam dowels. Screw them in to the shed, drill corresponding holes in the cover and push the cover over. I assume that you want to be able to remove the cover with ease.

Another alternative is to use the principle used to fit bed headboards to the wall. You have a bit of timber with a 45 degree inward tilt, which accepts a reverse 45 degree bit of timber in the upper part of the timber housing. It cannot fall off. I am guessing that it might not be ideal for exterior use though, in which case you might want to consider metal (male/female) fittings used to hang pictures.
 
Links in this post may contain affiliate links for which DIYnot may be compensated.
I want to avoid any metal .... unless there are stainless steel options ............ the cladding the isolator is fixed to was fitted with all stainless steel nails to avoid discolouration on the wood.
Cover can be simple lift on/off .... just thought the headrest fittings looked ideal.
 
I want to avoid any metal .... unless there are stainless steel options ............ the cladding the isolator is fixed to was fitted with all stainless steel nails to avoid discolouration on the wood.
Cover can be simple lift on/off .... just thought the headrest fittings looked ideal.

Fair enough with regards to stainless steel.

It the sides of the box are sufficiently thick, you could use a keyhole cutter in a plunge router to create two keyhole sized slots, and then have two stainless steel screws projecting out of the shed wall.

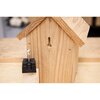
The following shows one used on the back of a bird house.

keyholel.jpg

 
fix a batten to the shed, with the top edge cut at 45 degrees - the higher side pointing out.
then inside the back of the box, fit an identical piece between the sides and level with the back
however the angled part is facing down, and is level with the rear face. Longer face outwards.

or

 
Fair enough with regards to stainless steel.

It the sides of the box are sufficiently thick, you could use a keyhole cutter in a plunge router to create two keyhole sized slots, and then have two stainless steel screws projecting out of the shed wall.

The following shows one used on the back of a bird house.

View attachment 278667


OK .... that has merit ..... I have a router, will give this some thought. I had been thinking of some wide velcro
 
fix a batten to the shed, with the top edge cut at 45 degrees - the higher side pointing out.
then inside the back of the box, fit an identical piece between the sides and level with the back
however the angled part is facing down, and is level with the rear face. Longer face outwards.

or


Yep .. can see how that would work ... Thnx
 
Yep .. can see how that would work ... Thnx

Erm, I did mention that (perhaps not quite so eloquently ... That said, I was concerned that it might not weather well. Any rain that fall down the wall will settle in the gap. I guess you could use 2mm nylon spacers (as washers) to project the "bevelled bar" forward, that will allow rain water to pass through. If you were to slightly adjust the angle of the other part, it will accommodate/compensate for the 2mm projection.
 

DIYnot Local

Staff member

If you need to find a tradesperson to get your job done, please try our local search below, or if you are doing it yourself you can find suppliers local to you.

Select the supplier or trade you require, enter your location to begin your search.


Are you a trade or supplier? You can create your listing free at DIYnot Local

 
Sponsored Links
Back
Top