Hanging an external door

Joined
22 Nov 2018
Messages
1,735
Reaction score
29
Country
United Kingdom
Got a heavy external door to hang for outside cupboard. Three sturdy looking hinges. Not a fire door.

Same as internal door?

I'm thinking of marking hinges with top of door pushed right up into the top as my internal doors always seem to drop. I'll then plane top.

Mark lock with marking gauge set with two pins . When planing the top over edge , if you plane at an angle (plane at 45 degree) will that stop it breaking out?
20210920_171712.jpg
20210920_171722.jpg
20210920_171338.jpg
Screenshot_20211102-084514_Gallery.jpg
Screenshot_20211102-084510_Gallery.jpg
Screenshot_20211102-084457_Gallery.jpg
Screenshot_20211102-084453_Gallery.jpg
 
Sponsored Links
When planing the top over edge , if you plane at an angle (plane at 45 degree) will that stop it breaking out?
I presume that you mean you are getting break-out at the end of the planing stroke on the stile when planing a traditional (rail and stile construction) door? In that case don't chamfer the top corners of the door - that's a 100% real bodge merchant's approach!

At the bottom of this page is one technique:

20211102_115710.jpg


Note the need to constantly check and recheck that you are planing square to the face of the door by using an accurate try square.

BTW, don't try that technique for holding a plane at the top of the page when using a power planer - it is strictly for hand planes only. A power planer requires a side fence to be fitted, ideally with a piece of plywood screwed onto it to increase the area of the fence plate. The enlarged fence plate also makes it easier to edge plane doors when they are supported horizontally on a pair of trestles. If the door is pre-finished it may be necessary to protect the face (where the fence runs) with a run of low-tack (green/blue) masking tape

An alternative technique is to plane into the middle from both edges, in which case the long cramp and break-out block aren't required

BTW, it's all well and good coming for help, but it is nice to see the end result when the job is completed.
 
Last edited by a moderator:
I presume that you mean you are getting break-out at the end of the planing stroke on the stile when planing a traditional (rail and stile construction) door? In that case don't chamfer the top corners of the door - that's a 100% real bodge merchant's approach!

At the bottom of this page is one technique:

View attachment 249309

Note the need to constantly check and recheck that you are planing square to the face of the door by using an accurate try square.

BTW, don't try that technique for holding a plane at the top of the page when using a power planer - it is strictly for hand planes only. A power planer requires a side fence to be fitted, ideally with a piece of plywood screwed onto it to increase the area of the fence plate. The enlarged fence plate also makes it easier to edge plane doors when they are supported horizontally on a pair of trestles. If the door is pre-finished it may be necessary to protect the face (where the fence runs) with a run of low-tack (green/blue) masking tape

An alternative technique is to plane into the middle from both edges, in which case the long cramp and break-out block aren't required

BTW, it's all well and good coming for help, but it is nice to see the end result when the job is completed.

Thxs. What's the name of that massive clamp?

I guess set square is a good as try square

I've out some of my finished work up- skirting, cupboard door
 
What's the name of that massive clamp?
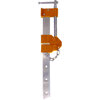
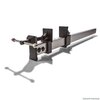
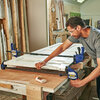
That's a sash cramp - a large enough QR- or F-cramp (900mm) would do as well or a pair of cramp heads and a piece of softwood. I have sash cramps in various sizes, a few 900mm Irwin heavy-duty QR cramps , various F-cramps and some sash cramp heads for this sort of thing, plus assembling door casings, repairing stuff, etc - but I have no particular preferences so far as this job goes. If I had no cramps with me I'd resort to planing in from both edges, although that takes a little more care

Toolstation Expert 36in sash cramp.jpg
Above: Toolstation Expert sash cramp
Below: Low cost aluminium sash cramp
Low cost aluminium sash cramp.jpg
Irwin QR heavy duty sash cramp.jpg
Above: Irwin heavy duty QR (quick release) clamps, 900mm long, being used to assemble/repair (?) a door

I guess set square is a good as try square
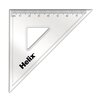
This is a set square:
Helix 45-45-90 set square.jpg
It is used for drawing, but is absolutely NBG for checking for squareness in woodwork, especially in the middle of an edge (i.e. the middle of the door - see drawing above for how to check squareness in an edge), or for that matter marking out hinge recesses. For checking squareness joiners use a try square:
J Marples Trial 1 T09 try square.jpg

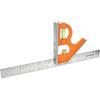
or a combination square:
Bahco combination square.jpg
The combi is generally the most useful of the two on installation as it can be used for checking square, setting out (square and mitre), marking parallels, measuring depths, etc (but unlike my apprentice it can't make a decent cup of tea - thinking about it neither can he!). The combi is also the ideal tool for setting out hinge recesses accurately, IMHO only bettered by a butt marking gauge, which in comparison is a bit of a one trick pony. As with any square check that it is actually square before using it for the first time and periodically afterwards (they can go out of whack if dropped)
 
Last edited by a moderator:
Sponsored Links
I presume that you mean you are getting break-out at the end of the planing stroke on the stile when planing a traditional (rail and stile construction) door? In that case don't chamfer the top corners of the door - that's a 100% real bodge merchant's approach!

At the bottom of this page is one technique:

View attachment 249309

Note the need to constantly check and recheck that you are planing square to the face of the door by using an accurate try square.

BTW, don't try that technique for holding a plane at the top of the page when using a power planer - it is strictly for hand planes only. A power planer requires a side fence to be fitted, ideally with a piece of plywood screwed onto it to increase the area of the fence plate. The enlarged fence plate also makes it easier to edge plane doors when they are supported horizontally on a pair of trestles. If the door is pre-finished it may be necessary to protect the face (where the fence runs) with a run of low-tack (green/blue) masking tape

An alternative technique is to plane into the middle from both edges, in which case the long cramp and break-out block aren't required

BTW, it's all well and good coming for help, but it is nice to see the end result when the job is completed.

What book is that?

I've recently been reading some modern C&G guides that the trainees use for various trades, which do have some interesting info for anyone from other trades.

So I wanted to get hold of an old skool carpentry book that may have been used back in the day just to compare.
 
It's from one of Charles Hayward's books called "Carpentry for Beginners" which were published by Evans (in the UK) and Sterling (USA) until the 1990s. Lost Arts Press in the USA has recently republished some of his stuff, too. Nice, but pricey.

I've used selected extracts of Hayward's books to instruct apprentices for decades, partly because I feel that the line drawings he uses are far clearer than the photographs in many modern texts as most extraneous details are removed. Because Hayward was time served (before WWI), was editor of "The Woodworker" for many years (back when it served both the trade and DIY communities) and was quite an accomplished illustrator I sometimes find his books are better teaching aids than the 1960s and 1970s C&G books I learned from, albeit when dealing with the less advanced stuff. He doesn't go into anywhere near the detail or complexity you need to cover the C&G syllabus (so no stuff like concrete formwork or cut roof structures) - for that in the 1960s and 1970s you'd probably want to find a set of 4 volumes by R. Bayliss called "Carpentry and Joinery". These comprise First Year, Second Year and Third Year plus the Advanced Supplement. TBH none of the trade books texts are self-learning texts and you really need mentoring to get the best out of them, but then that's why we were attached to a mentor at work and tutors at college.
20211103_134528.jpg

More modern (i.e. nearer contemporary, 1980s to 2010s) and you need to look for "Carpentry and Joinery for Building Craft" (2 volumes) by Peter Brett
Peter Brett book 1.jpg Peter Brett book 2.jpg
(the second edition I find better than the first edition), or alternatively "Carpentry and Joinery" Brian Porter & Reg Rose (2 or 3 volumes depending on issue. Reg Rose disappeared as joint author many years ago leaving just Reg Rose). I find Brett somewhat easier to follow

A bit earlier than Bayliss, but maybe a bit easier to locate copies of is "Newnes Carpentry and Joinery" (3 volumes, plus data sheets, published from before WWI up until the mid 1960s, and possibly later)
20211103_134628.jpg
and also the New Era "Carpentry and Joinery" (pocket size in 6 volumes, 1930s and '40s). Go for the post WWII editions of Newnes and you'll find the data sheets (if they come with the set) are all the EJMA standards which we used before metrication
20211103_134737.jpg

Another set to look for, if you are interested, is the American set called "Audel's Carpenter's and Builder's Guide" published in 4 (?) volumes from the 1920's to the 1950's (at least). Audel's was also published by the Brotherhood of Carpenters and Joiners in the USA (the guys they are referring to when a site is said to be a union site). A lot of the stuff in them is remarkably similar to British practice of the era
20211103_135121.jpg

All the above illustrations are of books from my bookshelf
 
Last edited by a moderator:
Somehow, I suspect that I won't be the only one to benefit from those books :cautious::rolleyes:
 
Somehow, I suspect that I won't be the only one to benefit from those books :cautious::rolleyes:
The thing is, @^woody^, as I said the C&G books are as likely to confuse some people as teach them. They are written with the understanding (to a degree) that you'll be familiar with at least with some of the tools and proficient in their use, to a degree (up until the 1970s most lads did some woodwork or metalwork at school, and many fathers did DIY at home). That shoild be fairly straight forward for a trade apprentice these days with a half-decent mentor who spends the time with you, but without that...

Thinking about it that explains some of the young lads we get who turn up with a new blue cards (CSCS) and a shiny new tool box who think they know it better. I've lost count of the "improved" techniques I've seen lads pull out over the years (also known as sloppy, slap dash, fly-by-night bodge jobs) :rolleyes::eek::confused:

The Hayward books on the other hand start from a lower level and teach you a lot about traditional hand tool carpentry ("Carpentry for Beginners") and cabinetmaking ("Cabinetmaking for Beginners"), and are good on hand tool technique (with the major exception of wooden planes, where they are frankly dire), but they are now at least 50 to 60 years old (since last edited, they were originally written in the late 1940s, based on a books published 20 or 30 years earlier by a chap called Brough, Hayward's predecessor as editor of "The Woodworker"), so don't expect information about new materials like MDF or OSB (both from the 1970s/80s), laminates or cement board (even newer, and in any case not a timber material), nor about (most) power tools, nor modern glues, nor modern finishes, because it simply isn't there. So I don't see it helping our mutual friend that much, especially if trying to square plane with a try square...:censored:

I will, however, keep pulling out bits and pieces from Hayward's books to demonstrate a point as and when necessary - partly because I happen to like Hayward's line drawings, and partly because they are so much better than anything I am capable of myself, as well as illustrating stuff I can't always find on the 'net
 
Last edited by a moderator:
I presume that you mean you are getting break-out at the end of the planing stroke on the stile when planing a traditional (rail and stile construction) door? In that case don't chamfer the top corners of the door - that's a 100% real bodge merchant's approach!

At the bottom of this page is one technique:

View attachment 249309

Note the need to constantly check and recheck that you are planing square to the face of the door by using an accurate try square.

BTW, don't try that technique for holding a plane at the top of the page when using a power planer - it is strictly for hand planes only. A power planer requires a side fence to be fitted, ideally with a piece of plywood screwed onto it to increase the area of the fence plate. The enlarged fence plate also makes it easier to edge plane doors when they are supported horizontally on a pair of trestles. If the door is pre-finished it may be necessary to protect the face (where the fence runs) with a run of low-tack (green/blue) masking tape

An alternative technique is to plane into the middle from both edges, in which case the long cramp and break-out block aren't required

BTW, it's all well and good coming for help, but it is nice to see the end result when the job is completed.

If you want plane into the middle from both edges, is there any particular technique?
 
That is the technique, however it is more difficult than planing in one direction against a back stop

As with all end grain planing the plane iron needs to be very sharp, with minimal set to reduce tear out to the bare minimum
 
Last edited by a moderator:

DIYnot Local

Staff member

If you need to find a tradesperson to get your job done, please try our local search below, or if you are doing it yourself you can find suppliers local to you.

Select the supplier or trade you require, enter your location to begin your search.


Are you a trade or supplier? You can create your listing free at DIYnot Local

 
Sponsored Links
Back
Top