I'm finally realising a dream and building my own snooker room where I live in Kent, UK. It's a single skin block walled room with pillars, and has a warm deck roof. Internal dimensions (inside of pillars) is 8m x 5m. It will have a double wooden garage door at the front (in case we sell the property in years to come and can revert it to a garage), and a uPVC "personnel" door on the side along with a single uPVC window.

The outside block walls are being rendered, and I plan to paint it with Sandtex Microseal masonry paint. The floor has a thick insulated concrete base strong enough for a full-sized snooker table and will be self-levelled before I plan to affix some industrial carpet tiles to it.
I'm at the point now where I'm considering internal insulation/finishing options. The room will be used a few times a week, for a few hours at a time - all year round. The table will have under-table heaters which I plan to have on a smart plug that I can turn on 20 mins or so before I play.
My thoughts are currently, batten between the pillars with treated timber, then use mechanical fixings to install foil-backed insulated plasterboard. I'm thinking (hopefully correctly) that this will both give the walls ample ventilation, and incorporate a vapour barrier.
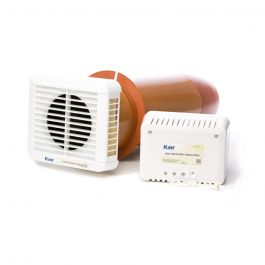
I'm also considering installing two of these heat recovery ventilators, one near each end of the room. I believe they are relatively low cost even if on 24/7, and keep the room from getting too cold.

 www.permagard.co.uk
I am also considering a wall-mounted air-conditioning unit for the cold winter and hot summers.
If any of you can spot any issues with my current plan, or has some alternative/better ideas please let me know, thanks.
James
The outside block walls are being rendered, and I plan to paint it with Sandtex Microseal masonry paint. The floor has a thick insulated concrete base strong enough for a full-sized snooker table and will be self-levelled before I plan to affix some industrial carpet tiles to it.
I'm at the point now where I'm considering internal insulation/finishing options. The room will be used a few times a week, for a few hours at a time - all year round. The table will have under-table heaters which I plan to have on a smart plug that I can turn on 20 mins or so before I play.
My thoughts are currently, batten between the pillars with treated timber, then use mechanical fixings to install foil-backed insulated plasterboard. I'm thinking (hopefully correctly) that this will both give the walls ample ventilation, and incorporate a vapour barrier.
I'm also considering installing two of these heat recovery ventilators, one near each end of the room. I believe they are relatively low cost even if on 24/7, and keep the room from getting too cold.

Kair Heat Recovery Room Ventilator K-HRV150/12RH
An energy efficient heat recovery unit designed to alleviate condensation in rooms with major condensation and air quality issues.
I am also considering a wall-mounted air-conditioning unit for the cold winter and hot summers.
If any of you can spot any issues with my current plan, or has some alternative/better ideas please let me know, thanks.
James


