Insulation and downlights and cables

Joined
4 Dec 2024
Messages
7
Reaction score
0
Country
United Kingdom
Hi

I have asked a questiion on here on insulation and kitchen ceiling/bathroom flooring void: https://www.diynot.com/diy/threads/new-ceiling-what-insulation-to-use.639047/#post-5874963 and everybody has been great,

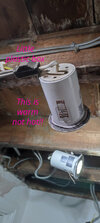
But now I am wondering if I can fill my joist with Rockwall slab! Rather than fill it is with the crappy, floppy insulation, as want to get as much as possible. There is cables stappled to the joists, and the downlights have 'plastic boxes' attached to them.

So whilst improving the insulation, (before water damage there was just crappy floppy insulation) I don't want to inadvertantly create a fire risk, by wedgeing slabs between the joists (100mm - Joist are 150mm) presumably cutting out circles for the downlights and plastic box attachment.

I am presuming again the electricity cables will be fine, as they are insulated! But the downlights/plastic boxes get hot?

many thanks in advance.
 
Sponsored Links
I've just done the same (rockwool between joists) but underneath my floor as I'm a first floor flat. Given I couldn't guarantee my neighbour wouldn't put halogens in (even though they're not sold anymore) I decided it was best to use thermalhoods over the downlighters and then insulate around them. I was speaking to a loft insulation guy though and he said nowadays with LED lights there's basically no heat produced so not much need for thermalhoods. Still if you want to be safe stick some over the downlighters. I used these but they're not cheap for a bit of plastic!
 
I've just done the same (rockwool between joists) but underneath my floor as I'm a first floor flat. Given I couldn't guarantee my neighbour wouldn't put halogens in (even though they're not sold anymore) I decided it was best to use thermalhoods over the downlighters and then insulate around them. I was speaking to a loft insulation guy though and he said nowadays with LED lights there's basically no heat produced so not much need for thermalhoods. Still if you want to be safe stick some over the downlighters. I used these but they're not cheap for a bit of plastic!
Oh ok, so wedged inbetween the joist is fine even iwth cable tacked onto the sides of the joist, and then these thermalhoods, look like a good solution for me.

My downlights are years old, the lightbulbs are modern, with no heat, but the units they plugin to are about 10years with a plastic box (not sure what that does) attached to the lightbulb unit.

So a hood would solve the problem, if there is actually one.

Whilst I am here do I push the rockwall slabs as deep 'closer to the underside of the bathroom floor' or just have them flush against the kithen ceiling end of the joist.

If I have them flish to the kitchen ceiling then I can cut out a shape for the thermal hoods which will keep them in one place. ?
 
I've just done the same (rockwool between joists) but underneath my floor as I'm a first floor flat. Given I couldn't guarantee my neighbour wouldn't put halogens in (even though they're not sold anymore) I decided it was best to use thermalhoods over the downlighters and then insulate around them. I was speaking to a loft insulation guy though and he said nowadays with LED lights there's basically no heat produced so not much need for thermalhoods. Still if you want to be safe stick some over the downlighters. I used these but they're not cheap for a bit of plastic!

With LED's it's not so much the heat from them causing damage, as the heat from the LED's damaging the LED's themselves. They are very susceptible to heat damage. The cooler they are allowed to run, the longer they will likely last.
 
Sponsored Links
None of my cables were clipped to the joists and I've just laid them on top of the insulation but sounds like in the other thread people thought that was ok as the joist could conduct some heat away.

I don't suppose it matters too much which side they're flush against. I would suggest whatever is easier to get them in. The hoods are there just to make sure the insulation doesn't smother the downlights and trap the heat inside the unit itself. They're also fireproof so should in theory prevent it spreading if anything did overheat.

Which bulbs do your downlights take? If they're GU10s like most then they're 240V which means there's no transformers or anything so basically all that plastic box and the unit is doing is connecting to the bulb, might be some other components in there if they're dimmable but nothing that's going to give off a bunch of heat.

I still wouldn't insulate directly around the downlights, give them 10cm each side if you're not going to use hoods. If you push the insulation all the way to the underside of the floor above then you might have enough clearance over the downlights anyway without using hoods but not sure what your joist depth or the downlight height is.

In terms of cutting the holes for the downlight hoods they might be a little heavy and smooth to friction fit but worth a try, I was lucky as I could just stick them onto my neighbours ceiling then I covered the top of the with a thinner bit of rockwool from ripping it up a bit as I can't imagine the hoods are quite as efficient at muffling noise.
 
LED down lights DO produce heat, some of them produce a lot so make sure there is sufficient air around each fitting
 
None of my cables were clipped to the joists and I've just laid them on top of the insulation but sounds like in the other thread people thought that was ok as the joist could conduct some heat away.

Heat in cables, is not an issue, providing they are derated.
 
hich bulbs do your downlights take? If they're GU10s like most then they're 240V which means there's no transformers or anything so basically all that plastic box and the unit is doing is connecting to the bulb, might be some other components in there if they're dimmable but nothing that's going to give off a bunch of heat.
None of my cables were clipped to the joists and I've just laid them on top of the insulation but sounds like in the other thread people thought that was ok as the joist could conduct some heat away.

I don't suppose it matters too much which side they're flush against. I would suggest whatever is easier to get them in. The hoods are there just to make sure the insulation doesn't smother the downlights and trap the heat inside the unit itself. They're also fireproof so should in theory prevent it spreading if anything did overheat.

Which bulbs do your downlights take? If they're GU10s like most then they're 240V which means there's no transformers or anything so basically all that plastic box and the unit is doing is connecting to the bulb, might be some other components in there if they're dimmable but nothing that's going to give off a bunch of heat.

I still wouldn't insulate directly around the downlights, give them 10cm each side if you're not going to use hoods. If you push the insulation all the way to the underside of the floor above then you might have enough clearance over the downlights anyway without using hoods but not sure what your joist depth or the downlight height is.

In terms of cutting the holes for the downlight hoods they might be a little heavy and smooth to friction fit but worth a try, I was lucky as I could just stick them onto my neighbours ceiling then I covered the top of the with a thinner bit of rockwool from ripping it up a bit as I can't imagine the hoods are quite as efficient at muffling noise.
hi
That's great thanks.

The bulbs are LED, GU10.

Actually now I have looked more carefully there isn't a plastic box attached the the actual downlighter!! They visible iwth the ceiling down and I look at them everyday!! Bonkers.

The actual downlighter is warm to touch... not sure why I didn't think to just touch them to check!

And yes giving a 10cm space around the installation/downlight is a sensible and fairly obvious idea!!

As for ease, having it flush with 10cm on kitchen side would be easier I think. Although I think you are right pushing up to underside of bathroom floor may give space for thermal hoods without need of cutting holes...

As with everything I will start with one plan and change as I make progress... :)

Once again many thanks
 

Attachments

  • WhatsApp Image 2024-12-06 at 16.52.02 copy.jpg
    WhatsApp Image 2024-12-06 at 16.52.02 copy.jpg
    178 KB · Views: 12

DIYnot Local

Staff member

If you need to find a tradesperson to get your job done, please try our local search below, or if you are doing it yourself you can find suppliers local to you.

Select the supplier or trade you require, enter your location to begin your search.


Are you a trade or supplier? You can create your listing free at DIYnot Local

 
Sponsored Links
Back
Top