Internal Damp

Joined
10 Jan 2017
Messages
1,837
Reaction score
282
Location
Derbyshire
Country
United Kingdom
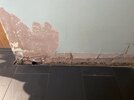
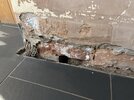
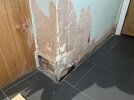
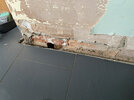
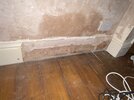
Hi all, internal wall was showing signs of damp (paint had gone darker, damp to touch). I took the lining paper away and found the plaster damp. I then removed the skirting board to find what you see in the pictures.

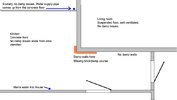
There is a water pipe somewhere in the general vicinity of this wall, which goes from the incoming supply over to the utility room. The pipe will be buried as this floor is concrete (contrary to the rest of the downstairs which is suspended). I don’t believe this is the cause of the damp wall however, just because I’d expect the floor to be wet.

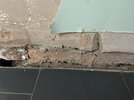
As you’ll see from the pictures, the damp is confined to one corner. In this corner is a missing brick (and a damp course) revealing a rotten piece of timber (which I assume is a joist which once served the room or a joist poking through from the suspended floor of the room behind).

No damp on the other side of the wall, so I’m assuming this whole problem stems from the lack of damp course. You’ll see the bricks to the right of the damp area are dry, and there appears to be a charcoal damp course doing its job.

If I’m right, how would I re-instate a damp course here?
 

Attachments

  • IMG_1407.jpeg
    IMG_1407.jpeg
    307.9 KB · Views: 40
  • IMG_1408.jpeg
    IMG_1408.jpeg
    403 KB · Views: 37
  • IMG_1409.jpeg
    IMG_1409.jpeg
    358.5 KB · Views: 36
  • IMG_1410.jpeg
    IMG_1410.jpeg
    330.3 KB · Views: 36
Sponsored Links
How old is the property?
It was built in 1906.

The rest of the house has had chemical injection (done many years ago) on the external walls and there’s no visible damp there — just this section and another interior wall. I probably should have said, but both walls are around the entrance to what was the cellar (filled in some years ago now).
 
OP,
Could you pic the other interior wall with damp signs - & the other side of the wall in the pics?
Can you get under the suspended floor that abuts the two walls with damp?
Look for signs of damp or decay.
Damp might show itself rising from the sub area soil - rising up the other side of the walls?
The cellar fill would take a long time for damp to rise thro the fill.
The pics show previous work - they also show a beginning to rust corner bead - & a lack of a DPM/membrane under the tiled floor.
Where is the "rotten piece of timber"?
 
Sponsored Links
OP,
Could you pic the other interior wall with damp signs - & the other side of the wall in the pics?
Can you get under the suspended floor that abuts the two walls with damp?
Look for signs of damp or decay.
Damp might show itself rising from the sub area soil - rising up the other side of the walls?
The cellar fill would take a long time for damp to rise thro the fill.
The pics show previous work - they also show a beginning to rust corner bead - & a lack of a DPM/membrane under the tiled floor.
Where is the "rotten piece of timber"?
The wall to the rear of the one pictured in post #1 shows no signs of damp at all. I remember taking the lining paper off it in July to reveal bone dry plaster. Sadly I’ve since laid Herringbone LVT and don’t fancy taking it up to look under the floor. Before I laid it though, I did stick an endoscope underneath the floor and everything I could see looked good. Air vents in the wall and floor.

I’ll post a pic tonight of the other wall with damp (shows your typical damp plaster patch rising from the bottom of the wall), as well as this stub of rotten timber (it’s within the area showing a missing brick in post #1).
 
Had a look this evening and the damp on the other interior wall I had mentioned (in the dining room) appears to be a false alarm. I raised it as a concern as when I removed the wallpaper two days ago (which was totally sound and dry), I found a darker, tacky patch of plaster underneath. At this point I hadn't removed the skirting board, but having done so this evening it appears the plaster and brick behind the skirting is dry to the touch -- see picture. It also appears to have been treated with chemical injection in the past. I'm unsure what this sticky residue is, so will remove and monitor.

Back to the main and apparently sole issue... I've attached another picture (entitled 'damp wall') which hopefully shows the problem a bit clearer. The area to the left is missing a brick (and therefore a damp course) and is where the damp is concentrated, indicated by the dark brickwork. The area to the right is bone dry and it's possible to just make out the dark-coloured damp course between bricks. Presuming this is charcoal, slate or maybe bitumen. You can also see the stub of rotten timber which I think must be the end of a joist in the other room.

I've included a very crude sketch of the layout in the area.

If the water supply pipe isn't leaking, then my only two theories are this. 1... The concrete floor has no membrane or a poor membrane, and is wicking up moisture from the ground and into the wall. 2... The missing section of brickwork has somehow allowed moisture to work its way up the wall. There was a fair amount of debris behind the skirting, so maybe this helped bridge the gap.

At this point, I've no idea what to do next. Do I start excavating the floor? Do I remove the dark bricks, insert a DPC and re-bed new bricks?
 

Attachments

  • Damp Wall.jpg
    Damp Wall.jpg
    383.1 KB · Views: 15
  • Dining Room.jpg
    Dining Room.jpg
    273.3 KB · Views: 15
  • Sketch.jpg
    Sketch.jpg
    45.8 KB · Views: 15
Just as an update for anybody interested... This damp corner section of wall has been drying out for around 3 weeks and the plaster is now visibly drier. It felt damp before but is now dry to touch. Yes I know this is not an accurate measure, but it's enough to determine whether or not the wall has got any wetter/drier.

After I had removed the skirting in mid-September, there was a fair amount of debris sat behind it. This mainly consisted of damp dust presumably created by the plaster/mortar/brickwork, etc. A lot of it was sat in the void seen in the picture, with the rest loose behind the board. This must have been wicking moisture up from the ground and taking it above the DPC. I raked all this out at the time of removal and I this is what I assume has helped dry the area out.

I am going to carefully chisel down the floor level in this area, to keep it clear of the DPC, and give the whole area another good vac. I'll let it dry out another month or two and then re-fix the skirting board. There is lining paper on this wall which probably helped to retain moisture in the plaster.
 

DIYnot Local

Staff member

If you need to find a tradesperson to get your job done, please try our local search below, or if you are doing it yourself you can find suppliers local to you.

Select the supplier or trade you require, enter your location to begin your search.


Are you a trade or supplier? You can create your listing free at DIYnot Local

 
Back
Top