Laying LVT Herringbone (glue down)

Joined
10 Jan 2017
Messages
1,827
Reaction score
282
Location
Derbyshire
Country
United Kingdom
Wife didn’t like my suggestion of carpet and of course wants herringbone.

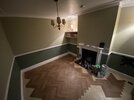
I decided to go for the glue down type as I think this will stand up better to fluid spillages from the children. I’ve screwed down 6mm ply and filled the gaps with jointing compound on the joints. Before I coat with primer, I have a few questions.

- I plan to mark up the room, starting with a cross to mark the centre and drawing a centre line down the middle.

- If this is correct, and I start laying from the centre, how do I then lay out from there? Is it possible to move around and across the flooring once it’s been glued down?

- Can you re-glue over glue which has already set? This is in case anything happens and I had to stop.
 
Sponsored Links
You can start in the middle of the room. You can start where you like really. The most recent one I did I wanted the 'V' pattern running from the middle of the entrance (doorway). Obviously just make sure it is all running perfectly straight. I do this by dry laying them along the line and then just making sure my spacing from the edges of the planks, to the edges of the room are the same all the way down my central row if that makes sense. As with any flooring I'd also make sure I had no tiny cuts at the edges, as much as possible.

It is possible to move across the floor, assuming you are going to use styccobond or similar.

I would recommend one of these, if you don't have one:

LVT roller

Regarding the glue, I used a scraper to scrape off any excess on areas I wasn't immediately laying on.

I also skimmed the entire ply surface with this when I did mine. Guess it depends how thick the planks are:

Karndean skim coat
 
Last edited:
That’s really helpful, thanks. In that case I’m going to measure and draw a line set back from the fireplace hearth, do a dry run to check for straightness, mark up this ‘section’ to glue and then this will be my first run. Means I can work down the room from top to bottom, and no going over drying glue.

I’ve also decided I want a border around the edge, so will first mark this up around the room. Then when I lay the main body of the flooring, I can overlap this drawn border and cut off excess with a straight edge and blade (hopefully you can lift the tile up to snap and re-stick down?). Then when it’s all dry, I can come back and glue the edge tiles down which should just slot in.

I have been lent that very roller. I wasn’t planning on slimming the boards as it all sits level, with no movement.
 
Yep that's what I did- just drew a pencil line around the row that I was gluing so I could apply the F44 to the right area. Then just use a paint scraper or similar to remove any excess around the edges. And repeat for next row. All pretty straightforward really.

I assume you've skimmed over the screw heads as well?
 
Sponsored Links
Yep that's what I did- just drew a pencil line around the row that I was gluing so I could apply the F44 to the right area. Then just use a paint scraper or similar to remove any excess around the edges. And repeat for next row. All pretty straightforward really.

I assume you've skimmed over the screw heads as well?

Never worked with this adhesive before so was unsure how workable it was once applied (aware of the waiting period). Good to know I can remove any excess.

Yes skimmed over the countersunk screw heads. Initially I unsure if this was needed as I’d hoped the primer would fill them.
 
Get your border drawn out. Then dry lay the centre so you are happy with the cuts.
Then glue down approx 1m2 in the centre and make sure it’s tight. Once that sets you can’t run out.
Use f48 plus adhesive if possible as it’s high temp so good if any sunlight.
 
So half the room is done. I drew the border first and it’s gone down nicely with no gaps. I laid dry first so could do some of the cuts around the edges (where it overlapped the marks for the border).

However. I think I applied too much adhesive (doubtful as I used the appropriate trowel) or it’s just not setting right. I’ve come down this morning and it’s still not fully dry and oozed out on one tile when I pressed hard enough. Walking over the rest of it cautiously seemed okay but a little “sticky” sounding.

I used Ultrabond VS90 which says a wait time of 0-10 mins. I waited 10 and put the tiles down on glue which was what I would describe as “wet”.

Have I ruined this job? I’m really concerned they won’t dry. Not sure if it’s a chemical reaction just taking longer if theres too much product, or an air reaction which can’t complete as the tiles have gone over too soon?
 
Last edited:
Have you read the technical data sheet (and some of the screwfix reviews)? You primed the ply I believe- data sheet of that product specifies subfloor must be absorbent. Is this the potential issue if this has reduced porosity. This is my best (non professional- just DIY er) guess from looking at data sheet.
 
What notch is the trowel you have? Should be a A2

It specified producing a 2mm bed. Unsure if that’s the same depth as a K2.

I’ve come home today and it’s noticeably firmer with no ‘sticky’ sound under pressure. I think it’s just taking longer to dry that expected — the tub says 24-48 hours before use, the data sheet online says 48-72 hours. The tub also says 0-10 min waiting time whereas the sheet says 10-20. Same product different advice….

I’ve done what’s on this pic so far. Just the main ‘field’. Will finish off after work tomorrow and then leave until Saturday. At that point I’ll go round and dry fit the border and cut tiles, then fix into place.
 

Attachments

  • IMG_0696.jpeg
    IMG_0696.jpeg
    154.1 KB · Views: 33

DIYnot Local

Staff member

If you need to find a tradesperson to get your job done, please try our local search below, or if you are doing it yourself you can find suppliers local to you.

Select the supplier or trade you require, enter your location to begin your search.


Are you a trade or supplier? You can create your listing free at DIYnot Local

 
Sponsored Links
Back
Top