Leaking French doors

Joined
23 Feb 2025
Messages
7
Reaction score
0
Country
United Kingdom
Hi all,

I would really appreciate your help please. I've been struggling with this issue for a whole year now. There's still no resolution, and the stress is starting to affect my day-to-day life. The manufacturer is completely useless (although pretends otherwise to save face), but they have no idea what's going on, they've been trying to fix it for a year, but nothing has worked. (Well, "trying" is a strong word, they visibly don't care, even though I'm still well within my warranty period, which just adds to my frustration.)

I'm in a flat on the 3rd floor, south facing, with French doors (opening inwards) and a Parisian balcony. The building is just a year old.

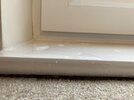
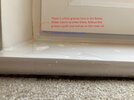
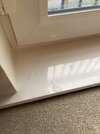
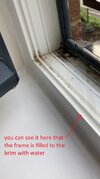
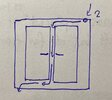
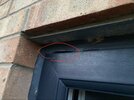
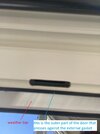
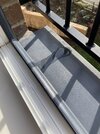
Rainwater seems to accumulate in the bottom left corner of the door frame, and instead of flowing towards the clean and functioning drain holes, it flows inwards, onto the inner sill, then onto my carpet. Photos attached.

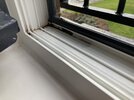
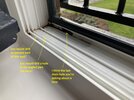
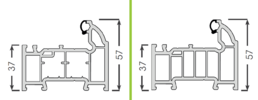
The cross-section of the door frame has these thresholds/dams with valleys between them (apologies for not knowing the technical words), the outer one has the drain holes, and the innermost/thinnest one seems to hold water, which then accumulates in the bottom left corner and ends up in my flat. I have no idea how a tight door against the frame means less resistance for the water than climbing a couple of small thresholds towards the drain hole.

Any help would be much appreciated. Will of course provide more info if needed.

Thank you,
Matt

P.S.

This is what has been tried before:

-- Doors were tightened against the frame.
-- Weather bars have been installed.
-- Silicone around the top and bottom mullion caps. -- this was 31 May 2024
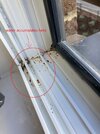
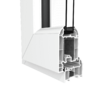
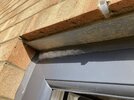
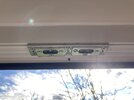
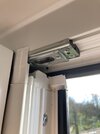
-- Small holes were drilled into the bottom mullion cap -- photo attached. (There was water in the bottom mullion cap, so the manufacturer's engineer drilled some holes in it to let the water drain out. (In my unprofessional opinion, there's already something fishy going on here, please let me know whether you think my concern is justified, or this is normal practice.) Before this, the leak was in the middle, where the two doors meet. After this, the leak was only in the bottom left corner of the frame. My suspicion is that the water draining out of the bottom mullion cap travels along the bottom frame and accumulates in the left corner. But it is still beyond me why it's easier for the water to get through a tightly closed door than to get across two small thresholds towards the drain hole. Is it at all possible to drill a few similar holes into the door frame where the water accumulates in such a way that it will connect into the regular channel of the drain hole?) -- this was 31 May 2024 as well
-- Nest packers have been swapped on the affected door, so the door now squeezes even more tightly against the frame. -- this was 20 Feb 2025 (and the latest leak that I'm talking about now was today, 23 Feb 2025)
 

Attachments

  • IMG_3239.JPEG
    IMG_3239.JPEG
    178.4 KB · Views: 38
  • video.zip
    9.6 MB · Views: 28
  • IMG_1280.JPEG
    IMG_1280.JPEG
    200.5 KB · Views: 35
  • IMG_3239 (1).JPEG
    IMG_3239 (1).JPEG
    201.6 KB · Views: 34
  • IMG_1969.JPEG
    IMG_1969.JPEG
    126.4 KB · Views: 32
  • water in the bottom mullion cap.zip
    11.1 MB · Views: 26
  • IMG_3235.JPEG
    IMG_3235.JPEG
    291.5 KB · Views: 36
please let me know whether you think my concern is justified, or this is normal practice
Modern window frames admit water into the frame; it cannot be kept out, but the frame can then have drain holes drilled in it that let it out again. Not drilling drain holes causes problems because the frame fills up and leaks from unintended places. Better to let it get in anywhere it is going to (hard to control) and then let it out in sensible dedicates places where it can be dealt with (easy to control)


it is still beyond me why it's easier for the water to get through a tightly closed door than to get across two small thresholds towards the drain hole
Because water doesn't flow uphill. It naturally finds the easiest route down hill. In your case that is to accumulate in the slots until it leaks into the house. If it has a choice between climbing over a "wall" 5mm high to leak into your house and over a "wall" 6mm high to reach a drain holes drilled, it will choose to leak into your house.

It would be better for us to see a picture of the frame with water pooled in it, but from the picture showni don't see any drain holes that would be effective in letting water out to the outside on the right hand side of the picture. I would drill to remove part of the wall between the two deeper channels, then drill a hole in the angled part so any water on a deep channel can get down into the frame inner, than have another drain hole right the way through the profile to the outside, if it doesn't already exist

It would be good, however, to double check the manufacturers drawings for the profile, to see what internal walls are found inside the profile, to better guide where the drain holes need to go. What details can you tell us about the profile/make?
 
Modern window frames admit water into the frame; it cannot be kept out, but the frame can then have drain holes drilled in it that let it out again. Not drilling drain holes causes problems because the frame fills up and leaks from unintended places. Better to let it get in anywhere it is going to (hard to control) and then let it out in sensible dedicates places where it can be dealt with (easy to control)
Thank you for getting back to me. Ok, this is reassuring. I was afraid that the new holes drilled into the bottom mullion cap were already a mistake. Also, makes sense what you're saying re hard to control and easy to control aspects. It just seemed a bit drastic to me to drill new holes to drain the water. I guess it's because I assumed that the product would be able to function properly without the customer having to add changes like this.

Because water doesn't flow uphill. It naturally finds the easiest route down hill. In your case that is to accumulate in the slots until it leaks into the house. If it has a choice between climbing over a "wall" 5mm high to leak into your house and over a "wall" 6mm high to reach a drain holes drilled, it will choose to leak into your house.
Sure, but if the downhill route is properly sealed, then water starts to pool and build up in the frame until the water level is high enough so it can climb over those little walls, right? At least that's my understanding. The fact that the water can choose the downhill route in the first place suggests to me that something is wrong with the way it has been sealed.

It would be better for us to see a picture of the frame with water pooled in it, but from the picture showni don't see any drain holes that would be effective in letting water out to the outside on the right hand side of the picture.
The video.zip attachment has a video of the frame with water pooled in it. I'll attach a screenshot from that video here as well. I also took another picture to show you where the drain hole is. There are four such drain holes along the length of the bottom frame, two for each door.

I would drill to remove part of the wall between the two deeper channels, then drill a hole in the angled part so any water on a deep channel can get down into the frame inner, than have another drain hole right the way through the profile to the outside, if it doesn't already exist
I attached another picture with markups. Please let me know if I understood what you said above correctly. I believe the last drain hole you're talking about already exists.
My only concern about drilling additional holes into the frame is water potentially pooling and unable to drain from inside the frame and causing problems there. I believe that is why you wanted to see the profile of the frame.

It would be good, however, to double check the manufacturers drawings for the profile, to see what internal walls are found inside the profile, to better guide where the drain holes need to go. What details can you tell us about the profile/make?
The manufacturer is Roundbrand, working with Liniar. I found a brochure on their website, attached it here as a PDF.
Slide 4 -- photo at the bottom in the middle, I think that's exactly my profile.
Slide 7 -- couple of cross sections of the profile. I believe these are the correct ones. In my case, since the doors are 'open in' style, the labels "outside" and "inside" are reversed. To be honest, these profile cross sections don't help me a lot in terms of determining where to drill safely, but I hope they're informative enough for you to advise further.
Slide 18 -- those are my French doors on the left, pretty much exactly.

Thank you again for your help. To be fair, you have already paid more serious attention to my problem than the manufacturer has over a whole year. Much appreciated.
 

Attachments

  • frame with water pooled in it.jpg
    frame with water pooled in it.jpg
    94 KB · Views: 25
  • drain hole.JPEG
    drain hole.JPEG
    168.2 KB · Views: 26
  • markups.JPEG
    markups.JPEG
    195 KB · Views: 24
  • Liniar_full_range_brochure.pdf
    5.2 MB · Views: 39
Ah, this is possibly similar to a problem that I had with my windows for a long time; the profile was designed to open outwards but I asked the manufacturer to turn it round and have them open in for easier cleaning and safety (they're full height and it's safer to have them inside than have to lean out of the building to pull them closed )
Alas the window manufacturers drilled the drain holes "where they always do; on the half that is nearer to the world" though this part of the profile was higher, because the profile manufacturer intended the profile to be the other way round and so deliberately made what is supposed to the the "world side" of the profile lower precisely to collect water. My windows thus had their drain holes drilled "at the top of the hill" and all the water pooled at the "bottom" and overflowed the lip on the house side, running into the house..

There is one more photo I’d like, of the underside of the profile on the door (the opener); can you open the door and place your smartphone in selfie mode, then use it to take a picture of where the drain hole is drilled in the door profile. It will help inform as to where any water that enters the moving part of the profile drips out and onto the fixed part of the profile already photoed
 
Last edited:
Ah, this is possibly similar to a problem that I had with my windows for a long time
My French doors are 'open in' by design -- i.e. I didn't ask the manufacturer to turn them around or do anything with them. And as far as the profile drawings go, it looks to me like the profile doesn't slope either way. Seems level, but I might be wrong. Nevertheless, this is good to have in mind too. Btw, I've found additional profile cross-section drawings, I've attached them here for more info. Regarding the png with the two cross-sections, I don't know which one is mine tbh. The left one is the standard, the right one is more energy efficient. I think it's more likely that I have the standard.
There is one more photo I’d like, of the underside of the profile on the door (the opener); can you open the door and place your smartphone in selfie mode, then use it to take a picture of where the drain hole is drilled in the door profile. It will help inform as to where any water that enters the moving part of the profile drips out and onto the fixed part of the profile already photoed
Sure, I'll do this over the weekend. It's too dark now, so I can't take good photos.

Update:

I got in touch with an external specialist for an inspection, who visited on Wednesday. He noticed a few things, the most important of which is basically a hole between the frame and the external sealant (photo attached).

Roundbrand never looked for a potential entry point for the water, they've only ever dealt with the water that's already in the frame -- trying to keep it from coming into the house -- mainly by tightening the door endlessly... Yet this guy literally spent a few minutes looking around and found this hole straight away. He recommended demoulding, foaming, trimming, and sealing the entire frame from the outside again. I don't fully understand all of these words, but I think it basically means replacing the outer seal completely.

So in terms of speaking with Roundbrand (they are attending on 7 March), I'm planning to:
1) Make them replace the external sealant entirely around the whole frame,
2) Talk to them about drilling additional drainage holes in the bottom frame,
3) Talk to them about removing sections of the walls between the channels in the frame.

Any thoughts? All input is greatly appreciated as I'm planning to get more serious with Roundbrand. On 13 March, it will have been exactly one year since we/they started this ordeal. I've told them if they can't fix the leak by then, I'm going to engage external experts, have them fix the leak, and I will send their invoices to Roundbrand for a full refund. If they refuse to reimburse me, I'm going to involve the Ombudsman, as they are unable to fix their defected product that is still well under warranty.

I've temporarily sealed the hole with silicone (photo attached) to test this as a potential entry point for the water, but it hasn't rained enough yet to know anything for certain. Also attached a sketch of how the water might leak from the bottom left corner of the frame. This is in line with what I discussed with the external specialist, and also with the fact that we've seen water accumulated in the bottom mullion cap before (now it just flows right through it because of those holes that Roundbrand drilled into the bottom mullion cap).

I'll send the photo you've asked for soon. Thank you very very much again for all your help.
 

Attachments

  • 70mm French Door - Small Frame Only_0.png
    70mm French Door - Small Frame Only_0.png
    74.5 KB · Views: 20
  • IMG_3267.JPEG
    IMG_3267.JPEG
    367.9 KB · Views: 17
  • IMG_3270.JPEG
    IMG_3270.JPEG
    375.5 KB · Views: 16
  • IMG_3264.JPEG
    IMG_3264.JPEG
    309.1 KB · Views: 18
  • uPVC cross section.png
    uPVC cross section.png
    51.9 KB · Views: 19
There is one more photo I’d like, of the underside of the profile on the door (the opener); can you open the door and place your smartphone in selfie mode, then use it to take a picture of where the drain hole is drilled in the door profile. It will help inform as to where any water that enters the moving part of the profile drips out and onto the fixed part of the profile already photoed
Photos attached as promised.

There are two drain holes in each door. It seems to me that water from these drain holes should drip into the outer part of the fixed profile.

I also noticed a little hole underneath the top latches. It looks like a drain hole, allowing potential water in the top frame to drain out. It's positioned above the top mullion cap of the left/slave door, which, again, is consistent with the fact that we saw water in the bottom mullion cap. So water might get into the mullion from the top, perhaps through the top latches themselves, or through this little hole.
 

Attachments

  • IMG_3286.JPEG
    IMG_3286.JPEG
    122.5 KB · Views: 15
  • IMG_3287.JPEG
    IMG_3287.JPEG
    99.1 KB · Views: 15
  • IMG_3289.JPEG
    IMG_3289.JPEG
    134.6 KB · Views: 16
  • IMG_3290.JPEG
    IMG_3290.JPEG
    142.8 KB · Views: 14
  • IMG_3292.JPEG
    IMG_3292.JPEG
    147.7 KB · Views: 13
The holes do look to all be drilled in the correct places and I agree that the holes in the doors should be dripping water onto the yellowed part of the profile, ie on the world side of that little wall in the profile :

1740983175247.png


and then out. First I would say to get half a jug of water and pour water here yourself, in the same approximate location as a door drain hole would, at a reasonable rate more than drip drip drip and observe. Do the drains function well? Does the water flow directly out of them or does it have to track sideways first? If you pour in the corners what then?

If it doesn't lead to any clues consider getting some coloured chalk powder (hardware stores like Screfix sell it for builders to use on a tool called a chalk line) or powder paint and give the frame a light dusting of it (an alternative if you have a grinder is to grind a brick and direct the dust spray at the area, but this is potentially a lot more messy; a well placed sheet of cardboard would be advised), shut the doors and spray then them with a hose or wait for the kind of rain that causes the issue. If spraying the doors doesn't reveal anything spray the brickwork around the doors. It's less likely that the wind would be able to drive rain against the top of the frame, but it would run down the wall outer

Once the water has made it into the frame and the dust it should help visualise the track it takes. Perhaps instead of dripping off the door bottom directly under the drain hole, it is clinging to the bottom of the door and running along sideways some way, moving sufficiently towards the inner of the house before dripping off and making it over that little wall separating the yellow highlight from the white part of the frame (in the pic above)
 
First I would say to get half a jug of water and pour water here yourself, in the same approximate location as a door drain hole would, at a reasonable rate more than drip drip drip and observe. Do the drains function well? Does the water flow directly out of them or does it have to track sideways first? If you pour in the corners what then?
I did some water tests. First, I poured a reasonable amount of water on the yellowed area. It moved sideways a bit first as expected, but then it quickly found the drain hole, which functions well (photo attached). As long as I only poured water in the yellowed area, everything was fine -- the water stayed in that channel and always found the drain hole before it even had the chance of getting over that little wall towards the inner channels of the profile. This strongly indicates to me that the water doesn't get into the inner channels by "tipping over" from the yellowed channel first. It somehow drips straight into those inner channels. My suspicion is through the drilled holes in the bottom mullion cap.

So, as a second test, I also poured water directly into the middle channel (the one with that little slope), and into the innermost channel that is the narrowest and closest to my living room. First I tried not giving the water any particular direction sideways, I poured straight from above, pretty slowly, and perpendicular to the frame. One thing was immediately clear: the water favoured flowing left, which means the profile slopes down a bit towards the left. This in and of itself does not seem like a huge issue to me, as it is impossible to make a perfectly level frame, so the water is going to favour one direction over the other. But the interesting point came when the water reached the corner. It started accumulating there in both the narrow and the "slopy" channels, unable to break through that little wall into the yellowed channel. It was really interesting to see just how big a role surface tension played in all of this. Eventually the amount of water broke the surface tension, towards the house side instead of the yellowed area. In that moment, a relatively large amount of water rushed into the room. I did the test again, but this time the water somehow managed to find a little passage right in the corner towards the yellowed area and the surface tension broke on that side first. Since there was less resistance now on the world side, the water started receding from the room side, draining out into the world. But it was really unpredictable, which might explain why I don't get a leak every single time it rains. It's still unacceptable that there is a (decent) chance that the water will find its way into my room before it can make it to the yellowed area, but this whole test was quite insightful.

They will replace the external sealant on Friday, and I'm also going to talk to them about draining the water that gets stuck in the inner and mid channels. I think the #1 priority is to stop excessive amounts of water from entering the frame (I hope fixing that hole by replacing the sealant will help with this), but #2 is to make sure water doesn't get stuck in the bottom left corner but it can drain out. I'm going to suggest drilling additional holes and/or removing short sections of those little walls to let the water out towards the drain hole that's already there. As I was doing the water test and observing what the water was doing I could totally see the benefit of opening up two of those little walls and giving the water a path towards the drain hole. Actually, the water even climbed up on the wall separating the innermost and mid channels, sort of merging the two channels into one before it could break out on one side. Water definitely accumulates in the bottom left corner and then it "randomly" breaks out either on the room side or the world side, depending on who knows what exactly.

I recorded all these water tests on video so I can show them to the manufacturer on Friday.
coloured chalk powder
This is a great idea. Will definitely keep it in mind if there are still issues after Friday.
Perhaps instead of dripping off the door bottom directly under the drain hole, it is clinging to the bottom of the door and running along sideways some way, moving sufficiently towards the inner of the house before dripping off and making it over that little wall separating the yellow highlight from the white part of the frame (in the pic above)
This is what I'm thinking too.
 

Attachments

  • IMG_3305.JPEG
    IMG_3305.JPEG
    338.6 KB · Views: 15
I've got some updates from yesterday. A different engineer was sent by the manufacturer, who was much more thorough than the other two. To be honest, he did more in an hour than the other two in a year… Ranting aside, here are the updates:

1) We can't drill additional holes in the middle channel or in the house-side (narrow) channel, he says, otherwise the water can't drain out of the frame, it will accumulate inside, and eventually overflow back into the frame. Only in the world-side channel can we drill holes, but we already have functioning drain holes there. This was disappointing news, but he understands the frame profile more than I do, so I have to go with his word on this one.

2) We'll see if we can remove sections of those little walls between the channels. He has to check how it would affect the warranty. But he said that could be a working solution to channel the water in the yellowed area. But he also said we shouldn't have to do this if the door was working properly. Duh.

3) The sealant on the outside has been (partially) replaced. It will be completed on Monday.

4) The engineer suggested that we replace the whole mullion -- he thinks there should not have been any water in it in the first place. So there shouldn't have been any need to drain the mullion by drilling holes in its bottom cap, which was done last May.

5) He also suspects that the glass in the leaking door is the wrong size ( :oops: ) -- i.e. too thin and doesn't squeeze hard enough against the gasket to create a tight enough seal, and that is the source of the excessive amount of water coming in. He poured quite a lot of water on the door to test this -- to see if we would see any water accumulating in the middle or house-side channels. We waited about 5–10 minutes after he had done this, and checked. But the frame was bone dry. Not what he expected. But after he had left, I checked again (this was about an hour after he had poured the water), and there was some water in the middle channel. Perhaps it takes more time for water to accumulate there. I repeated this test in the evening, and checked in the morning. Same result: some water in the middle channel. (The water was poured on the glass, so this could be a test for/against the other idea that water enters in higher - in the top right corner - as well.) -- I want to do a few more of these water tests. If this is the cause, surely it takes more consistent "watering" of the door (like actual rain for a longer period of time) to have water accumulate in the inner channels.

Manufacturing the glass and the mullion takes about 2 weeks, so I'm currently waiting for these to be made and replaced.

Before they drilled the holes in the mullion, the door was leaking from the middle. Afterwards, from the bottom left corner. This tells me that the mullion has a role to play in all this. I wouldn't be surprised if, after replacing the mullion, water would stop leaking from the bottom left corner, and either stopped leaking completely (oh yes please), or started leaking from the middle again.

So now we are doing three things at the same time (new sealant, new glass, new mullion). I really hope one of these things will resolve it. Still very much appreciate your support and input, thank you.
 

DIYnot Local

Staff member

If you need to find a tradesperson to get your job done, please try our local search below, or if you are doing it yourself you can find suppliers local to you.

Select the supplier or trade you require, enter your location to begin your search.


Are you a trade or supplier? You can create your listing free at DIYnot Local

 
Back
Top