My Walk-in Wardrobe project

Joined
16 Mar 2006
Messages
85
Reaction score
1
Location
Lincolnshire
Country
United Kingdom
Ok, so earlier this year I did the ensuite conversion to a wetroom. Now it's the turn of the wardrobe to be enlarged.

My plan is to use some of the main bedroom space, the existing wardrobe space and part of the bedroom adjacent. I'll be removing two stud walls, re-positioning the bedroom door, and fitting full length sliding doors. Hoping to have new racks, drawers and rails fitted inside too. We're lucky in as much as this house has two further double+ bedrooms in the loft space. Just as well as i'll be producing one of my famous DIY messes very soon and needing somewhere to sleep!

I'm hoping this will be a relatively quick project but I always seem to say that. The reason is that I've always wanted a walk-in wardrobe, neat and tidy and big enough for all of my clothes and shoes. I'm already having time for delivery issues with the supplier of certain items so will possibly going for other options as I see fit.

Hope I don't bore you all to death again. :LOL:

Doors removed then forgot I hadn't taken pics!


Small built in wardrobe, your typical newbuild cheap option.


Wardrobe in other room was used as a sheet and towel store.


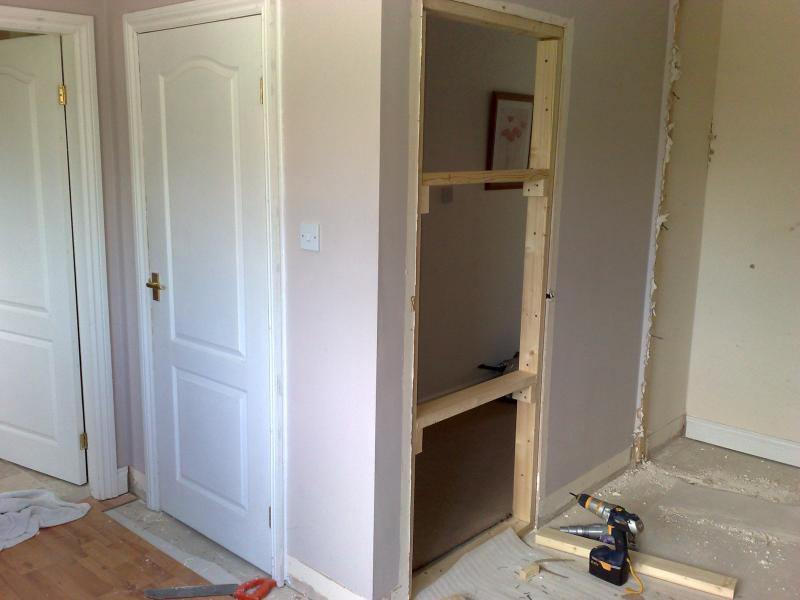
Hopefully a doorway will replace the picture!


You can see here where the new doorway will go.

Now, i've never moved a doorway, so this will be interesting.
 
Sponsored Links

demolition begins. forgot about how much dust generated and had removed the doors and didnt put any covers down anywhere. Just as well the wife is away for a few days!


Before


After


couldn't help myself


Got that awful feeling I get when i've never done a job before and wonder if i'll ever manage it.


remind you of anything.???
 

Ok, so not too much progress overall but managed to get the door and doorway moved, also now blocked up the old doorway and will be plastering that today hopefully. Need to look at tidying up the outside wall and skirting so I can paint that then just work inside room itself. Decided to take up all the laminate flooring and bin it, and going to screw the floor boards down as they creak. Ideal opportunity. What a way to spend Bank Holiday Monday.

Would just like to add, I know the door isn't exactly opening the right way into the room, but it was the easiest way of doing it without having to redo the hinges etc. This can be changed at a later date. ???? Maybe. :D
 
did you check there was nothing resting on the walls you are about to knock down!!

this can be a water tank joists joining above or even supports fron a new roof transferring weight
 
Sponsored Links
The house is a relative new-build and the upper floor above the bedrooms are two further bedrooms. I was worred that the wardrobe wall as being used as a support for the floor upstairs but now it's out, all sems ok. They are basically just the quick throw up stud wall we see nowadays. No supporting walls I think. :LOL:

Anyway, got some time before work tomorrow so might make some more progress. Plan on trying to skim the doorways to match the existing walls. Should be fun!
 
stud walls can be load bearing too, so don't let the fact that it's timber fool you..

if it runs the same direction as the floorboards then it may be load bearing.. as it then rests on / under several joists..

the cupboard door from the other room is hung the right way, was that not the right size to use?

doors can be re-hung, but you then end up with bits that need filling...mainly the hinges will be on the other side of the frame... and the latch too..
 
The wooden frame that was in place for the wardrobe, is still in place as I haven't taken it out yet. Just the top horizonal and each vertical run of timber.
I've decided against using the other room and cupboard as it looks as though I have more than enough room now anyway. Less work and mess too.

Hence the reason I didn't use the other door from the other room.

I will have a good look at the joists today and make a decision on whether to remove the timber frame completely. The fact that there is a division wall between the two rooms that I havent now removed, would tend to indicate that would be the load bearer if any, not the previous wardrobe wall which is now gone!
 
Ok, so I know I haven't updated for ages, but there's a perfectly valid reason. Basically, B&Q online are s**t !!!! I ordered the internal wardrobe stuff start of september but I only received a part of the order on friday. I have spent nearly 4 hours on the phone trying to get the rest of the order sorted and no-one has been capable of helping. It's like a comedy of errors!

Anyway, i've just cancelled the lot, and i'll buy it again as it's now 1/3 off in a sale.!!!

The room is finished, the carpets are down. Just no wardrobe internals and no sliding doors!

:cry:


Needless to say i'm not impressed by the farce that calls itself B&Q online. They even managed to fail to deliver to my home address as someone had got a 2 mixed up with a 1 on the delivery address paperwork!
 
Hi Mikeg68.
Nice idea for renovation of your bedroom.I Liked your idea. Actully I also wanted to renovate my badroom and kitchen. I have also same situation like you so I prefferd your suggetion first. before this I have no idea as you did. Thanks a lot.
Thank you very much.
 
Ok, so believe it or not, I finished this 10 minutes ago and now sat here havong a swift beer to celebrate! The main reasons for the delays were due to the pathetic excuse which is B&Q, but due to their incompetence, we managed to save £250 off the same items as they were on sale when we re-ordered it all. Result, I guess.
Anyway, we had to wait for the wardrobe doors to arrive as they are made to fit and these were only ordered at the end of November. Can't speak highly enough of the guys who supplied these doors. Price very competitive, delivery prompt, and the delivery guy was very helpful and polite. Unlike others i've had to deal with.

So, started to fit the internal racks/shelves


wife couldn't wait to start putting clothes away. They had been lying in the spare room for months by this time! LOL


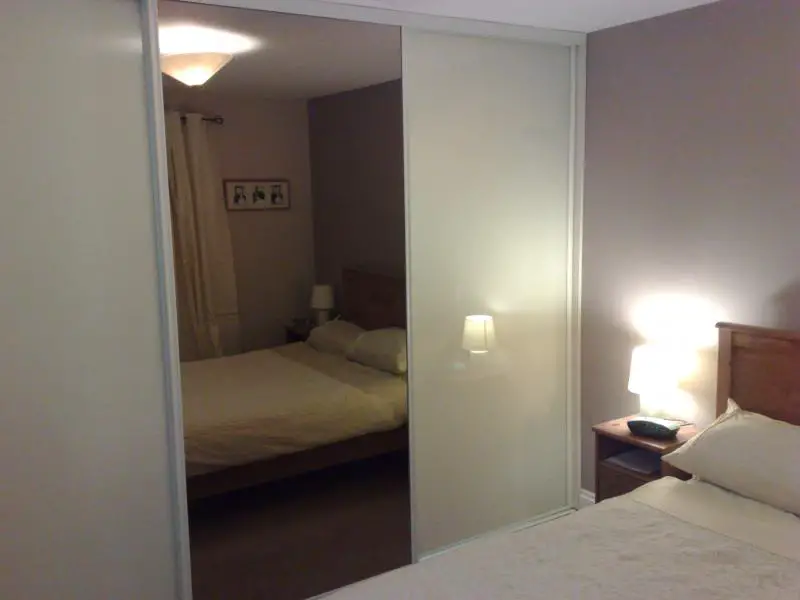
So the doors arrived this morning.

Two Butternut coloured glass doors and one bronzed mirror door


Very straight forward to fit them by myself.


Centre door opened. At least the room doesn't appear as small as we thought it might and we can actually walk into the wardrobe. The whole point of the exercise though.


I wonder what's next. I know our main bathroom needs doing but I need to get promoted at work before that ever happens! It's xmas! I've no money, but hey, I finished another job off.

Merry xmas all!!

 
Nice job! Can I ask how big is the walk in robe - Am also thinking of creating a semi enclosed his and hers WIR next year and wondered about what sort of dimensions you have

Thanks
 
Hi, the total width is 3020mm, depth is about 1700mm, units are 500mm deep.

http://www.doorsdirect.co.uk

These guys supplied the doors, very reaosnable price and quick delivery by a very helpful delivery driver.

Any questions, just ask.

:D

[/url]
 
Hi, the total width is 3020mm, depth is about 1700mm, units are 500mm deep.

http://www.doorsdirect.co.uk

These guys supplied the doors, very reaosnable price and quick delivery by a very helpful delivery driver.

Any questions, just ask.

:D

[/url]

Cheers - slightly deeper than my original dseign but may have to borrow some of little girl's room as the depth of 1700mm looks about right to avoid it being just a deep wardrobe! Width is about 12foot I think so similar to yours

Nice to see one in the flesh so to speak as gives some good ideas
 
CortinaV8, I take your point. I'm doing a major wardrobe clearout and I think 2 pairs actually still fit me! :D

New Year resolution, buy more colourful clothes!
 

DIYnot Local

Staff member

If you need to find a tradesperson to get your job done, please try our local search below, or if you are doing it yourself you can find suppliers local to you.

Select the supplier or trade you require, enter your location to begin your search.


Are you a trade or supplier? You can create your listing free at DIYnot Local

 
Sponsored Links
Back
Top