Radiator Valve Switch

Joined
10 Dec 2023
Messages
80
Reaction score
7
Country
United Kingdom
Hi All

I just tried to switch my vertical radiator from a traditional valve to a TRV. I bought a 15mm TRV. However, upon going to switch the valve, I have come across a few issues:

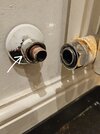
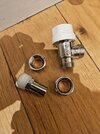
1). The pipe leading to the wall is 15mm, however, the nut behind it is too big to lock onto the new valve.

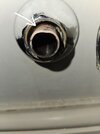
2). I cannot work out how to remove / replace that nut, as there is a bulge in the pipe (deliberate) and it sits behind that, presumably to keep it secure for tightening.

3). The valve going into the radiator appears to be 15mm internally, but the outside is more like 22mm, therefore, my 15mm valve will not fit over the top of it, so I can't screw it on that side either.

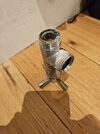
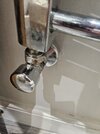
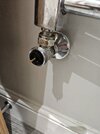
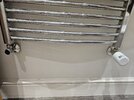
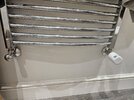
I've attached pictures of the original valve, the new valve and the pipes (including the bulge mentioned in point 1).

If anyone is able to help me with a solution for these points that would be amazing!

Thanks if you can.
 

Attachments

  • 20240102_173902.jpg
    20240102_173902.jpg
    159.8 KB · Views: 80
  • 20240102_173823.jpg
    20240102_173823.jpg
    275.7 KB · Views: 66
  • 20240102_174008.jpg
    20240102_174008.jpg
    262.9 KB · Views: 77
  • 20240102_173954.jpg
    20240102_173954.jpg
    366.8 KB · Views: 69
Sponsored Links
You need to remove the valve tail from the rad ,and fit the one that is supplied with the new valve.
And remove the olive and nut from the copper pipe.
 
You need to remove the valve tail from the rad ,and fit the one that is supplied with the new valve.
And remove the olive and nut from the copper pipe.
Thanks for this - in terms of the valve tail from the rad, would it be a straight swap, as the outside diameter seems thicker, or would I need to covert it somehow?

Regarding the olive and nut from the copper pipe, how would I go about removing this?
 
Your existing valve tail has, internally, a hexagonal shape ,and a hexagonal wrench ( Allen key) is used to unscrew the tail out from the rad. The large nut comes out with it ,as it is captive.
If you remove the decorative ,large round, cover from the pipe ,you may then be able to move the nut closer to the wall ,exposing the olive . Once olive is exposed a set of grips ,used carefully,may be able to grip the olive ,and using a slight twisting motion remove it off the pipe. Failing that ,a junior hacksaw ,again used carefully, can be used to cut a slot in the olive,into which a flat bladed screwdriver can be used in the slot to split the olive.
A professional would use an olive puller ( tool specifically for removing olives from pipes)
 
Sponsored Links
Your existing valve tail has, internally, a hexagonal shape ,and a hexagonal wrench ( Allen key) is used to unscrew the tail out from the rad. The large nut comes out with it ,as it is captive.
If you remove the decorative ,large round, cover from the pipe ,you may then be able to move the nut closer to the wall ,exposing the olive . Once olive is exposed a set of grips ,used carefully,may be able to grip the olive ,and using a slight twisting motion remove it off the pipe. Failing that ,a junior hacksaw ,again used carefully, can be used to cut a slot in the olive,into which a flat bladed screwdriver can be used in the slot to split the olive.
A professional would use an olive puller ( tool specifically for removing olives from pipes)
That's really helpful, thanks - I'll give it a go. So regarding valve tail, if I remove this, the smaller one will just screw in, despite being smaller? Or would I need to use something like this?

 
Your new tail ,complete with PTFE tape to seal between the threads, will screw into the radiator.
After removing the existing tail just ensure the thread inside the radiator is clean.
 
Your new tail ,complete with PTFE tape to seal between the threads, will screw into the radiator.
After removing the existing tail just ensure the thread inside the radiator is clean.
Thanks! Would I need to change the other side to a lockshield that came with the TRV, or could I keep the current one (manual wheel style)?

Also, the valve said it was bi-directional, so I'm assuming it's not an issue which end of it goes into the different valves, I.e. so I can put it horizontally instead of vertically? That's what the product details seem to suggest...

 
Last edited:
No ,you don't need to change the wheel head ,it can be used as a lock shield.
The bi directional arrows refer to the flow directions.
The TRV can be fitted in the orientation of your pipework,although I personally don't because it sticks out and looks naff !!
 
No ,you don't need to change the wheel head ,it can be used as a lock shield.
The bi directional arrows refer to the flow directions.
The TRV can be fitted in the orientation of your pipework,although I personally don't because it sticks out and looks naff !!
Yes indeed, thanks for the information! I've changed it over and all has gone well. However, I just tested it and turned on only that radiator via the app... I've then gone and checked the other rooms to see if are off as they should be, to find that the towel radiator had come on (when it shouldn't have).

Do you have any idea why this may be? I have attached the TRV to the towel radiator correctly. The other valve also has a pin. If I tightened the cover on it fully, no heat comes out. But if I loosen it, the radiator seems to turn on whenever the CH turns on to other radiators (when it should be off according to the app)!

I'm wondering if I need to change the return valve side to a lockshield too, as it seems both sides have pins currently.
 
What valves are fitted to your rads ,and how are they individually controlled ?
 
What valves are fitted to your rads ,and how are they individually controlled ?
I've attached pictures of the valve (it's the same the other side, which currently has a smart TRV attached). This side has a screw on cover. If I tighten it fully, it stops any heat (presumably because it is pressing the pin in), which the other side (currently with the TRV) has too.
 

Attachments

  • 20240103_212147.jpg
    20240103_212147.jpg
    342.2 KB · Views: 38
  • 20240103_212049.jpg
    20240103_212049.jpg
    297.1 KB · Views: 51
Something amiss with the smart TRV / set up. The other valve should be left open ,and preferably a lockshield.
 
Something amiss with the smart TRV / set up. The other valve should be left open ,and preferably a lockshield.
It is currently left open, however, when it is left open, the radiator seemingly heats up whenever the CH turns on (for other radiators).
 
It is currently left open, however, when it is left open, the radiator seemingly heats up whenever the CH turns on (for other radiators).
The smart TRV should close and prevent the rad it's connected to from heating up .
Am I missing something here ,the TRV in your original pics isn't a smart TRV ????
 
The smart TRV should close and prevent the rad it's connected to from heating up .
Am I missing something here ,the TRV in your original pics isn't a smart TRV ????
That's what I thought! I probably didn't explain it well, so I've attached a picture of both valves of the towel radiator. One is with the cap on and one off.
 

Attachments

  • 20240103_215830.jpg
    20240103_215830.jpg
    349.3 KB · Views: 43
  • 20240103_215820.jpg
    20240103_215820.jpg
    346.5 KB · Views: 42

DIYnot Local

Staff member

If you need to find a tradesperson to get your job done, please try our local search below, or if you are doing it yourself you can find suppliers local to you.

Select the supplier or trade you require, enter your location to begin your search.


Are you a trade or supplier? You can create your listing free at DIYnot Local

 
Sponsored Links
Back
Top