Repair socket?

Joined
12 Mar 2016
Messages
342
Reaction score
2
Country
United Kingdom
Hi all

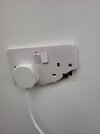
My daughter is autistic and she hit her doll against the socket and the plastic broke. Can I myself just replace the plastic with a new cover or is the plastic attached to the wires and need an electrician to do it?
Would the electric need to be turned off on just the breaker for those sockets for repair?
Here's a photo. Thanks all
 

Attachments

  • 20240816_145939.jpg
    20240816_145939.jpg
    109 KB · Views: 43
Sponsored Links
They are connected and that gap is dangerous for anyone especially your daughter. You can isolate the individual breaker having purchased a replacement socket, carefully pull the old one out and take pics of the connections, including the earth so you can make a like for like replacement with the new socket. If you are not confident it is an easy job for a sparky to do
 
In the UK, (unlike the USA) we don't normally have seperate "cover plates" on our sockets. The socket is built-into the plate and sold as a unit.

So yes, the whole socket needs to be replaced as a matter of urgency, and anyone not mentally capable of understanding the dangers of electricty needs to be kept away from it in the meantime.
 
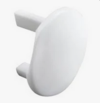
That is not a grid socket, you can get sockets with a separate face plate but that in not one of them. You can get safety covers for sockets
1723821250365.png
that allow you to even lock the socket, so plugs can not be inserted or removed, they would it seem give some added protection even if not locked. There are many versions
1723821410090.png
just don't get any of these daft things 1723821464861.pngthey are fatefully flawed, but the other covers do seem OK.
 
Sponsored Links
Ok thanks I am debating to do it myself or get someone to do it.

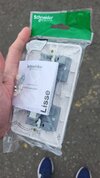
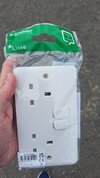
I've bought a replacement here.
 

Attachments

  • IMG-20240816-WA0003.jpeg
    IMG-20240816-WA0003.jpeg
    338.6 KB · Views: 43
  • IMG-20240816-WA0001.jpeg
    IMG-20240816-WA0001.jpeg
    320 KB · Views: 43
Do you have a good screwdriver that flits the screws that are on the back of the new socket?
Asking as want to make sure you have the basics in terms of tools.
 
Last edited:
I worked as an electrician for 40 years plus, so to me it seems easy, can't really advise some one who has never done it before, I helped my dad before even doing an apprenticeship, so looking back some 60 years when I fitted my first socket. So I looked at some Youtube video the first one showed doing it in an ideal situation the second one was more down to earth I use a non contact tester, Testing for live.jpg the same idea as second video to test dead before I remove the screws, but also plug in the leads after to test after the socket has been removed from the wall just like the second video, the plug in tester in the first video can give misleading results, it's a bit too cheap, the second tester is the opposite looking at £1000 for the tester, there is a happy middle road, the plug in tester with loop and RCD test, 1723850632915.png is a good tester, they do not record the time the RCD takes to trip, or test the loop is low enough for a ring final, we are looking for 1.38Ω or better and they typically pass at 1.9Ω which is the pass for a 20 amp circuit not a 32 amp one, however at between £30 and £60 they are within the pocket for DIY. And I would be happy with just the plug in tester, as the guy in second video says, electricians would not use them, as they need to write down the results on the minor works certificate.
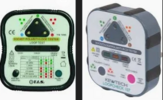
Also with a ring, I would use the loop test and write down the results, before starting, then while doing the job test continuity between the two lines, the two neutrals and the two earth wires, then on reinstall test again, should a wire have come off where getting the socket in place, I would see the change in the loop impedance reading. It saves me testing at the consumer unit.

However I am sure many change a socket with no testing. When my dad showed me how to change a socket all those years ago he never tested the socket, he also added spurs on spurs, and fluorescent fittings with no earth wires, and it did not cause a fire or electrocute anyone.

As said as electricians we can't really see what is hard about changing a socket, only another DIY man can really say if hard or not.
 
@blackcloud you need to be safe. If you don’t have any electrical test gear I suggest you do this.
Plug an electric light in to the working side of the socket and turn it on.
Go to the consumer unit and turn off the big double main switch.
Make sure the electric light has gone off.
Make sure that nobody can turn the main switch back on!
Remove the old socket and fit the new one.
Turn the main switch back on and test both sides of the socket using the electric light.

Done
 
And be careful you connect that you connect L & N the correct way around, some types/makes of sockets have the terminals in different places to other types or makes, even being the exact opposite of each other (right/left & left/right etc.
Making sure the L terminal is used for the same conductor wire as the L terminal of the one you are removing - providing that it was wired correctly in the first place - read the lettering on both sockets.
As you have purchased a Schneider Electric Lisse socket-outlet,
this (too short) video (if you stop it at 0:30) will show you how to connect the Line (Brown or Red), Neutral (Blue or Black) and Earth (Green/Yellow sleeved) conductors.
(Note: You may have only one of each.)

 
Some manufacturers have the switched and unswitched versions of their sockets the other opposite way around from each other for example.

The ones I prefer have them Line to the right terminal and N to the left terminal (as viewed from the front of the socket) just like the ones that Frodo video shows, but others are the other hand.

In fact I once came across one unobscure make that at first glace encouraged some to get the E & L terminals transposed, not good at all in my opinion (actually it might have been their FCU or DP switch rather than sockets, I can not remember).
 
Last edited:

DIYnot Local

Staff member

If you need to find a tradesperson to get your job done, please try our local search below, or if you are doing it yourself you can find suppliers local to you.

Select the supplier or trade you require, enter your location to begin your search.


Are you a trade or supplier? You can create your listing free at DIYnot Local

 
Sponsored Links
Back
Top