Replacement Bath Front Panel - flush or tucked under?

Joined
26 Jun 2007
Messages
32
Reaction score
1
Country
United Kingdom
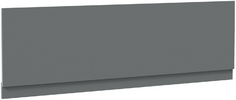
I'm replacing the long front panel of my bath, using a plastic composite panel which won't swell when wet, as its predecessor did. The new panel, like the old, is about 15mm thick.

My question is, should the new panel be flush with the outermost edge of the bath edge, or can it be inset? The reason I ask is because the outer flat edge of the 6mm acrylic bath, where you'd put your hand if lowering into the bath, has a central wooden runner all along its four undersides. Obviously hidden from view, this central wood is about 30mm wide in a gap about 60mm wide, leaving 15mm gap either side of this rail which is the same on all four sides or the bath.

So the resultant 15mm gap on the outer side seems a perfect fit for the bath side panel, as if intended, but that would leave the panel inset by the thickness of the acrylic bath's outer lip, about 6mm. Which doesn't seem common from pics? The old, blown panel was flush but seemed to have a thin 'tongue' on it's top edge which engaged with the 15mm gap.

Here's a rough drawing to illustrate:
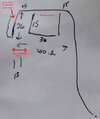
Bath edge profile edit - Copy.jpg
 
Sponsored Links
Nothing wring with that. A lot of the MDF panels that have separate adjustable piece at the bottom do exactly that. That's how they stay ok and aren't then aren't prone to swelling, as they sit under the lip and not flat with the edge so any water hits the waterproofed coating and runs off and doesn't get into the edge.
 
Which might explain why the previous MDF panel, which was flush with the outer lip (but with small gap), did indeed absorb water, swell up and stick when I tried removing it.

Is this 15mm inner groove intended to hold a bath panel? My new plastic composite panel has an adjustable lower plinth, I assume to cope with varying heights and floor/bath being not level. But that lower plinth adds another 15mm to the main panel's 15mm thickness. I was thinking of building a wooden frame on the open side, for the new panel to butt against, but the inset lower plinth means the upper main panel would never touch it. Are wooden frames or else inset plinths not common?
 
Nope - a step in at the lower panel is absolutely fine and the way these adjustable height bath panels are supposed to look.

1721910815801.png
 
Sponsored Links
So with the lower plinth pushing the main panel out by 15mm, I should give up on making a wooden frame to support it?
The lower plinth doesn't push the upper panel out, rather the small lower panel sits further in towards the bath feet/legs, couple of blocks screwed to the floor allows that panel to butt up against it to stop it being pushed in and then same coloured screws to fix to them.

The large upper panel can still sit up under the lip of the bath.
 
Personally,

I tend to set my bath panels so they are a little proud of the bath "rollover" top.

Usually by about 5mm.

This gives a good "shelf" along the top edge of the bath panel, along which to run a bead of silicone.

Setting it flush gives no chance of a silicone seal.

Setting back, also allows no space for silicone and will expose the "usually rough" edge of the bath rim.

My tuppence worth.
 
The lower plinth doesn't push the upper panel out, rather the small lower panel sits further in towards the bath feet/legs, couple of blocks screwed to the floor allows that panel to butt up against it to stop it being pushed in and then same coloured screws to fix to them.

The large upper panel can still sit up under the lip of the bath.
Are you saying secure the small lower plinth against blocks on the floor, leaving the main panel above (which it overlaps) 15mm proud? That's what I meant by push it out, not literally, but leaving it proud of the lower plinth by another 15mm and so not attached to and battens etc, just slotted into the notch under the bath lip.
 
I think we are saying the same thing, just in a different way.

If you look at the pic I attached, the small lower portion goes behind the larger panel, so yes the larger panel will sit proud of the lower panel. The larger panel is then fitted under and up into that lip of the bath and then set it vertically. The bottom piece should be measured and fitted so that the whole bath panel when fitted under the lip and the pushed vertical is still held in under the lip. Mark the floor where the lower plinth piece sits 1/3rd from either end. Remove the panel, measure in 15mm (panel thickness) in from the marks and screw a block of wood to the floor, that'll provide a stop for the panel to sit against and keep it vertical.
Yes I think we are talking about the same thing. If I understand you, once finished, the main panel will be tucked into the lip groove above that I drew in my original pic. The inside wooden blocks you suggest will stop the lower plinth from pushing in too far, and by marking the floor as you suggest, will leave the main panel nicely vertical.

So if we are saying the same thing, that leaves the main upper panel not attached to any batten, just tucked in to the groove above, and screwed to the lower plinth down below. It sounds fine to me, I was really seeking reassurance that the main upper plinth would not be attached to battens behind, as many sites suggest it should be. 15mm panel seems quite robust and probably doesn't need more than top & bottom fixings, it's not one of those thin ones you can cut with scissors.

Assuming we are on the same page then, the only other question is, should the main upper panel be pushed fully up into the groove in the bath lip, or will doing that make getting enough angle to insert/remove the panel, i.e. sliding in/out at the bottom whilst pushing the top in/out of the groove, a bit tricky?
 
I was really seeking reassurance that the main upper plinth would not be attached to battens behind, as many sites suggest it should b
No need for that for the bath panel - if the panel rattles about then a couple of small dabs of silicone up under the lip between the bath and the panel should stop that.

All but the thickest acrylic baths can benefit from a frame along the open front edge, as that will stop deflection when any weight in placed upon it, when entering or exiting the bath. That being said as long as the bath is sitting on secure support batons along all the walls that the bath touches, especially the outside corners then that should support the bath substantially and reduce deflection, especially at the seal areas, where it's needed most.
 
All but the thickest acrylic baths can benefit from a frame along the open front edge, as that will stop deflection when any weight in placed upon it, when entering or exiting the bath. That being said as long as the bath is sitting on secure support batons along all the walls that the bath touches, especially the outside corners then that should support the bath substantially and reduce deflection, especially at the seal areas, where it's needed most.
OK great. There are a couple of brackets along the tiled/sealed long side, but neither brackets nor wall look strong, as in I don't know if the installer sunk the screws into studs behind the plasterboard or just used plasterboard fixings more designed to hold pictures on walls.

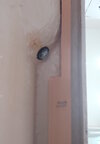
So I did give a lot of thought to retrofitting some kind of wooden frame on all sides (except the taps end where plumbing interferes). However, as the pic of the underside here shows, the wooden runner becomes half thickness and the fibreglass moulding protrudes where the handles are mounted inside the bath. So I couldn't have a 1.6m batten under under either long side, I'd need to break the batten run either side of the handles. Plus the metal cradle would foul any long batten run. I was tossing up whether to do broken batten runs, or to add some standalone props at intervals held with brackets, or just give up strengthening and hope the metal frame is enough.

Bath edge underside edit - Copy.jpg
 

DIYnot Local

Staff member

If you need to find a tradesperson to get your job done, please try our local search below, or if you are doing it yourself you can find suppliers local to you.

Select the supplier or trade you require, enter your location to begin your search.


Are you a trade or supplier? You can create your listing free at DIYnot Local

 
Sponsored Links
Back
Top