Sash window repair. Is this ok

Joined
31 Aug 2015
Messages
343
Reaction score
16
Country
United Kingdom
Hi

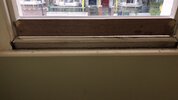
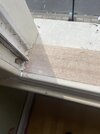
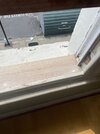
I had my sash window repaired and this is the result - Is this ok? There is a 1CM gap which I think was down to bad measurement! The proposal is for a weather strip at the bottom which might work

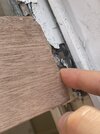
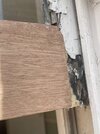
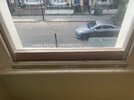
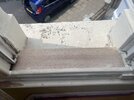
Should I be angry that the shape of the sash window at the bottom has been lost because a square piece of hardwood was used?

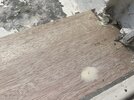
The wood was all rotten and I did think of wet rot hardener and then filler but decided to replace the whole section with polyurethane glue etc
 

Attachments

  • 46d6c44e-1ac3-4373-8152-33ffc87b3374.jpeg
    46d6c44e-1ac3-4373-8152-33ffc87b3374.jpeg
    171.9 KB · Views: 63
Sponsored Links
I think you know the answer to that!! Go on, give us a laugh, what did you get charged! If you haven't paid, don't. It needs doing again - it's a window, it shouldn't have gaps when it's closed! And as to those joints......
 
The old window was very bad but I suppose could have been filled with two part filler rather than replace

Here is a video of it -

I suppose I need to add a strip to th ebottom yes? The carpenter spent all day routing out a glass piece holder and trying to match the height

I feel so foolish - Is it terrible?


Here is what it looked like before
 
I feel so foolish - Is it terrible?
No need to feel foolish, - loads of people end up with carp jobs, but yes, it's terrible. The problem will probably be that what you paid isn't worth it, but what you paid isn't enough for a proper job.

Personally, I wouldn't have attempted to repair that. It's almost quicker to make up a complete new sash - (they come out easily once you take the staff beads off), and all the standard profiles are available off the shelf - for example - https://www.chilterntimber.co.uk/product-category/sash-window-components/. I very much doubt the joints between the new bottom rail and sash stile will last more than 5 minutes - how were they joined if he didn't take the complete sash out?

Sash windows are a relatively simple construction, and you can make them with hand tools, so there's no excuse
 
Sponsored Links
The rail was screwed in and glued with polyurethane glue - But this window will take a lot of force going up and down and being pushed and pulled

My biggest regret is the moulding are now lost and the wood is too short - He suggested a weather-strip (Seriously!)

Paid £700 for that (material was 100 so his time 600)
 
I think I would leave him a very bad review with pictures, and start saving for a proper joiner to come and do it properly. £100 for materials!
 
The sash should have been removed to repair it. The fact that the staff bead hasn't been removed is evidence that he didn't do that.

As mentioned, he used the wrong profile of timber in the first place.

Polyurethane glue is a great but it is not strong enough (its gap filling qualities are limited). He should have used epoxy resin (which is far more expensive).

Oh, and from your video, I am not sure that the first sash has poly glue, it looks clear- more like a clear MS polymer (eg CT1)

For what it is worth, the price you paid is low for a quality finish, unfortunately, the price you paid for your work is high.

Out of interest, did he use proper window sill timber? Take a photo with the lower sashes raised up. And why are the staff beads still missing at the bottom?

Can you take photos, it is too difficult to see the quality (or lack thereof) from videos.
 
IMG_2483.jpeg
 

Attachments

  • IMG_2495.jpeg
    IMG_2495.jpeg
    343 KB · Views: 39
  • IMG_2494.jpeg
    IMG_2494.jpeg
    355.4 KB · Views: 40
  • IMG_2493.jpeg
    IMG_2493.jpeg
    284.1 KB · Views: 36
  • IMG_2491.jpeg
    IMG_2491.jpeg
    276.6 KB · Views: 36
  • IMG_2490.jpeg
    IMG_2490.jpeg
    263.8 KB · Views: 39
  • IMG_2489.jpeg
    IMG_2489.jpeg
    249.1 KB · Views: 36
  • IMG_2488.jpeg
    IMG_2488.jpeg
    224.6 KB · Views: 40
  • IMG_2487.jpeg
    IMG_2487.jpeg
    307.5 KB · Views: 33
  • IMG_2486.jpeg
    IMG_2486.jpeg
    511.6 KB · Views: 50
Hello

So I uploaded the pictures from my phone so not great formatting

The carpenter changed three cills and replaced two bottom brackets by using some glue and a few screws

It looks ok just about but this is the problem

On the outside the bottom rail is thicker than the rest of the window so it is not flush
Gaps around the cill were filled with expanding foam
The cill was raised with a bit of timber and some expanding foam put on the front of the cill to hide the height difference
The window at least is better but am I being fussy or is this just apprentice level work

How is it so hard to find a decent carpenter man?
 
The window at least is better but am I being fussy or is this just apprentice level work

I'm afraid this isn't "apprentice" level work - it's bodgit and scarper. Looking at the outlook I'm guessing this is London - it looks very much like my Son's street in Walthamstow. The problem is once the bottom corners of a sash window go rotten, it requires a good bit of surgery to let new timber in properly, plus ideally the sash has to come out and be probably remade. The materials aren't expensive but based on how quickly I could do it, it's a solid 1-1.5 days work at least per window to do it properly, so at London rates that's probably £600 per window plus materials absolute minimum, and probably quite a bit more if it's a company with overheads and VAT.

However, the windows don't look in unrecoverable condition, and a good repair will be a heck of a lot less than new windows. I'd make contact with one of the specialist sash window repair companies in your area.
 
What alternative did i h ave? I could have tried wet rot harener and then used a ton of filler - Not a good answer

Timber sash window creation is about 2K a piece ! Thats single glazed and basic !
 
Sorry, doesn't help you but that work is shocking.

The timber sill should be stepped to stop the wind blowing the rain back in. And it should not be flush with the interior staff bead.


It does look like he used epoxy resin to lock in the lower rail (a good thing) but he has done nothing on the outside to prevent further water ingress.

The sills have polyurethane foam where they meet the sash boxes. The foam is "waterproof" but unless painted, it will turn bright orange and become very brittle. The old sills should have been removed (in situ) and a new one pushed in (from the inside).

Did you find the fellow from one of those checkatrade type of sites?

... image 2487- you have what looks like a 20mm gap on the right hand side that is just full of PU foam.

... image 2483- has the guy used two separate bits of timber for the bottom rail???

As previously mentioned, the lower sashes should have been removed to repair them. Your guy has not necessarily "ripped" you off but his work is definitely sub-standard.
 

DIYnot Local

Staff member

If you need to find a tradesperson to get your job done, please try our local search below, or if you are doing it yourself you can find suppliers local to you.

Select the supplier or trade you require, enter your location to begin your search.


Are you a trade or supplier? You can create your listing free at DIYnot Local

 
Sponsored Links
Back
Top