Securing back box in plasterboard

Joined
16 Jan 2009
Messages
74
Reaction score
0
Location
Avon
Country
United Kingdom
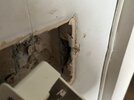
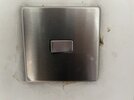
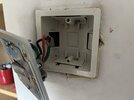
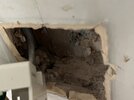
I’m replacing a dimming light switch with a regular rocker type switch and the orientation of the back box is causing a challenge. The lugs that secure the back box behind the plaster board are orientated at the top and bottom, apparently due to the plasterboard being undermined at the sides, meaning the lugs won’t hold the box securely in that orientation. Given that the lugs determine the screw position, this means the new rocker light switch has to be 90° out. As the dimmer switch was circular and the screws hidden, this didn’t previously present an issue. Can anyone suggest how I might resolve this so that the new light switch can screw in on the sides?

I hope this all makes sense!
 

Attachments

  • IMG_0282.jpeg
    IMG_0282.jpeg
    199.1 KB · Views: 55
  • IMG_0283.jpeg
    IMG_0283.jpeg
    189.8 KB · Views: 56
  • IMG_0284.jpeg
    IMG_0284.jpeg
    188.1 KB · Views: 54
  • IMG_0281.jpeg
    IMG_0281.jpeg
    217.2 KB · Views: 48
Sponsored Links
What would be the best way of achieving that in such a way that would be sturdy enough to withstand the lugs?
 
1717253123660.png


Remove loose pieces.
Cut the edge square, straight and flat on the back.
Stick thin flat piece of wood/metal/plastic on the back level with where the edge should be - higher and lower.
Fill the missing areas with filler and sand to correct shape.
 
Sponsored Links
no more nails or similiar on the wall in the back of the box, turn box through 90 degress and push into place, fill round damage as appropriate, or replace the plastic one with metal and fix to wall behind box
 
I repaired something similar years ago.

I filled around the hole with expanding foam, making sure the switch cables were in the correct position.

Then I filled the remaining space with goodly dollops of bonding, threaded the cables into a new metal box and rammed the box into the bonding. Finally, l made sure it was true, then wedged it in place with a length of timber that I screwed in place until the bonding had gone off: around 30 mins to an hour.

The last thing to do was tidy up the edges with finish.
 

DIYnot Local

Staff member

If you need to find a tradesperson to get your job done, please try our local search below, or if you are doing it yourself you can find suppliers local to you.

Select the supplier or trade you require, enter your location to begin your search.


Are you a trade or supplier? You can create your listing free at DIYnot Local

 
Back
Top