Shower Tray Help

Joined
15 Dec 2011
Messages
63
Reaction score
2
Location
London
Country
United Kingdom
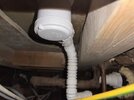
Im replacing a shower tray. Rats had bitten through the flexi waste pipe from the trap otherwise the shower was working fine for 12 years with no water ingress anywhere.

I removed the shower bi-fold door + tiles on the 2 plaster boarded sides with a multi-tool. Seem to have achieved a clean cut out on both sides.

I didn't want to disturb the wall side because of plumbing and its much messier dealing with a wall. I then removed the old tray by cutting it out as no space around edges to lift it out.

Questions

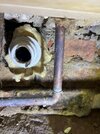
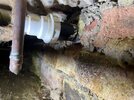
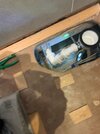
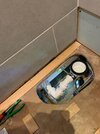
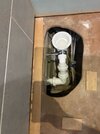
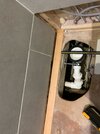
1. Is there an easy way to remove the old connection to the waste pipe? See pic. Its obviously glued on. I was going to cut on one side carefully if i can without cutting the external black waste pipe with a mini wireless dremel then use screwdriver to *hopefully* prize it off. Any easier way? It's in a tricky position.

2. What is the best practice way to put it all back together?

First, I'm going to raise the floor using exterior hardwood plywood as the new tray is 45m high but the current gap to the tiles on the shower side is 60mm - so the final gap will be 2mm for silicone. Could have brought a 50mm tray but higher prices + felt matching old might be best move. The old tray was 45-47mm high. Correction* : the floor is not level. Its 9mm lower on the shower side so ill need to put down a sloping piece of plywood = 10mm right to 1mm left.

Do I need to treat this new raised wood? The existing plywood does not look treated but was probably also pretreated external plywood (18mm).

What is the best way to connect the new trap to the waste so it never leaks or is bitten? I will be using a solid pipe. It will be floating, but supported, in the correct position until connected to tray. The rats are gone.

I'll put some silicone on the new moisture resistant plasterboard that goes up against the old moisture resistant board so they are 'stuck' together / water tight.

Do I need to waterproof the new moisture resistant plasterboard or can I just tile on to them?

I'll fit new tray by putting it up against the left side shower side then lay it down and slide under the wall tiles as the old one was. I'll silicone under tiles first and/or shower tray edge after so it's sealed against wall.

Then re-tile and grout the 2 sides + re-fit bi-fold door and silicone everything.

And am i missing anything? Any helpful tips?

Pictures

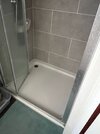
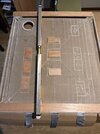
1 - how is was
2 - the bitten waste pipe
3 - removing tiles on 2 sides so tray can be removed.
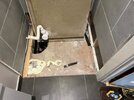
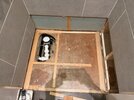
5 - removed. can see piece of 7mm wood on left which was raised only that side.
6+7 - old connection on waste
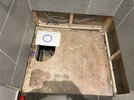
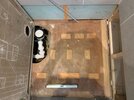
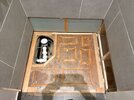
10 - cleaned & prepped ready for tray. blue lines is where waste is and circle is roughly where the trap will be suspended.
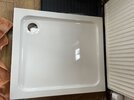
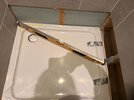
12 - new tray
 

Attachments

  • 1.jpeg
    1.jpeg
    156.9 KB · Views: 52
  • 2.jpeg
    2.jpeg
    102.2 KB · Views: 42
  • 3.jpeg
    3.jpeg
    173.9 KB · Views: 45
  • 5.jpeg
    5.jpeg
    277.4 KB · Views: 45
  • 6.jpeg
    6.jpeg
    237.4 KB · Views: 52
  • 7.jpeg
    7.jpeg
    343 KB · Views: 47
  • 10.jpeg
    10.jpeg
    160.8 KB · Views: 44
  • 12.jpeg
    12.jpeg
    218.8 KB · Views: 52
Last edited:
Sponsored Links
Is there a room below the shower tray. I just find it easier to remove part of the ceiling plasterboard below and do the work underneath. Also, fit trays with the waste on the opposite side and have a trap door in the bathroom/en-suite floor to access the trap (joist positioning permitting). Trays should be bedded on a screed of mortar containing SBR.

The waste pipe is probably solvent weld which means cutting it. I've seen on YouTube etc.. solvent weld reamers so you can ream out the pipe out of a solvent weld fitting.
 
1. Is there an easy way to remove the old connection to the waste pipe?
The waste pipe section in the wall - pic6/7- is a compression coupler end of the old flexi onto the (edit) black waste pipe - so you just need to undo the nut and the whole white section will pull off, use a couple of sets of pump pliers if you need the extra reach
2. What is the best practice way to put it all back together?
just use water resistant wood - WBP ply/OSB3 - if it is all sealed and no water gets to it it doesn't need treated but I always tank a shower space 'just in case'
Do I need to waterproof the new moisture resistant plasterboard or can I just tile on to them
refer you to the previous answer and all depends on how good your tiling/grouting and sealing skills are.
What is the best way to connect the new trap to the waste so it never leaks or is bitten
How to vermin proof a plastic pipe - hmmm, not an easy way to answer that. Flexi's are notorious for (edit) vermin damage but alas all plastic pipes are - wrapping in chicken wire can be an option - but certainly hard pipe it all and try and find the vermin entry points and stop them getting access. Ideally it would all be solvent welded but not sure what the black plastic pipe is - it may be PB/PB and not ABS/PVC, if it's the former it cannot be glued and the final connection would need to be compression
 
Last edited:
Is there a room below the shower tray. I just find it easier to remove part of the ceiling plasterboard below and do the work underneath. Also, fit trays with the waste on the opposite side and have a trap door in the bathroom/en-suite floor to access the trap (joist positioning permitting). Trays should be bedded on a screed of mortar containing SBR.

The waste pipe is probably solvent weld which means cutting it. I've seen on YouTube etc.. solvent weld reamers so you can ream out the pipe out of a solvent weld fitting.
It a ground floor shower so only access is the hole in the plywood floor. Main bathroom is upstairs so this 'extra' shower + toilet were added when we did kitchen extension. As its an existing shower setup I'm just replacing like for like.
 
Last edited:
Sponsored Links
After over a year ive finally got around to "doing" this. Ive installed a trap & pipe to the waste and that seems to be working without leaking and it the correct position to screw down on to.

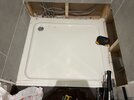
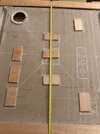
The issue is the bottom of the con concrete shower (900 x 800) is not even. Ive raised the trap side by 9mm hardwood plywood (sealed) so it sits 2-3mm away from tiles for silicone. The other side is raised with 3.6mm hardwood plywood (sealed). And it is level with these additions.

How do I support the un-even bottom of the so it doesnt crack after 100-1000's of showers of the coming years.

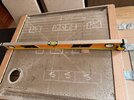
After putting the tray on a table and using a level I tried to place blocks of plywood to support the main areas but it didn't sit level in one corner. I don't want to trial and error any more - ive spent a lot of time and I am about to call someone to do it but i'd prefer the satisfaction of doing it all myself.

I know you can use self levelling compound etc - which I brought have yet to open. But if the bottom of the shower is not even wont that cause it to sit even anyway if placed after drying?

Or frame the hole and non tiled side and use some premixed cement to the level on each side and lay the shower down before it dries?

What is the best way do to it? I cannot raise the shower as my mom will be the primary user so it cant have a step.
 

Attachments

  • IMG_0433.jpeg
    IMG_0433.jpeg
    2.1 MB · Views: 14
  • IMG_6984 (1).jpeg
    IMG_6984 (1).jpeg
    139.8 KB · Views: 13
  • IMG_6975.jpeg
    IMG_6975.jpeg
    109.1 KB · Views: 16
  • IMG_6974.jpeg
    IMG_6974.jpeg
    113.7 KB · Views: 12
  • IMG_6964.jpeg
    IMG_6964.jpeg
    95.7 KB · Views: 13
  • IMG_6960.jpeg
    IMG_6960.jpeg
    109.2 KB · Views: 11
  • IMG_0437.jpeg
    IMG_0437.jpeg
    780.8 KB · Views: 12
  • IMG_0432.jpeg
    IMG_0432.jpeg
    1.8 MB · Views: 14
  • IMG_0431.jpeg
    IMG_0431.jpeg
    1 MB · Views: 11
  • IMG_0470.jpeg
    IMG_0470.jpeg
    48.7 KB · Views: 15
Last edited:
Some but not all stone resin trays are lower in the centre section than they are at the sides - It escapes me why they do that for exactly the reasons you are describing. I presume the tray manufacturer has asked you to use sand and cement to bed it into?

You have done well using packers of Ply to take up the gap. As long as you support the tray over most of it's area then you are doing the best you can, just ensure that all the raised areas are securely fixed down to the sub floor when the tray is set down so there isn't any flexing, then that's really as much as is achievable

The only thing I would say is that you have left quite a gap around the waste section and it may be prudent to infill some of that with ply to the areas around the waste is more supported. Also is there flex in that clamp @ the trap? Usually when the tray is set down and you then fit the top threaded waste fitting, the trap and seal is usually pulled up and tight onto the bottom of the tray to provide the seal or is the trap at the right height so it sits on the tray once it's fitted?
 
Manufacturer : I don't know what the manufacturer recommended, id have to check. Likely sand cement.

Support : I took time doing the ply to avoid cement etc but it's not sitting level with my custom packers and im not wasting more time on that. So thats why I was asking what is a better way. I think I need to frame the area with low frame 3.6mm and use cement following the 9mm on one side down to 3.6mm on other then lay the tray into it. Any small excess will sit into the crease around he bottom edge of tray.

Waste section : It was done like that by the previous fitters to allow waste fitting - I think that they had to conform to the shower tray + waste position we brought at the time. Im guessing as long as the sides and rest of the tray is fully support by a cement base it will be fine as putting full weight wont happen in that area as close to taps mid way up.

Waste Trap : The trap is at the right height and the screws are loose intentionally so there is play to allow for fitting. The brackets are primarily for position.

I think I need to prep the plywood for cement. Is PVA enough or I read I need SBR something ....
 
Last edited:
I think I need to prep the plywood for cement. Is PVA enough or I read I need SBR something
Someone else may be able to advise - I never use it. This is because I have replaced more tray's that were a problem because of sand and cement than any other.

I have used flexible tile adhesive before but I always tank the wet space, so that has a primer and than a liquid polymer membrane applied and that doesn't need any other priming.
I researched SBR and im using it on the plywood so waterproof (1:4 ratio with water) and I will apply a 1:1 ratio for the bonding.

The question I have is as the underside of the tray is uneven relative to its sides which are level (as you saw with my chalk).... by up to approx 9mm.

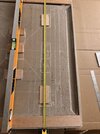
So if you look at the photo im thinking of sectioning off the hole and creating other sections using 5mm ply (screwed) which I will also apply SBR too. Within those sections (4?) im thinking to put 10mm depth mortar (with added sbr which helps with flexibility) then lay the tray on top + and level = allowing any excess mortar to spread onto the ply sectioning. Once mortar is dry it will be supporting the majority of the tray where people will stand.

The thicker wood left and right will be supporting the tray directly. So its everything in between supported by mortar. Equiv to legs if the shower was raised.

Make sense? Am I missing anything?

Appreciate your responses.

(1 photo with tray showing alignment of trap).
 

Attachments

  • IMG_0483.jpeg
    IMG_0483.jpeg
    836.1 KB · Views: 9
  • IMG_0473.jpeg
    IMG_0473.jpeg
    459.8 KB · Views: 10
Last edited:
.... I will fill the squares (made from plasterboard fabric tape ) with mortar between 5-10mm high and as I place the shower tray into position these will settle and upon drying will support footfall in those areas. The left and right plywood (treated) will be supporting the tray directly - so those are the fixed levels. The mortar is to provide support in those areas as it's raised slightly.
 

Attachments

  • IMG_0487.jpeg
    IMG_0487.jpeg
    853.1 KB · Views: 6
From a process perspective then no, that's about covered everything.

I just wouldn't be using mortar and I certainly wouldn't be using legs either, just as a reflection to the analogy
 
From a process perspective then no, that's about covered everything.

I just wouldn't be using mortar and I certainly wouldn't be using legs either, just as a reflection to the analogy
What would you use instead of mortar? flexible tile adhesive? I can use that... probably easier to work with right out of tub.
 
yes - if you are going to use a cementitious adhesive to take up the offset in depths then I would use that if anything. It is a bit of a nightmare though that the tray centre is so far off of level, it really shouldn't be like that.
 
I chose mortar because it was mentioned here and there, but I'll use ready mixed flexible tile adhesive in those spots - easier for me. I'll adjust them in to slightly smaller equally spread areas.

Ive said this before - but fyi, Ive raised it 9mm on left and 3.6mm on right because the wood floor isn't level + I want the existing tiled left side to be close to the tray so after sliding the tray under I can just silicone. But the tray bottom is also not level hence this need to support different levels in the centre. The previous fitting also had wood on the left side and they put some expanding foam to support :confused:

Using tile adhesive means I dont need layer of SBR 1:1. I can just put blobs straight into squares. But don't even need squares really - just trying to get a roughly even spread without covering the whole area.

Thanks for your feedback - much appreciated.

Update : cant get ready mixed floor adhesive.
 
Last edited:

DIYnot Local

Staff member

If you need to find a tradesperson to get your job done, please try our local search below, or if you are doing it yourself you can find suppliers local to you.

Select the supplier or trade you require, enter your location to begin your search.


Are you a trade or supplier? You can create your listing free at DIYnot Local

 
Sponsored Links
Back
Top