WC offset

Joined
7 Jan 2010
Messages
749
Reaction score
9
Location
Yorkshire
Country
United Kingdom
Hi guys, I wonder if I could trouble you for some help plumbing in my new floating WC.

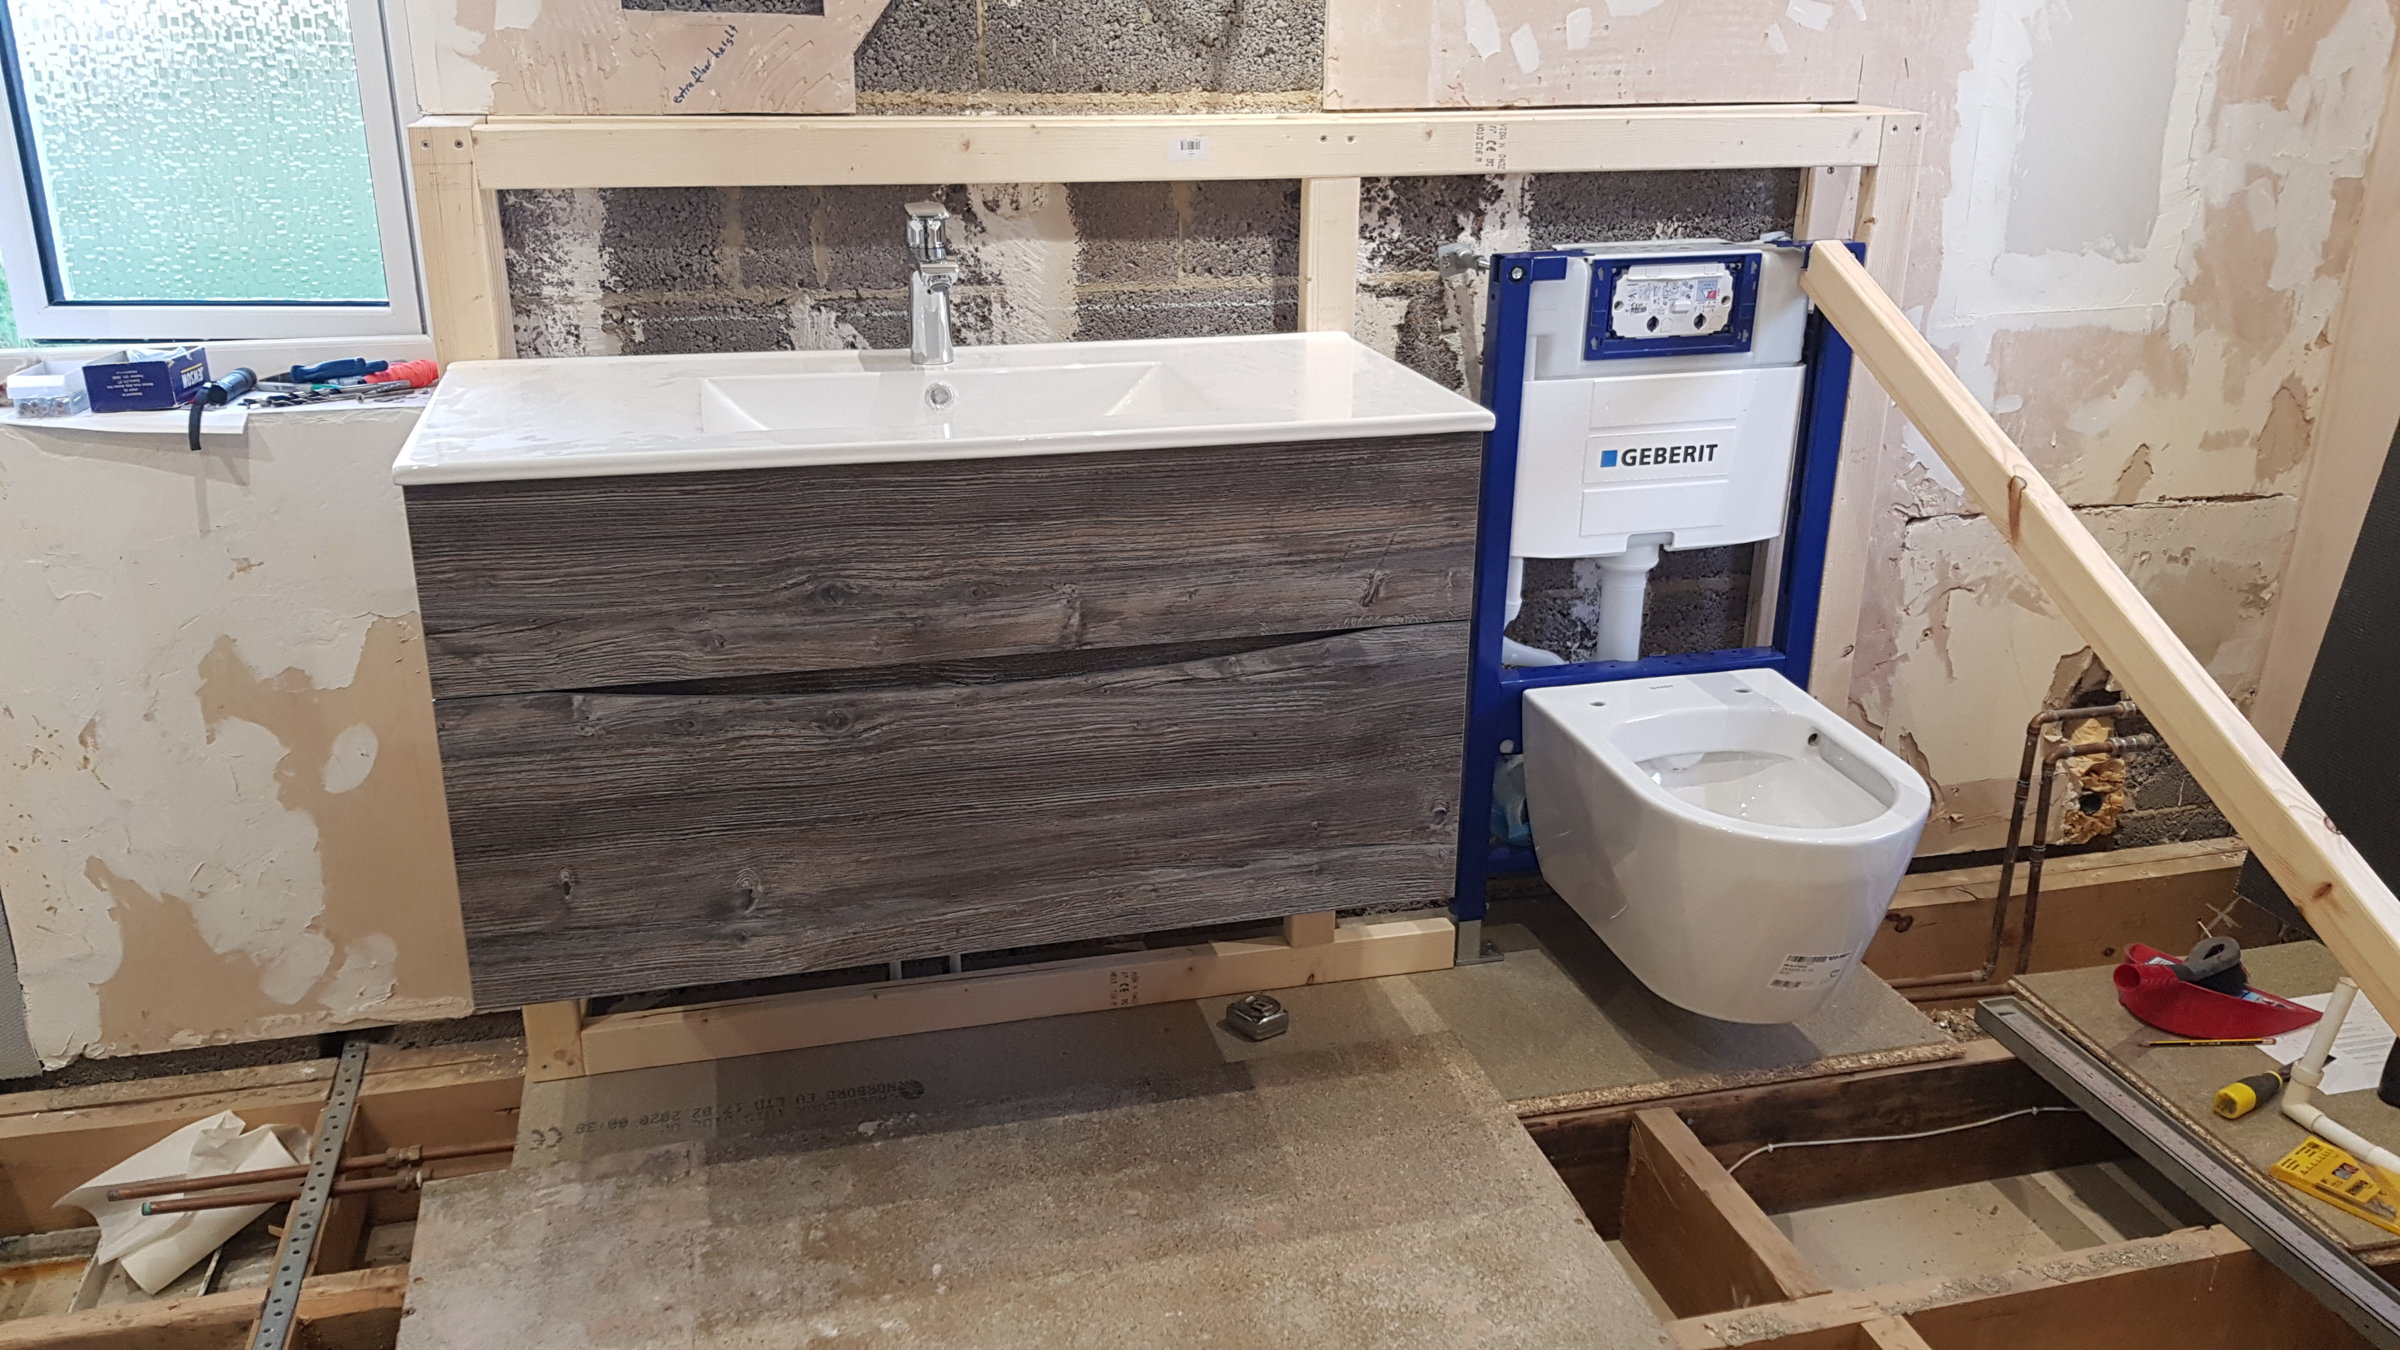
I have a Geberit frame, which will be boxed in and I've set this to the required height to ensure the top of the pan (minus the seat) will be at 42cm above the tiled surface.

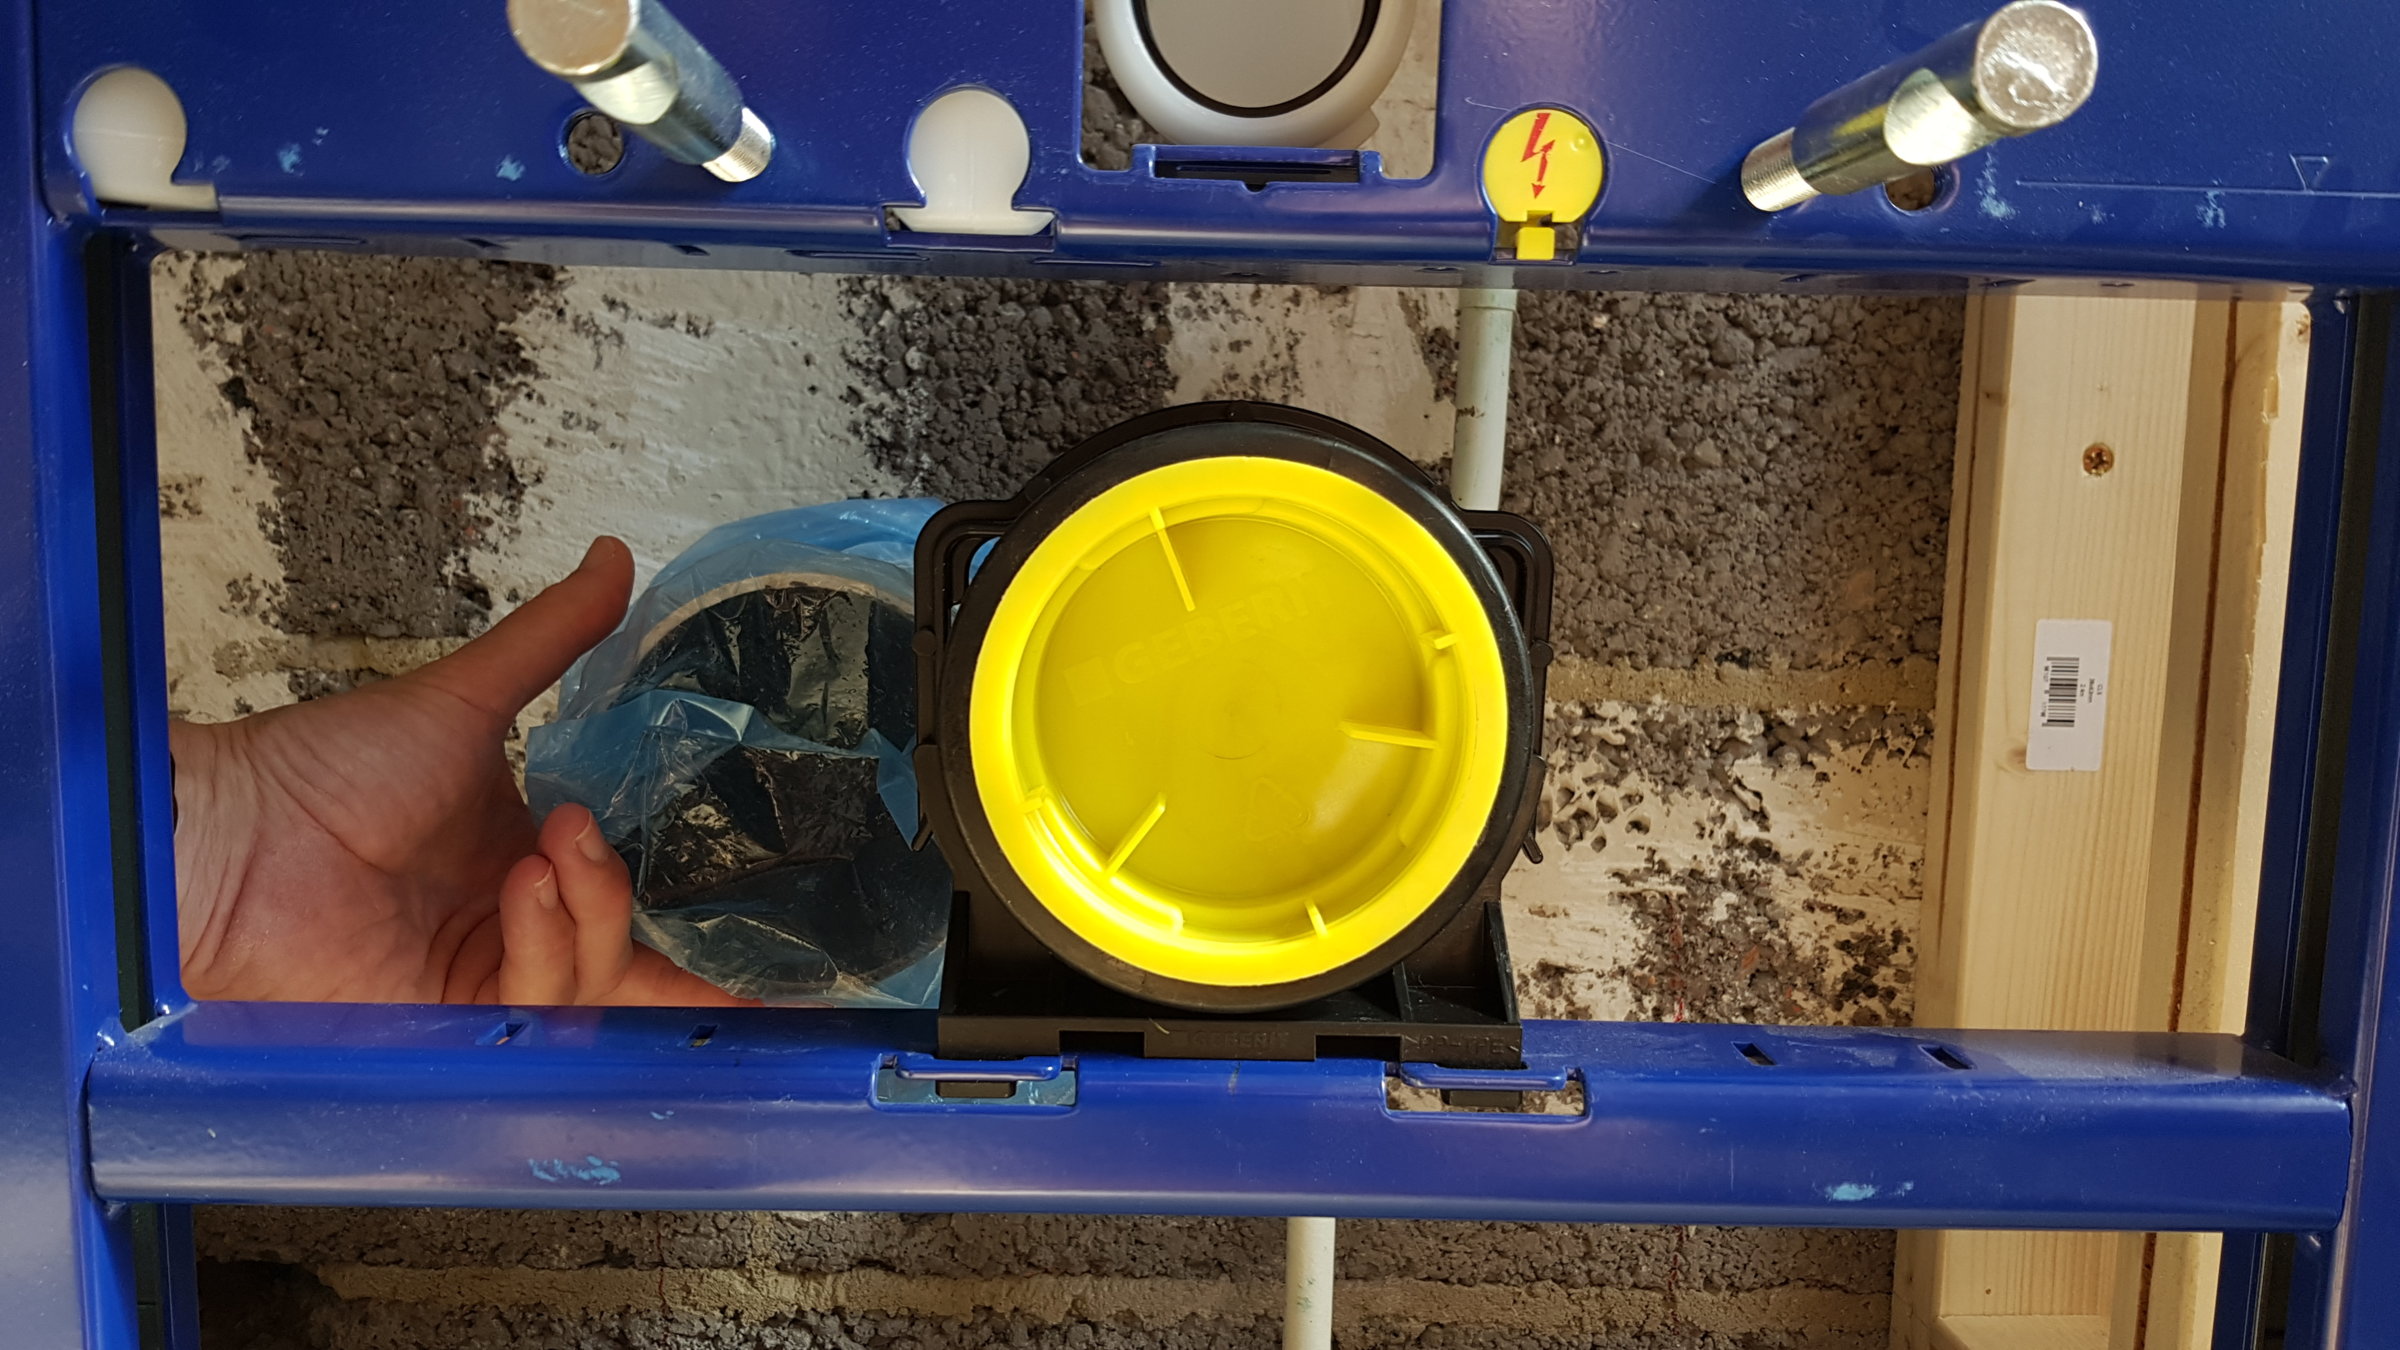
Because we are fitting a new and rather large floating basin unit next to the WC I've had to move the toilet to the right of where the old toilet used to be. This means the 110mm soil pipe is now around 120mm to the left and slightly lower than where I need it to be.

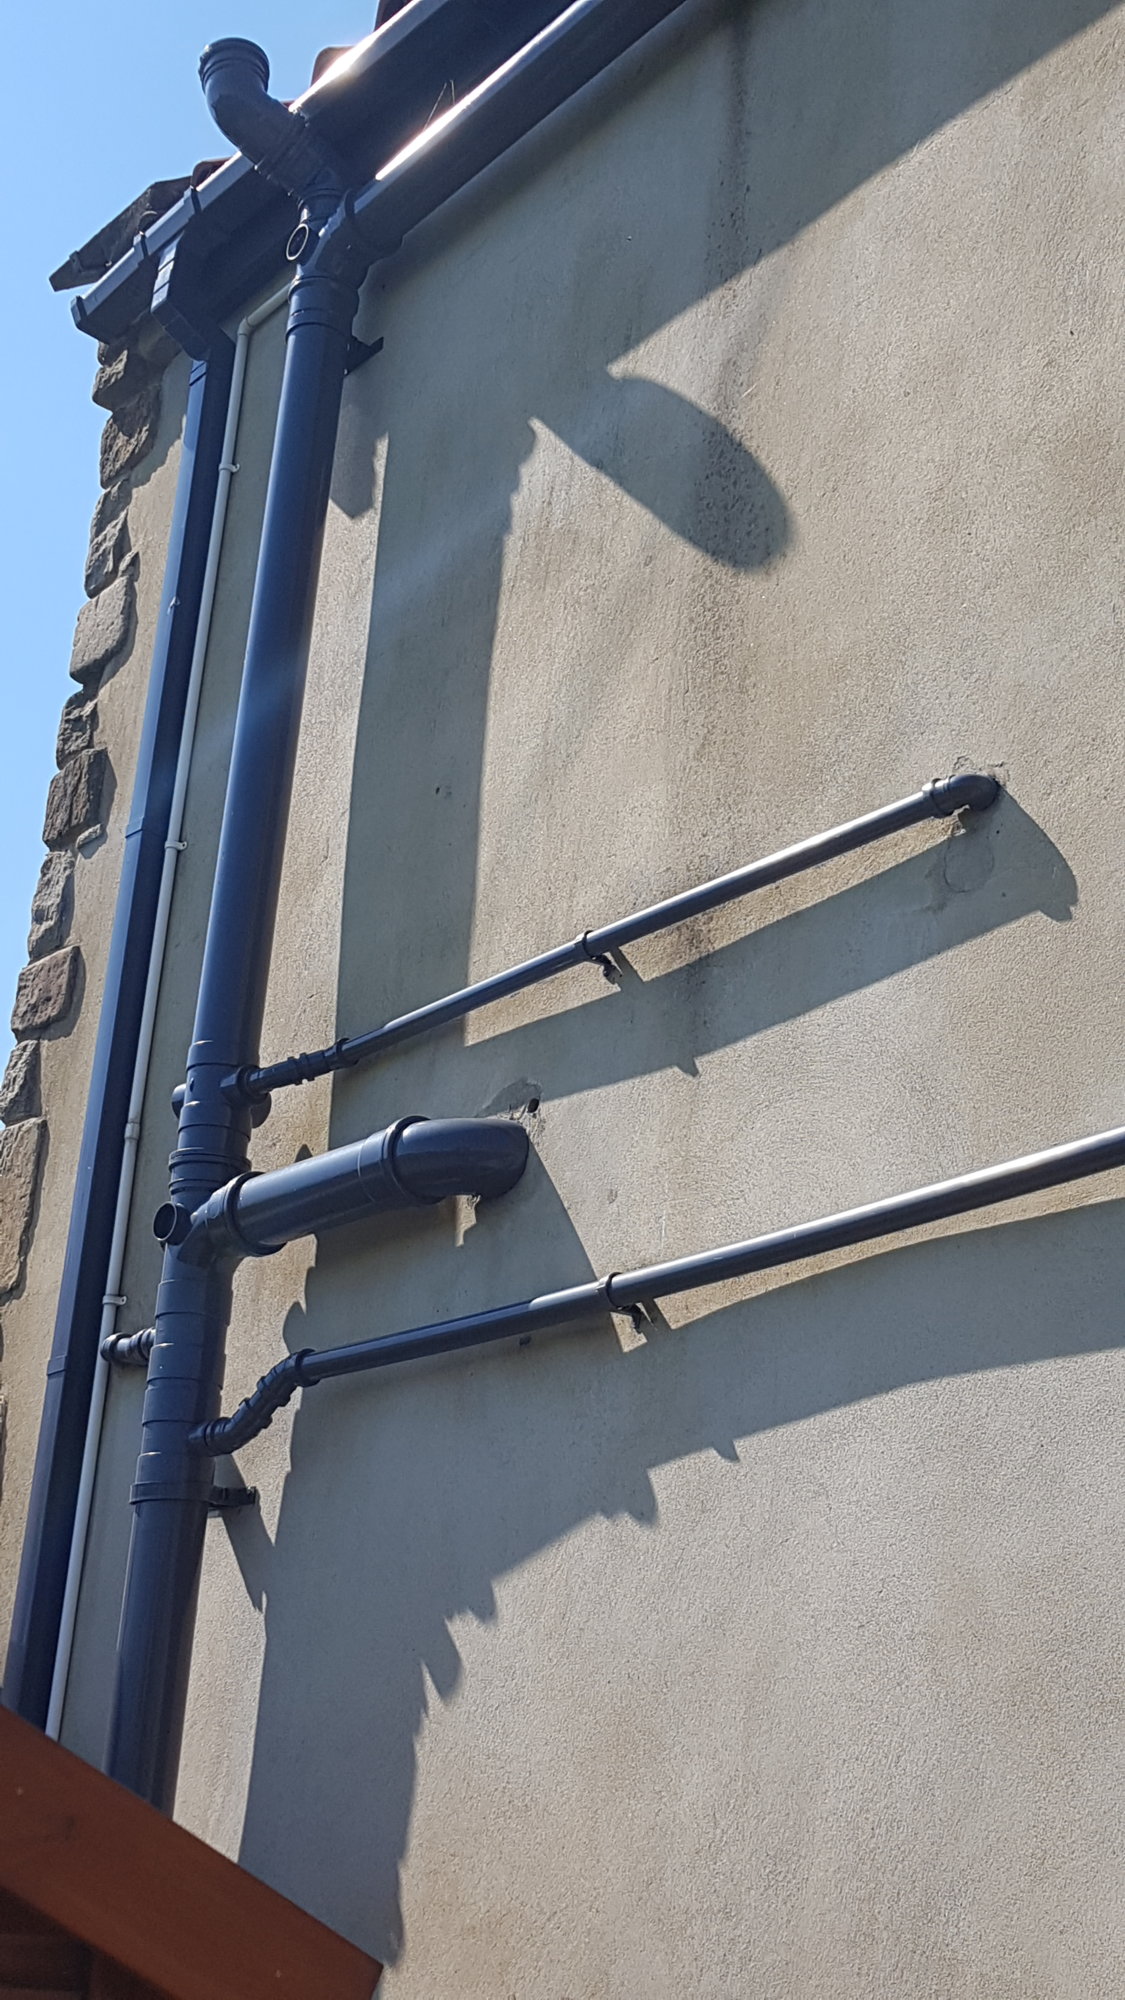
I don't think it is possible to offset the waste by as much as 120mm, so I'm resigned to cutting a new hole through the wall and the hassle of connecting this upto the existing soil pipe, but I think this will give me some issues. Here's a few photos to show what I'm working with.


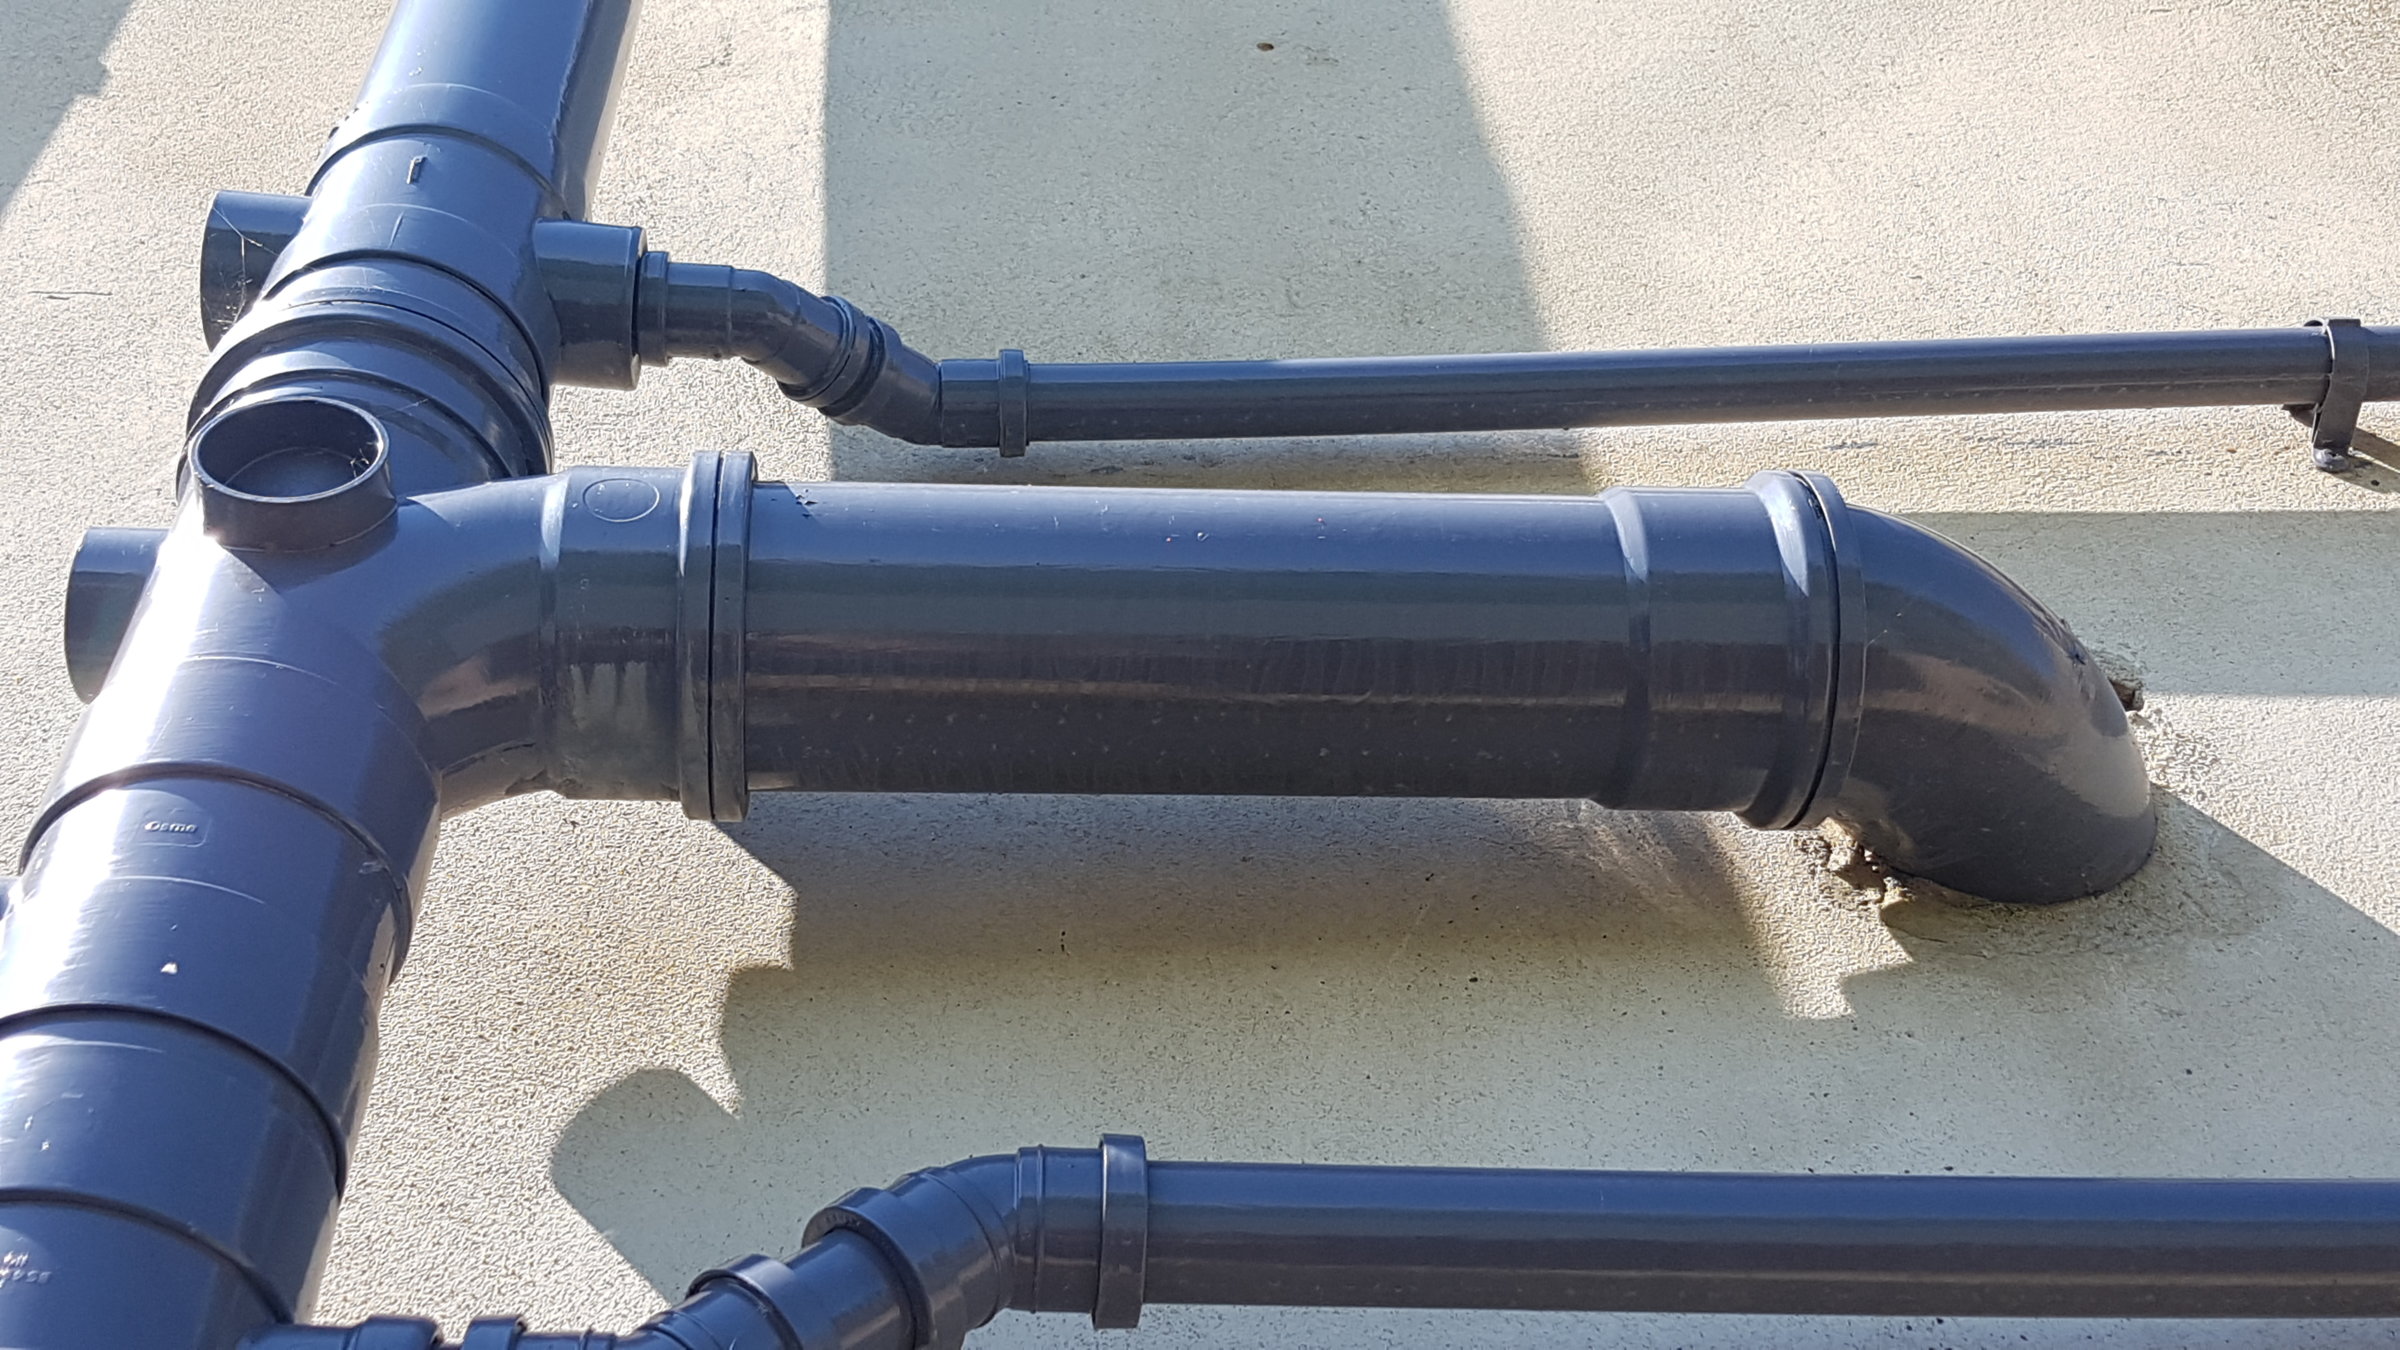
From the outside of the house the pipe run will need to be moved to the left and slightly up. Because the run to the soil stack is so short, I don't think there is any possibility of using bends etc. to change the position, so I'm guessing my only option is to cut into the soil stack and move the branch upwards. I'm struggling to understand what type of fittings have been used, but I think the top part of the branch is push-fit and the bottom part solder? The soil pipe running from the branch into the house looks to be push fit into the branch and a push fit 90 degree elbow attached to the end of the straight and turning the pipe into the wall.

I believe the piping system used is Osma.

Forgive my ignorance in these matters, but this is the first time I've attempted to do any work with soil pipes, so I'm not too familiar with them.

Is there any way I can connect upto the existing soil pipe in the bathroom or do I have to re-run the pipe from the soil stack?

Thanks in advance for you help/advice.
 
Last edited:
Sponsored Links
I've been looking at the Wavin Osma product and installation manual and think I may have found something that will help me.

Looking at the various connections in my last photo, it would appear that the branch has two push fit fittings and a solvent weld end. One of the push fit ends is what the push fit length of pipe on the right connects to and this itself appears to be connected to a push fit elbow, where the push fit end of the elbow is hidden in the wall. The other end of this elbow will have a piece of straight pipe that pokes out into the bathoom.

So, If I were to insert the following into the push fit branch:


This would angle up slightly (15 degrees). I could then connect a short length of push fit straight with the same elbow and this combination should allow me to run the soil pipe through a hole in the wall that is left of and slightly higher than the existing hole.

The only issue may be that the 15 degree connector may angle the straight pipe to much!

Does anyone know if the Osmo straight pipes can be solvent welded as well as push fitted? They are described as PVC-U so I think this means they can? I ask as the bit of straight pipe that feeds out to the pan will have a 110mm to 90mm adaptor solvent welded to it. I have already purchased this adaptor as I realised it would be required due to Geberit supplying 90mm fittings (European size) but not bothering to also provide an adaptor!
 
Yes, all PVC-U pipework can be solvent welded, the installation you have there has a mix of both solvent welded and ring seal (push fit) joints. Seems a shame they've gone to the trouble of using quality fittings for the soil and then run the wastes in cheap push fit, but I wasn't responsible so that's just my opinion! (Solvent waste looks neater and more professional in my view.)

The junction is solvent welded, along with the boss pipe below it, any attempt to alter that lot opens up a whole world of pain, along with a hell of a lot of work... Also, I'd be very wary of pulling that existing branch pipe out from it, as I suspect you will disturb the seal, and any subsequent attempt to get it to re seal will fail.

What I would do is, work out where your new soil pipe exit will be for the new pan position. Then offer that 15° bend up alongside the existing branch pipe, and see what it gives you. I have a suspicion, putting the socket end of that slow bend downstream, with the spigot going into the 92.5 bend through the wall, you may find it'll line up with the existing horizontal run at some point, at that point cut the existing horizontal section back to suit.

Alternatively, if the 15° bend is too much, look at an adjustable bend. They are not pretty, but may give you either the angle required, or will 'dogleg' to give you the slight height raise you need to get from the existing branch run to the required height for the new pan outlet. https://www.screwfix.com/p/floplast-sp560-0-90-adjustable-bend-black-110mm/77224
 
Hi Hugh, thanks for posting and confirming my suspicions.

... Also, I'd be very wary of pulling that existing branch pipe out from it, as I suspect you will disturb the seal, and any subsequent attempt to get it to re seal will fail.

Is it experience that tells you that pulling out the pipe from the push fit branch will cause issues? I thought the point of push fit was that they could be pulled apart and re-fitted if required?

My first issue will be to remove the existing pipework to allow me to cut the new hole through the wall. I was planning to either:

1) cut the straight horizontal pipe from the branch a couple of centimetres away from the branch entry so that I could then use pliers to pull out the pipe left in the push fit branch. This should allow me to re-use most of the straight pipe and the elbow, once I dig the elbow out of the wall.
or
2) cut the elbow and pull the pipe out from the wall. This would then allow me to pull the push fit straight from the branch and cut it to size as required. If I did this I would need to purchase a new elbow.

I don't think I'll be able to remove the straight pipe from the branch without cutting into it somewhere, but then I guess the installer must have managed to initially get it in place? I guess I'll find out if I dig out around the elbow first and see how much horizontal movement there is.

Alternatively, if the 15° bend is too much, look at an adjustable bend. They are not pretty, but may give you either the angle required, or will 'dogleg' to give you the slight height raise you need to get from the existing branch run to the required height for the new pan outlet. https://www.screwfix.com/p/floplast-sp560-0-90-adjustable-bend-black-110mm/77224

Unfortunately, the supplied link doesn't seem to work, but I think Osma do something similar and I'm tempted to stick with the same make of fittings, although I appreciate they are likely to be more expensive.

This looks like the type of thing you mean:


Also, is this a replacement seal for the push fit fittings. If so, I assume replacing the seal would ensure the branch pushfit was still giving a good seal:


I guess you guys would normally have a masonry hole saw tool to cut a large 110mm hole, unfortunately I don't and so will probably have to drill lots of small holes in a circle and use a chisel to join them up, a bit like I did when fitting a new extractor outlet not so long ago.
 
Sponsored Links
The seals harden over time, experience says, even if you can get the existing pipe out, (and they can be very tight!), the seal will be perished/distorted and may not seal again. The fittings you have there are of a type where the seal is kept into place with the locking ring, (whereas some of the new pipes especially, have a moulded socket, with the groove to retain the seal integral to the pipe, so a new seal can simply be pushed in. You wont be able to do that with those fittings you have.)

Ring seal soil is more commonly used possibly as its cheaper, and also allows expansion movement in the pipework. Terrain solvent welded Soil seems to be the most popular out there, I know a few that use it in preference to ring seal, (other manufacturers also offer a solvent soil range), Terrain offered a 'lip' and seal to convert a standard solvent weld coupler into an expansion joint coupler, for when required.

I would cut the straight pipe immediately after where is reduces from the socket, get you new pipe position set through the wall, then see how you can join up to the existing straight section. You may have to cut it back a bit further, but I would hope a short radius bend, or the adjustable bend, then the 90° bend through the wall will then work to get you to the required position.
 
Hi, I removed the toilet waste from the soil stack branch today. Having removed the cement render around the elbow and lots of expanding foam around the inside of the wall, holding the elbow in place, I then cut the straight pipe about 3cm to the right of the branch as I had originally suggested.

I did consider your suggestion to cut it at the socket end (right hand side before the elbow) to save having to remove the straight pipe from the branch, however, a couple of things cropped up that made me decide to take this course of action:
1. While digging out around the elbow it became obvious that the push fit into the branch was actually quite loose. Once the elbow was released from the wall I was able to easily twist the straight pipe and also ease it away from the branch slightly (the elbow in the hole in the wall still restricted actually pulling it apart).
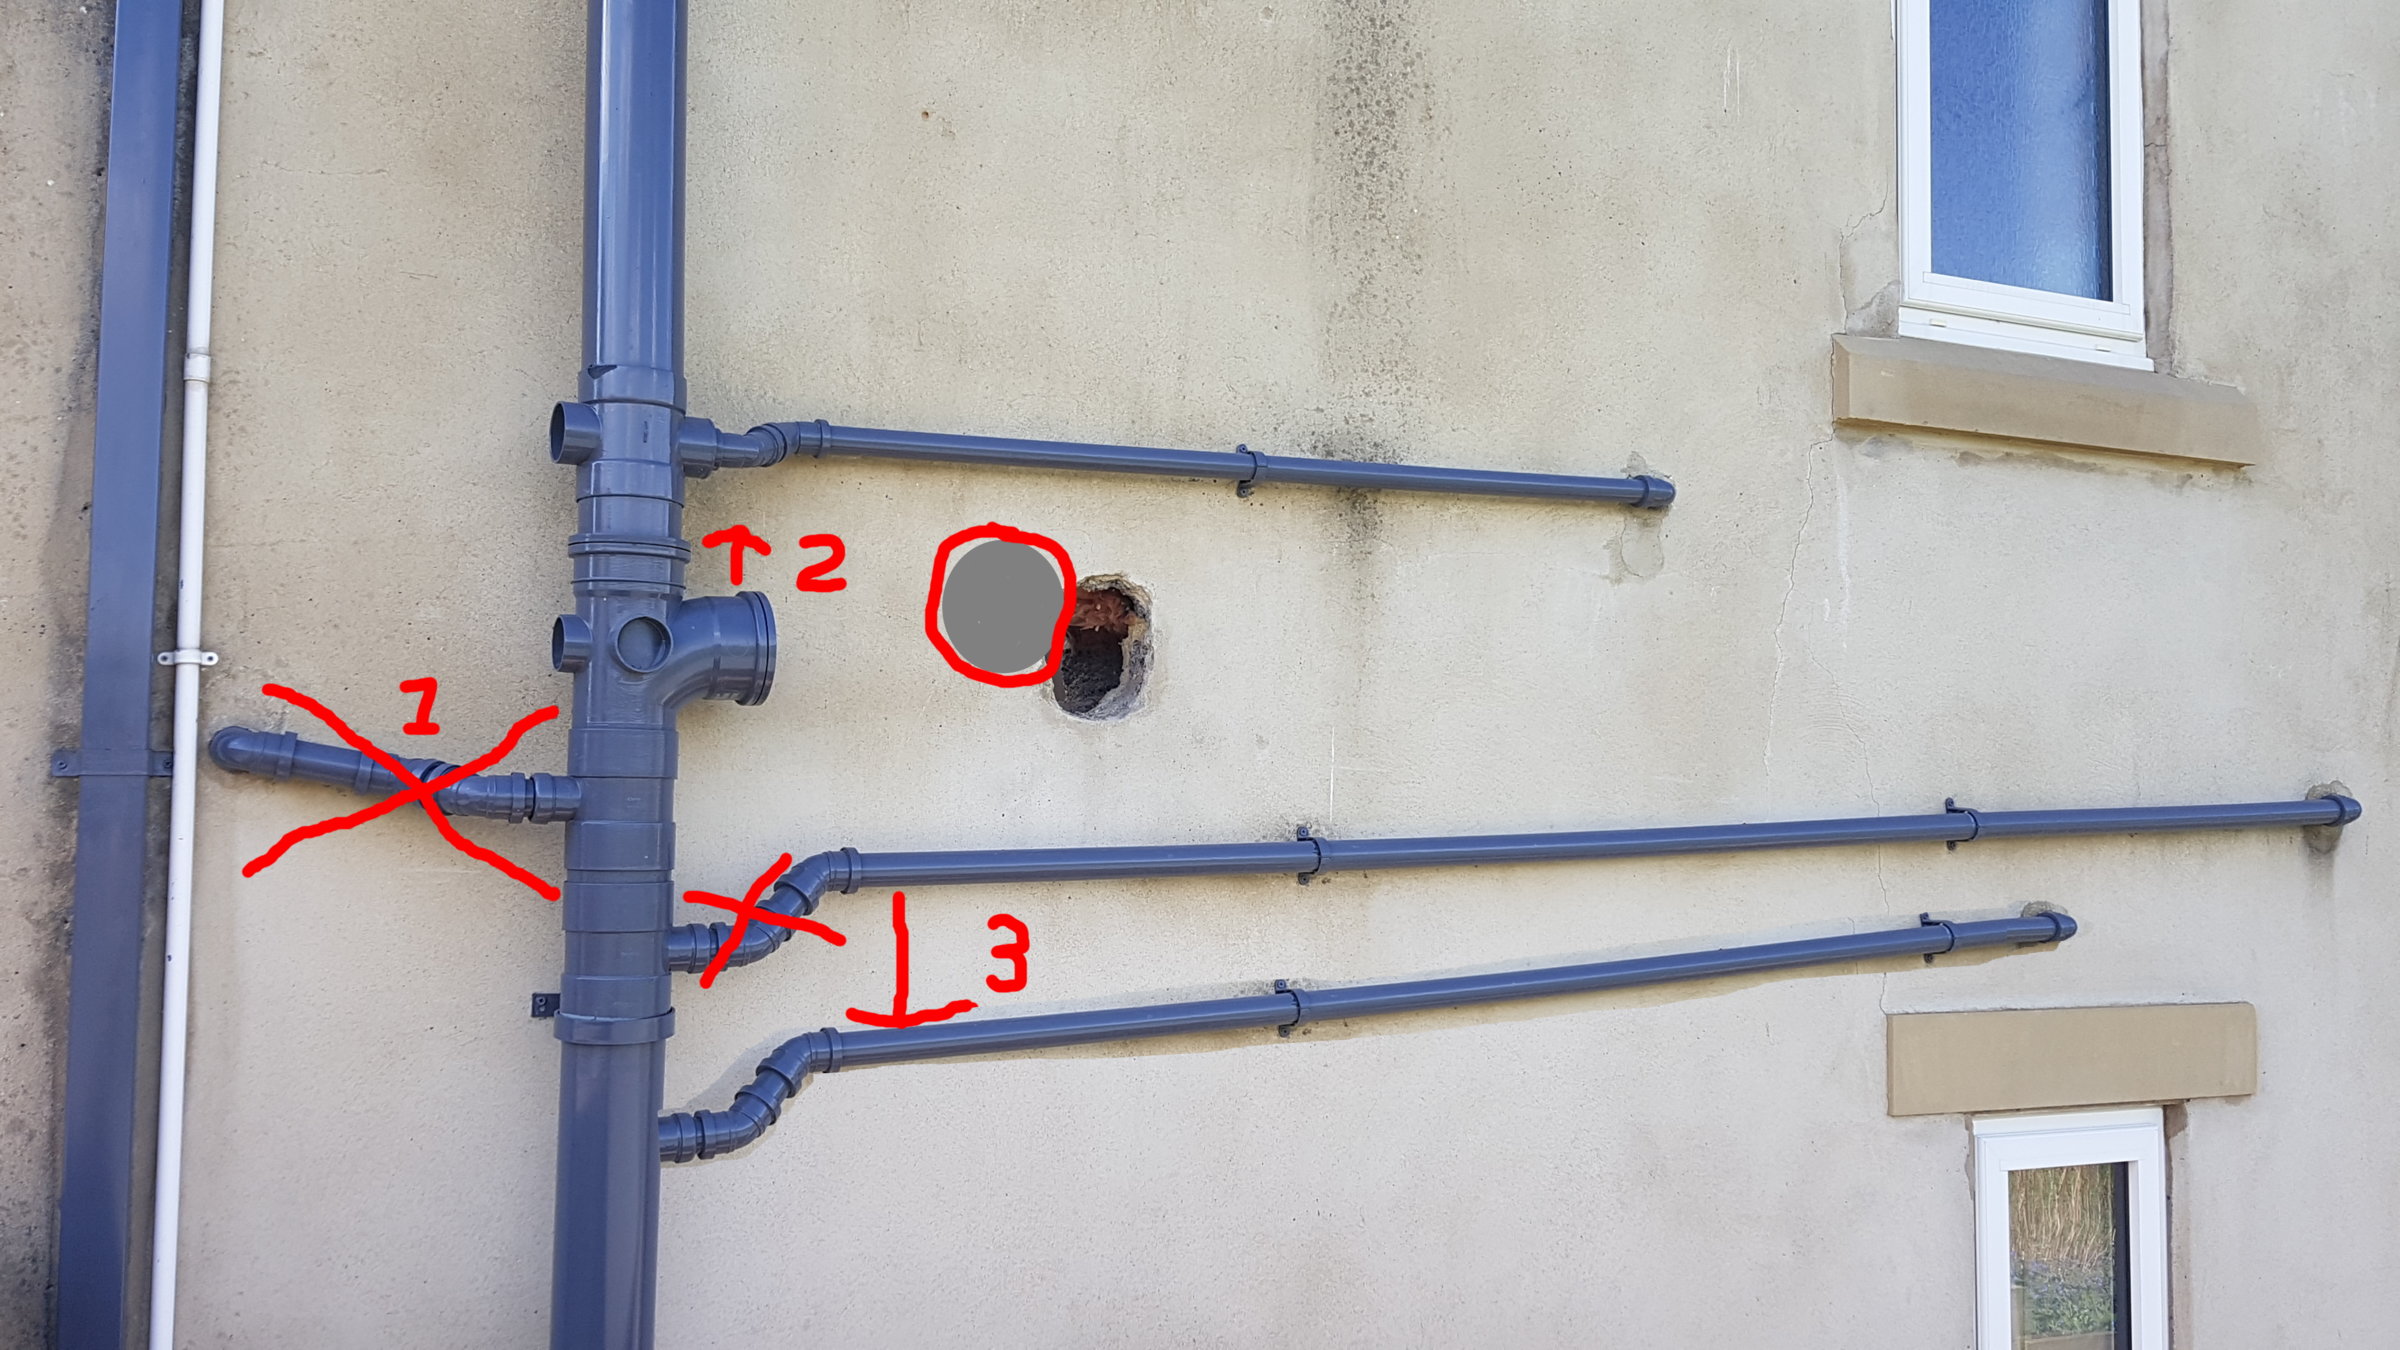
2. I have realised I need to do quite a bit of additional work around the soil stack as shown in the following diagram, which raises yet more questions about the best way forward.


In the photo the red numbers reflect the following:
1. This is the old bath waste pipe, which is currently above the floorboards in the bathroom and so is too high to use for the freestanding bath. This will therefore be removed, so I assume there is something I can use to seal the boss socket on the ring-seal bossed pipe?
2. The options for the toilet soil pipe have been discussed above, however I'm now thinking of a different plan (see below)!
3. This shows the current shower waste pipe (top pipe) and the required new waste pipe (bottom pipe - copied and pasted). Again because the old shower was on a raised platform, the waste ran above the floorboards and is therefore too high to be used by the new shower tray. I was hoping I could use the same ring-seal bossed pipe connection for the re-positioned waste, unfortunately as I will need to drill a 40mm+ hole through the centre of the joist this will actually be around 21cm lower than the old waste pipe, meaning the existing boss pipe connection will be too high. I will therefore need to also seal this boss socket! In addition, I was thinking of using a boss strap to connect the new shower waste lower down the soil pipe.

So, given I now have a situation where I don't want to use the two existing ring-seal bossed pipes and as you've mentioned, the seal on the branch may be compromised, being 22 years old, I'm thinking I should consider the following:

1. Cut the soil stack just above the branch push fit.
2. Cut the soil stack below the bottom ring-seal bossed pipe. I have now removed the toilet soil pipe connection and old bath and shower waste pipe connections.
3. Fit a new single branch for the toilet soil pipe and a new ring-seal bossed pipe for the new shower waste, positioned at the appropriate heights. For the toilet soil pipe, the branch would be fitted slightly higher than it currently is to avoid my current issue of requiring an angle to lift it. For the waste pipe this again would be fitted lower than the current waste pipe as appropriate for the new shower waste.

This feels like more work and is definitely more expensive as I need a number of new connections and some straight pipe, but it will definitely give a much neater, cleaner finish.

Which method would you go for?

I also have to figure out how to run the new freestanding bath waste and have a number of options, but that is for a separate thread I think.
 
Given 2 0f the 3 current boss connections are now going to be surplus to requirement, (and again, they may not be keen to seal once the waste pipes are removed), you may well be wise to just remove that entire section, and graft in a new junction at the required height. It will guarantee the branch is in the right position for the new WC, and allow you to also make your new waste connections as required. If you cannot get the branch high enough for the required new position without fouling the boss pipe above taking the basin, cut that out as well, make up the gap, and reroute the basin waste to connect lower down.

Admittedly more work in the short term, but may prove much less of a headache long term.
 
Thanks Hugh, I think I will go ahead and replace the whole section. Now to figure out the part numbers and find a supplier.

One last question. I painted all the piping a couple of years ago as it was originally black (22 years ago), but had faded over the years. The paint has taken really well but obviously where I use a solvent weld I think I will need to remove the paint. Also possibly for push-fittings, although maybe this isn't as important.

Do you have any advice on the best way to remove paint from plastic pipes? I thought about using something like wire wool and white spirits. This will leave fine marks on the plastic, but I don't think this would be enough to affect the seal.
 
I'd use sandpaper or wire wool, or even a Stanley blade in a scraper, just be careful not to take fine strips of plastic off too! Painting plastic pipes is good practice, it protects from the UV rays in sunlight which, as you've found, causes plastic to fade and/or turn brittle.

Main concern with ring seal joints, it is vital to chamfer the spigot end of the pipe before inserting it into the socket. Also a little lubricant on the seal helps immensely, (washing up liquid is not advised as it affects the seals).
 
Main concern with ring seal joints, it is vital to chamfer the spigot end of the pipe before inserting it into the socket. Also a little lubricant on the seal helps immensely, (washing up liquid is not advised as it affects the seals).

Thanks for the advice. I was aware of the chamfering, but had decided to use washing up liquid as a lubricant rather than spending "more" money on some silicon spray, but now that I'm doing a little more than originally anticipated I'll purchase some spray from screwfix.
 

DIYnot Local

Staff member

If you need to find a tradesperson to get your job done, please try our local search below, or if you are doing it yourself you can find suppliers local to you.

Select the supplier or trade you require, enter your location to begin your search.


Are you a trade or supplier? You can create your listing free at DIYnot Local

 
Sponsored Links
Back
Top