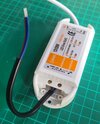
What's the best way to replace or extend the cable on this power supply?

Joined
28 Apr 2008
Messages
90
Reaction score
0
Location
Gloucestershire
Country
United Kingdom
I, perhaps foolishly, assumed that there would be screw terminals for at least the mains cable on this power supply (there should be a picture attached). Instead the cable appears to be soldered to the board and I can't get the case open to replace the stubbly little bit the manufacturer has included (I would probably trash the enclosure getting it open, I've already had a go at it). The cable looks like stranded, flat, 2x0.75mm^2 although I don't have a section with markings.

I've used Wago's and an enclosure in the past to extend mains cable but that feels like a sledgehammer to crack a nut here. I assume soldering on a length of cable and covering it with heat shrink is a no-no?

EDIT: I didn't know Wago did these inline boxes. They are much smaller than the one's I've used in the past. I guess this would be a decent solution.

Actually, an inline switch would be an even better solution, something like this. I think that's the solution I'll go for unless someone has a better solution.
 

Attachments

  • 20240308_170154.jpg
    20240308_170154.jpg
    194.7 KB · Views: 103
Last edited:
Sponsored Links
Soldering and heatshrink is a perfectly good method of extending the cable.
You'd still need to do that to the neutral if you use the inline switch, you may be able to do it in the switch though.
 
Soldering and heatshrink is a perfectly good method of extending the cable.
You'd still need to do that to the neutral if you use the inline switch, you may be able to do it in the switch though.
The in-line switch is double pole.
 
Unless you actually want switching functionality at that point, I would just use a flex connector.
 
Sponsored Links
Is there some kind of cover goes on where the cable grip is? It looks like there are screw holes either side of the cable grip

I'd just chop the wire there , solder and heatshrink a new long length onto the stubs of wire then fit the grip to the new long wire and place the cover
 
Yes, there's a cover and cable gripper. I had wondered about cutting the cable short as you suggest, but it would be very tricky to solder on a new length of wire.
 
Honestly, it really isn't; the short length of wire is self supporting, you skin it and bend it to a good shape, you hold the solder in one hand and the iron in the other, you load solder onto the one wire so there is a small blob(don't superheat the wire so the solder runs all into it). You do the same to the other 3 wire ends (2 old, 2 new) so you have 4 wire tips loaded with solder, you set the solder down and pick up the new wire, (making sure you've got the heatshrink on each core loose and waiting), you put the new wire so it's touching the old wire, then you touch the iron to one of the wires and let the heat conduct across, then remove the iron, keep supporting the new wire, blow on it to speed the cooling then when the solder sets (you may see it change from shiny to matte) you can stop supporting the new wire

Take about a minute; much easier than faffing around twisting wires or trying to balance two dry bright copper tips so they touch then bring solder and iron in and hope they don't separate, and no need for a third hand clamp either
 

DIYnot Local

Staff member

If you need to find a tradesperson to get your job done, please try our local search below, or if you are doing it yourself you can find suppliers local to you.

Select the supplier or trade you require, enter your location to begin your search.


Are you a trade or supplier? You can create your listing free at DIYnot Local

 
Back
Top