Wiring advice please

Joined
6 Dec 2007
Messages
1,424
Reaction score
28
Location
Dundee
Country
United Kingdom
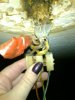
My mum wants her lounge light changed. I took down the one that was up so that I could see if it would be straight forward for me to swap it over.

Technically, the way it is looks like it will be straight forward for me to put the new one up, but I just wanted to check if the way the existing wiring is, is safe - block connectors and insulating tape. :confused:

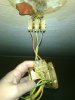
I've attached a pic of the connections on the new light fitting too.

Also, I couldn't lift the old fitting back up to re-attach it - it's too heavy, so I've had to just leave the wires as in the pic - is this OK temporarily? Nobody is going to be touching them
 

Attachments

  • Photo0520.jpg
    Photo0520.jpg
    84.7 KB · Views: 145
  • Photo0521.jpg
    Photo0521.jpg
    92.2 KB · Views: 147
  • Photo0525.jpg
    Photo0525.jpg
    94.4 KB · Views: 152
Sponsored Links
but I just wanted to check if the way the existing wiring is, is safe - block connectors and insulating tape. :confused:

No not safe,

Use one of these to replace the three way terminal block and the terminal in the red tape.

ASJ501X.JPG


https://www.tlc-direct.co.uk/Products/ASJ501.html


or one of these
ASJ804.JPG


https://www.tlc-direct.co.uk/Products/ASJ804.html


Then the box can be pushed through the hole in the ceiling with a three core flex coming down for the new fitting. Mark the wire ( the Switched Live ) that is connected the the brown from the lamp so it doesn't get "lost" when you change the wiring
 
Thankyou. Was trying to work out where I can get one of these on a Sunday - it's not looking good - the only place I could find similar is Yesss and they're not open on a Sunday.

Can you give me idiot proof instructions as to where each wire would go in the junction box please?
 
If you've got a screwfix nearby, they're open on a sunday, never used one of these but the data sheet says it's the same idea as the Ashley ones linked above.

You could also get one of these, and some of these if you can get it in and out of the ceiling hole easy enough.

You will need 4 connections and just copy what you already have. Those covered in tape, into one connector on their own, then just use the other 3 to replicate what you have, and use a bit of flex if you have it, to connect onto the new light connector.
 
Sponsored Links
How can you expect the op to get one of those large junction boxes, connect wires to it, make a massive hole in the ceiling, shove it up the hole, then try to find a decent bit of ceiling left to fix the light fitting to?

Unless there is access above the lounge ceiling, fitting a large junction box is going to be a bit awkward.

Common sense has to prevail here.

The connector supplied with the new fitting isn't really suitable to connect that bunch of wires directly to, and an additional connector block is required to accomodate that bunch of brown wires, known as the loop.

For the convenience of the op, I would suggest using 'standard' 6 amp connector blocks, instead of that supplied connector, and wrap them up with insulation tape.

I would also encourage the use of an overlapping BESA box lid placed between the ceiling and the light fitting - to provide the connections with an enclosure.

A 20 mm or less hole is required in the lid to allow the cables to enter.

A round plastic pattress is also available to house the connectors.

The browns goes into a seperate block all together on their own.
The blue with the brown sleeve goes to the live of the light.
The remaining blues go the neutral of the light.
The green and yellows go to the earth of the light.

Please be certain that all the power is completed isolated before starting work.

Please get an electrician to do this work if you are in any doubt whatsoever.


I see no point in getting the op to cut large holes in the ceiling and then find getting the light fitting to cover the damage to be an absolute bugger to do.
 
Thanks for the replies. The first block connector barely fits in the hole in the ceiling and I wouldn't want to make it any bigger.

As it stands, mains wires go into block connector, then there's live,neutral and earth wires coming out and currently going into a second block connector (which I don't think I need) - these three wires from the first block connector could just go straight to the light?

Do you mean this type of thing - to provide the enclosure?

http://www.screwfix.com/p/galvanised-box-lids-pack-of-5/68110
 
Almost correct.

Only you would need a (white) plastic one - so earthing is not a problem.

Also, as that is the standard size, it may be too small to fully form an enclosure with the base of the new light fitting.

They do make a larger one (for use when BESA boxes are flushed into plaster walls for the technically minded) but these are MUCH harder to find.

You would need to order one or find a good electrical wholesaler.

Must be plastic, and white in case the edges are seen.

Of couse in the real world most people would just throw away that connector supplied, use new 6 amp connector blocks, tape up very well with a good quality insulating tape and not even bother with a round plastic lid.

But I'm not going to mention that.
 
I recommend carefully re-stripping any existing cables ends too, as they may be brittle from the previous connections, and on the verge of snapping off.
 
Thank you. I'll go to the electrical wholesaler tomorrow and see if they have them.

Sorry if I'm being thick - just want to check what I'm doing - the connector from the mains cable is staying in the ceiling and then I'm putting a BESA box lid on the ceiling and bringing the wires for connecting to the new light fitting through it? I take it I need to make a hole in the lid for the wires to come through?
 
Yes 20 mm hole as said, all connections would be between the box lid and the light fitting, this way all the connections are enclosed.

I doubt they got larger lids on the shelf though...
 

DIYnot Local

Staff member

If you need to find a tradesperson to get your job done, please try our local search below, or if you are doing it yourself you can find suppliers local to you.

Select the supplier or trade you require, enter your location to begin your search.


Are you a trade or supplier? You can create your listing free at DIYnot Local

 
Sponsored Links
Back
Top