Blue brick curved wall

With a large radius you will probably be OK without the cuts and using the level and plumbing points.
On some jobs the level isn't used that much. Getting the rods set perfectly plumb for the trammel takes care of the wall staying plumb, and having datum pegs and a steel straight edge made to the shape of the curve means that you can set the bricks to the gauge and keep the top front arris of the bricks inbetween right.
 
Sponsored Links
With a large radius you will probably be OK without the cuts and using the level and plumbing points.
On some jobs the level isn't used that much. Getting the rods set perfectly plumb for the trammel takes care of the wall staying plumb, and having datum pegs and a steel straight edge made to the shape of the curve means that you can set the bricks to the gauge and keep the top front arris of the bricks inbetween right.
I just set out and level the fist course the curve, then lay say 4 or 5 bricks at a time - level them then plumb them. It is so important to make sure you get them level or else it will show, especially with high suction bricks. And especially important not to lay and level too many at once. The OP will have plenty of fiddle time with blues though.
 
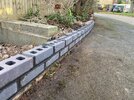
Made a start today. Using the everbuild black mortar tone at maximum allowed dosage, so will see how it pans out. Got fixated on having a dark look to the mortar so went for the dye.
Fairly happy with the approach and took my time with the curve, which was already formed by the solid base of the old wall which I’ve reused. Jointed up too early but I couldn’t be bothered to wait more than the 4 hours I’d already given it.
Also only just realised that these bricks have a good face, the other face is a bit bevelled on the corners so I’ll pay more attention as I go up.
A bit of smudging but I’ll always get that with blues, and a lot of it is just the water soaking in which should dry out.
Thanks again for the advice, invaluable as ever (y)
 

Attachments

  • 679BA7AD-24FE-44F2-8672-62E6C7549735.jpeg
    679BA7AD-24FE-44F2-8672-62E6C7549735.jpeg
    597.1 KB · Views: 115
  • 55F95571-D362-4836-8AD5-40B555D6D5E9.jpeg
    55F95571-D362-4836-8AD5-40B555D6D5E9.jpeg
    730.8 KB · Views: 122
  • CFD622D3-58E5-4B31-BA15-6E168D710DF1.jpeg
    CFD622D3-58E5-4B31-BA15-6E168D710DF1.jpeg
    662.9 KB · Views: 126
Sponsored Links
Not much curve there, just get a "bricklayer" off checkatrade and tell him you want a straight wall.
 
No, but enough of one to need to build the whole thing off a level. Plus the coloured mortar meant it was a bit out of my comfort zone. I’ll subject you to another pic when complete
 
SmartSelect_20231224_102006_Chrome.jpg


With blues, you need to up the additive and reduce the water. Also do as few trowel taps as possible as every tap forces the water to the surface of the joints and the face of the brick.

Lay the bed, and just press the brick down. Then leave it.
 
On the plus side, it was still sufficiently workable this morning to brush the snots off again and iron it, looks really good now.
 
After laying a few courses of bricks like those you realize why in the old days when buildings walls with Accringtons or similar they used really tight joints.
With normal sized bed joints 2 courses is enough at a session.
Was on a job abroad many years ago with similar bricks and after pointing up the walls were rubbed with old bits of carpet. The wall was then jointed up again.
The brickwork was covered in a thin film of laitance but the idea was that it was easier to acid clean like that, rather than leave it and clean off just the larger bits of residue left.
 
No further progress on this due to Xmas and the weather, but tomorrows looking like no rain, so I could lay a load more. However, the ground is very wet, the bricks look wet in patches (but do these bricks absorb any water?) and the perfs are full of water (but I can easily wet vac it out).
Reckon I should crack on tomorrow or am I risking the quality (time taken to firm up for jointing etc) and should leave it till things have dried up more? Ta.
 
Last edited:
Need dry brick and a dry bed to lay them on, you will struggle if the bricks are damp, vac out the water tomorrow morning and let it dry out during the day, then cover the wall last thing to keep it dry, the brick need lifting off the floor (ie pallet) stacked with gaps to allow airflow, and covered well, or even inside a garage/shed.
I just used (dry) blue engineering brick on edge on a garden wall at home over Christmas, and had to use a headtorch to point them up, even though i laid them in the morning, (bricklayer for 40 years) its just the wrong time of year for blues, but to give yourself a chance keep everything dry, good luck.
 

DIYnot Local

Staff member

If you need to find a tradesperson to get your job done, please try our local search below, or if you are doing it yourself you can find suppliers local to you.

Select the supplier or trade you require, enter your location to begin your search.


Are you a trade or supplier? You can create your listing free at DIYnot Local

 
Sponsored Links
Back
Top