Cast iron stack - leaking at the bottom

Joined
12 Mar 2019
Messages
266
Reaction score
20
Country
United Kingdom
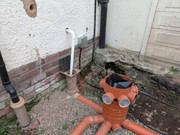
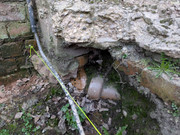
Joyous. I've got an otherwise perfectly fine cast iron stack on my 1930's house, but while excavating for my new patio project I've discovered it's leaking (badly) around the clay connections. To add further complexity, most of this is under a garage / concrete slab (I'll get a photo and you'll see what I mean).

I'm actually more comfortable with the underground portion than I am the cast, as I've done a bit of underground drainage now! I'm fairly happy exposing the clay, and I know it'll connect up to the main clay run.

My questions are:

1. Is this the time to just accept it and replace the whole stack?

or

2. Is it possible to replace the clay portions with plastic and still get a good termination?

And, I assume the concrete block at the bottom is structural?
 
Problem with cast to clay is, there's no flexibility in the joint, and any slight ground movement means something has to give, the clayware usually cracks and the joint starts leaking. Given the amount of concrete around it, it'll take some exposing to see what you've got to work with. Possible you could expose enough of the cast to get a connection onto and replace the damaged section with plastic, but there's also the question of how much the cast above is relying on the concrete for support, and also getting a clean break on the concrete so you don't affect the slab under the wall.

If you think you would be able to get a decent connection onto the existing drain, I'd look at the feasibility of coming out from under the slab, and running a new stack up parallel with the existing route, allowing you to abandon the current section through the concrete.
 
OP,
1. The CI stack is well supported above ground - the concrete block is not supporting the stack.
2. The stack is standing well off the wall so you can hand feel the back of the pipe to search for any defects.
3. The conc block can be cracked out with a Jack-hammer & eliminated. Nothing will collapse.
4. Its possible that the CI in the block has perished.
5. At the base of the block in pic #3, how this is actually arranged will become clear when you remove the concrete block, & some of the soil & debris.

FWIW:
The down pipe & waste could have been combined.
The down pipe gulley would need a Hopper & Grate.
Rainwater and waste gullies need bottle traps
 
It's impossible to tell the condition of the fixings from the picture, so I'd err on the side of caution, cast does often rely on the pipework below for some support, and ultimately you are disturbing what has been there for a number of years, given there is a lot of weight in that stack.

I'd replace, before you lay the new patio, and futureproof things. Wastes from bathroom and kitchen could be coupled into new stack, eliminate the hopper, and leave the Gully for rainwater. It looks to be set up correctly, with rainwater connection into side Boss, so is fine as is.
 
I'd be inclined to keep it, if it's in otherwise good condition, if certainly looks so. But then I'm not a fan of plastic on buildings.

By all means convert to plastic from ground level.

There are structural pipe support brackets available, but I'd be surprised if that was going anywhere, unless you lock yourself out one day and attempt to climb it.

 
OP,
Definitely keep your well maintained & painted CI stack - there is no reason at all for dropping it, you dont go creating heavy lifting work for yourself or your pocket for no reason.
The pipe hub ears can be clearly seen with no traces of rust or any other defects - the painted render behind the hubs shows no staining, and the stack itself is in plumb.

Before removing the block you would have already cut the CI pipe above the block - this would break the CI connection & allow the installation of Boss FloPlast single socket access fitting for access & waste.
But enough detail for now, later I can take you through the complete procedure for doing the job (what tools to use & how to use them) when you say what you want to do.
IOW how to do a proper professional job.

Whatever does "ease of use thereafter" mean?
 
Last edited:
If the cast pipe is OK, then its just a case of renewing the drain connector.

If there is a crack in the cast pipe, then see if there is potential to cut the pipe above the crack and add a new section of plastic pipe in with a suitable connector.
 
Poster #7,
There is no bathroom waste - there is however, a CI WC soil pipe branch. Perhaps your above proposal includes going thro the wall to make a plastic WC connection?
FWIW: the CI branch also acts as a fixing for the stack.
Which Hopper would you eliminate?
You seem confused about bottle traps, & what is required at a drainage turn of direction - & a gully you mention when there are no gullies - however, I'm sure you will clarify these odd details?
I will explain, at risk of further abuse, as your lack of understanding of UK Drainage systems again leads to poor advice.

There is a waste from the Bathroom going into the hopper. Rerouting that to the stack, allows the rainwater to continue in one length of downpipe.

This https://postimg.cc/0MT7pRYQ shows a Gully, the Osma Bottle type, which is trapped, and allows side connections via the bosses, as has been done here, for rainwater and wastes.
 
Some of the proposals given would involve working at height, which adds to the complexity and cost of the job. Not to mention getting a tower or ladder on that ground as it currently is.

Changing to one single pipe would certainly be neater, but the turds and toothpaste won't care what direction they take into Lake Windermere!
 
Replace it all. Put a longer vent pipe on the new one, the existing is right next to the window. It needs to be up beyond the gutter, taller is better. Solvent weld is much less wobbly (and neater).

Put the new plastic pipe right through the wall and couple directly onto the toilet.

Does it take some weird doubling back on itself route at the bottom of the stack? If so simplify, straighten it all out.

The toilet needs to go to the centre channel on your chamber, so the "lumps" don't sit around in a branch pipe in there until it rains or you use whatever happens to run through the middle.

Eliminate all iron, then you don't have to climb up a ladder with a 1/2" paintbrush to paint it ever again!

Take it all to the scrapyard, you'll get enough for a few tins of beer from that lot.
 

DIYnot Local

Staff member

If you need to find a tradesperson to get your job done, please try our local search below, or if you are doing it yourself you can find suppliers local to you.

Select the supplier or trade you require, enter your location to begin your search.


Are you a trade or supplier? You can create your listing free at DIYnot Local

 
Back
Top