First Time tiling DIY - Hearth

Joined
10 Jan 2010
Messages
111
Reaction score
16
Location
London
Country
United Kingdom
Hi Everyone,

I am currently redecorating my master bedroom, which will also include a new herringbone floor. I am currently refurbishing the fireplace and would like to lay down some mosaic tiles as hearth. This fireplace is closed and will never be used, so I do not require fireresistant materials.

I've roughly sketched out the area to be tiled and the plan is to continue all the way into the fireplace:
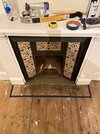
IMG_9865.jpg
I've already ordered below tiles for this:

IMG_9875.jpg

The flooring will be installed on top of the floorboards, so there will be a 15mm-20mm buildup. As such, my flooring guy recommends to install the tiles after he will put down the herringbone floor so the tiles can be built up to be flush with the new floor. I am currently in the planning stage and getting the required materials for this job, so any advice would be greatly appreciated. I've never done any tiling before, but given the small scale I really would like to give it a go. My rough idea would be:

- Layout dry tiles and measure the exact area
- install tile underlay, self levelling compound first if area is not level
- Install tiles
- Grouting

Materials & Tools I am planning to get or borrow:
- Tiles
- Self-leveler, or can levelling be simply done with tile adhesive and a long spirit level?
- Some underlay
- Tile adhesive (mapei any good?)
- Grouting
- Small manual tile cutter
- Notch trowel (Do I need a regular trowel as well or something to spread the grouting)
- Sponge (to wipe off excess grouting)

I have the following questions:

What sort of tile underlay/substrate should I use? I believe the base will be just as you see on the picture. i.e. the tiled area will be partially on floorboards and inside the fireplace. I still have some spare 6mm warmup insulation boards, can I use these or is it better to use this flexible polypropylene matting?

Is it recommended to use tile spacers for such a job? These mosaic tiles come prefixed into a mesh in smaller sections, but of course I still need manually adjust for the pieces to go together.

I think the flooring guy will put strip pieces of wood around the planned tiled area. How should I fill the gap where the tile ends and the wood section begins? Will regular tile grout stick to the wood?
 
Sponsored Links
Tiles can’t be laid directly to floor boards, need a 6mm hardibacker or similar to prevent movement .
If tiles meet any other flooring flush it need a metal trim to avoid breaking tile edges when walked on .Need a machine tile cutter or a grinder with tile blade to cut .
Better to adjust dimensions to suite tile dimensions to avoid cuts if possible .
 
The challenge you have is that the tiles will be solid and the flooring will flex a little, so grout is always going to break up. You need something that is durable enough to cope with the difference in flexibility. Quickstep laminate has a special colour-matched profile in their range ideal for this. You fix a plastic channel section between the floorings and then tap a self-locking height adjusting T profile in to it to cover the gaps. https://www.quick-step.co.uk/en-gb/laminate/accessories/laminate-profiles https://www.quick-step.co.uk/-/media/imported assets/flooring/a/0/d/qstdsaccqswincpincizoprofileenpdf47950.ashx?rev=8920f2165ed34efab4510ac9c0690dc5&type=original&filename=Technical+Information.pdf

You would need to arrange to have the flooring and the tile surface level, so if your flooring is e.g. 8mm laminate + 3 mm underlay, you have 11mm to play with. I wouldn't normally tile on to ply, but a 3mm ply + a little adhesive + those mosaics should be about the same height. Cut the ply to the tile area, fix the plastic channel around. get the flooring man to stop close to the channel, once all done mitre the cap strip and carefully tap in to the channels. Use a wood block and tap evenly to avoid breakage.

The mitres will be vulnerable, so if you intend to walk on them, then perhaps use either the incizo metal profiles, or any thin metal cap strip. The beauty of the incizo profile is there are no visible screws and it fixes securely along the whole length into the locating channel

The thing with mosaics is you don't want too deep cement, because if it's a thick bed as you push one down, it squidges up the others and up between the joints and is a PITA to get flat - use the thinnest adhesive layer that is practical.
 
Great, thanks for the useful replies. Got more follow-ups:

Tiles can’t be laid directly to floor boards, need a 6mm hardibacker or similar to prevent movement .
ok. so my spare 6mm warmup insulation boards would work? I could cut that exactly to size and use as base layer. Should the the insulation board be screwed down or adhesive? something thin like no-nails glue.
If tiles meet any other flooring flush it need a metal trim to avoid breaking tile edges when walked on
Understood, the end result should look something like this. It does not look like there is a metal trim but they might have a heath stone supporting the entire area. A metal trim (L-Shaped) would then go inwards for the tiles to sit "inside"? If I can't find any, could I also get away with a flexible wood filler? This will not be a heavy walked over area.
Need a machine tile cutter or a grinder with tile blade to cut .
Better to adjust dimensions to suite tile dimensions to avoid cuts if possible .
No way with manual cutter? I don't think I will want to spend the money for this one time job. The idea is to adjust the area, so I can exactly fit the edge/surround and two-three rows of checkerboard tiles. Everything then will be adjusted inside, where I will need to do a few (diagonal) cuts. The fireplace also has a grate in front (removed for the picture) so a lot of the uneven areas meeting the tiles will not be visible.

You would need to arrange to have the flooring and the tile surface level, so if your flooring is e.g. 8mm laminate + 3 mm underlay, you have 11mm to play with. I wouldn't normally tile on to ply, but a 3mm ply + a little adhesive + those mosaics should be about the same height. Cut the ply to the tile area, fix the plastic channel around.
So the flooring will be engineered hardwood, glued down piece by piece in herringbone. Just checked the sample piece, the wood is about 14mm and then with 4-6mm plywood underneath. So there is a full 20mm in theory to play with. I could either ask them to build around the area and leave it as is (then I have full 20mm), OR they just put the ply down (perhaps even tell them to lay the ply that one full sheet covers the entire area) so then I would have 14-15mm to build up. 6mm ply + 6mm insulation board, tiles are 6mm, leaving ~2mm for adhesive. Would this work? I prefer not to use a trim profile, but just one next to the other similar to that pinterest link above.

The thing with mosaics is you don't want too deep cement, because if it's a thick bed as you push one down, it squidges up the others and up between the joints and is a PITA to get flat - use the thinnest adhesive layer that is practical.
This sounds like crucial advice. Thanks. So if I have the space, would it make sense to "build up" with self leveller, let it fully set and then I should have a hard thin surface for the top tile layer?
 
Sponsored Links
If the wood is that thick it isn't going to flex, so yes, you will be able to do it without a trim. Yes, build up the level under the mosaics to whatever is the correct height for a thin adhesive bed. I'd use cement board if you have any.

You'll find a little wet cutter is ideal for cutting mosaics - much easier than a diamond disk in a grinder https://www.screwfix.com/p/titan-450w-brushless-electric-tile-cutter-240v/100ta
 
OP,
You can use a metal trim as suggested in post #2 - or a traditional, polished wood margin can be used.
The point of using any kind of trim or margin is to distinguish the tiled area from the field, & to protect the edge of the tiles.

You will need to start on a level playing field so perhaps remove the grate & the raised SLC or similar thats inside the fire place opening. Determine how far into the opening you will tile. And dry fit everything.

FWIW: why not consider sanding & polishing the floor boards?
 
No. Use cement board, Nomoreply or hardibacker.
Understood. How can I cut these to size? Requiring angle grinder or can a multitool with decent carbide blade cut through it?
Edit: just checked a video.. ignore this question…

FWIW: why not consider sanding & polishing the floor boards?
We thought about it. Have done this with the reception room and it looks fab. But the boards here are in really really bad shape. 30% of the tongue and grove are broken due to various repairs, very uneven. They are much worse in real than how they look like on pictures.
 
Last edited:
OP,
You can cut Hardibacker etc with an ordinary utility/Stanley knife.
You can cut tiles with, say, a screwfix 956PG tile scribe, and pliers.
You can nibble tiles with pliers.
 
Poster #11,
Maybe you will struggle trying to do the above but I 've never struggled cutting & shaping mosaics or tiles with a scriber.
I've also taught others how to do it, & none of them struggled.
 
I don't even own a scriber I've cut 1000's tiles with a wet cutter. I'll stick to what I know is reliable. Love to see you cut the little glass mosaics with a nibbler....
 
Poster #11,
Maybe you will struggle trying to do the above but I 've never struggled cutting & shaping mosaics or tiles with a scriber.
I've also taught others how to do it, & none of them struggled.
Another school day with ree :LOL:
 

DIYnot Local

Staff member

If you need to find a tradesperson to get your job done, please try our local search below, or if you are doing it yourself you can find suppliers local to you.

Select the supplier or trade you require, enter your location to begin your search.


Are you a trade or supplier? You can create your listing free at DIYnot Local

 
Sponsored Links
Back
Top