My cottage is Victorian. The walls at the side are single-skinned. I have SBR bond, PVA, Tanking Slurry and Liquid Applied DPM available for repair.
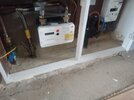
The first photo shows the inside of the meter cupboard which is on a side wall. After having smart meters installed I wanted to improve the interior which was bare brick. I used cement on the walls and floor but now understand that cement will stop the bricks from breathing. I believe this could contribute to potential damp issues. Should I chisel out the cement and replace with hydraulic lime mortar, or leave it be and paint over it with a DPM paint, slurry or PVA?
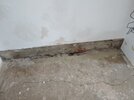
The second photo shows a portion of the lounge wall (single skin of brick) that had some damp issues. I removed the skirting and found the wall to be rather broken up bare brick with some plastic sticking up from the DPM plastic sheet beneath the concrete screed. The edge of the screed is broken where I had to chisel out the wooden grips that were glued in place (for the carpet). My plan is eventually to have an engineered wooden floor. My first instinct was to fill all the gaps and render the wall with cement. I have since learned this is a mistake. So I have chiseled out most of the cement. My dilemma is what to do next. There seem to be two schools of thought. One is that it is an old building and the bricks need to breathe, so I should perhaps only point with hydraulic mortar and try to maintain a gap between the wall and the floor. The other approach is to seal in to prevent damp issues. I have also been advised to use PVA and sharp sand and cement to repair the screed, and then paint with a DPM paint (including the exposed wall). I also cut back the plastic to improve the sealing – but that may have been a mistake too. I would appreciate some clear guidelines as to what to do now to resolve this issue. Let me add one other thing. I also drilled and inserted silicon rods. I now think this also was a mistake. I want to be as thorough as possible and this may mean I have gone too far in the wrong direction!
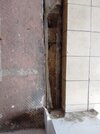
The third and fourth photos show the floor under an arched area between the lounge and the kitchen. The wall is the original back wall of the cottage. At some point an extension was added to incorporate the kitchen including a raised floor. This area is at the centre/heart of the cottage and there have been some damp issues. My plan is to have an engineered floor in the lounge. To prepare for this, I have started to remove the carpet and pull up the wooden grips that were glued to the concrete screed. This meant that the screed became broken up at the edge. It was also very cracked at this point, so I removed the worst. This has exposed what was under the screed where the two rooms join. The kitchen area has bitumen (like roofing material) projecting out, over the plastic sheet under the screed. I cut back the bitumen with a view to repairing the whole section. I am trying to decide what is best to do. The plastic is not sealed (not my fault for a change!), so there may be the means for damp to enter into the wall. I removed some of the soft wall at this point.
My inclination is to paint PVA or SBR over the area and then use sharp sand and cement (and/or a dryish mix of tanking slurry?), and paint over with the DPM. But will this adequately seal the area or just create a barrier for dampness to find its way around? I Would appreciate any clear guidance to resolve these matters. (Can I add here that at another place I drilled and installed some silicon dry rods – but did them from the outside and too low. These may have pierced the plastic membrane under the screed. I could chisel out that small area to check and follow whatever instructions I am given to deal with the problem above.)
The first photo shows the inside of the meter cupboard which is on a side wall. After having smart meters installed I wanted to improve the interior which was bare brick. I used cement on the walls and floor but now understand that cement will stop the bricks from breathing. I believe this could contribute to potential damp issues. Should I chisel out the cement and replace with hydraulic lime mortar, or leave it be and paint over it with a DPM paint, slurry or PVA?
The second photo shows a portion of the lounge wall (single skin of brick) that had some damp issues. I removed the skirting and found the wall to be rather broken up bare brick with some plastic sticking up from the DPM plastic sheet beneath the concrete screed. The edge of the screed is broken where I had to chisel out the wooden grips that were glued in place (for the carpet). My plan is eventually to have an engineered wooden floor. My first instinct was to fill all the gaps and render the wall with cement. I have since learned this is a mistake. So I have chiseled out most of the cement. My dilemma is what to do next. There seem to be two schools of thought. One is that it is an old building and the bricks need to breathe, so I should perhaps only point with hydraulic mortar and try to maintain a gap between the wall and the floor. The other approach is to seal in to prevent damp issues. I have also been advised to use PVA and sharp sand and cement to repair the screed, and then paint with a DPM paint (including the exposed wall). I also cut back the plastic to improve the sealing – but that may have been a mistake too. I would appreciate some clear guidelines as to what to do now to resolve this issue. Let me add one other thing. I also drilled and inserted silicon rods. I now think this also was a mistake. I want to be as thorough as possible and this may mean I have gone too far in the wrong direction!
The third and fourth photos show the floor under an arched area between the lounge and the kitchen. The wall is the original back wall of the cottage. At some point an extension was added to incorporate the kitchen including a raised floor. This area is at the centre/heart of the cottage and there have been some damp issues. My plan is to have an engineered floor in the lounge. To prepare for this, I have started to remove the carpet and pull up the wooden grips that were glued to the concrete screed. This meant that the screed became broken up at the edge. It was also very cracked at this point, so I removed the worst. This has exposed what was under the screed where the two rooms join. The kitchen area has bitumen (like roofing material) projecting out, over the plastic sheet under the screed. I cut back the bitumen with a view to repairing the whole section. I am trying to decide what is best to do. The plastic is not sealed (not my fault for a change!), so there may be the means for damp to enter into the wall. I removed some of the soft wall at this point.
My inclination is to paint PVA or SBR over the area and then use sharp sand and cement (and/or a dryish mix of tanking slurry?), and paint over with the DPM. But will this adequately seal the area or just create a barrier for dampness to find its way around? I Would appreciate any clear guidance to resolve these matters. (Can I add here that at another place I drilled and installed some silicon dry rods – but did them from the outside and too low. These may have pierced the plastic membrane under the screed. I could chisel out that small area to check and follow whatever instructions I am given to deal with the problem above.)