Honeywell ST6400C to Nest Gen3 -

Joined
25 Feb 2025
Messages
16
Reaction score
5
Country
United Kingdom
Hi

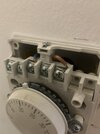
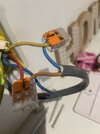
I have a heat only ideal boiler which currently has an old Honeywell ST6400C timer & Thermostat which I wish to upgrade to a Nest Gen3 that I have brought I’ve looked through the forum and seen that the Lives need to be linked across but just to make sure I wire this correct first time could you advise on the correct terminals that the Honeywell transpires across to the nest

Thanks in advance attached is images from my current Honeywell
IMG_0593.jpeg
image.jpg
IMG_0688.jpeg
 
Sponsored Links
The wires go to the terminals that have the same function.

123.jpg

456.jpg


N=N
L = L
1 HW Off =4 Hot Water Satisfied
3 HW On =6 Hot Water Call for Heat
4 CH On = 3 Heating Call for Heat

As you have figured, Nest terminals L, 2 and 5 should be connected together.

The Nest Thermostat is connected to T1 and T2

I don't see an earth connection at the existing programmer, although if it's mounted above a metal box it may be connected to that.

The existing room thermostat should either be set to its maximum setting to prevent it interfering with the Nest, or decommissioned by removing it and making a wiring modification to close the circuit that its removal will have left open.
 
The wires go to the terminals that have the same function.

View attachment 374370
View attachment 374371

N=N
L = L
1 HW Off =4 Hot Water Satisfied
3 HW On =6 Hot Water Call for Heat
4 CH On = 3 Heating Call for Heat

As you have figured, Nest terminals L, 2 and 5 should be connected together.

The Nest Thermostat is connected to T1 and T2

I don't see an earth connection at the existing programmer, although if it's mounted above a metal box it may be connected to that.

The existing room thermostat should either be set to its maximum setting to prevent it interfering with the Nest, or decommissioned by removing it and making a wiring modification to close the circuit that its removal will have left open.
Am I right in thinking

Wire Number 2 from the Honeywell CH OFF does not go anywhere?

I’d rather remove the old stat can I just disconnect the cables from the old thermostat if not what wiring mod would need to be done ?

I am aware that if they could magically connect to T1 and T2 that would be the ideal scenario as that would charge the nest stat however I highly doubt they come back to the old Honeywell programmer I think they’re amongst the wiring next to the hot water cylinder

Your help is much appreciated already!! @stem
 
Sponsored Links
Y-Plan.jpg
This is the basic diagram for Y Plan.
I can't see the white wire where the motorised valve is, so can't see how to identify cables to the thermostat. I would agree using the T1 and T2 connection is best, but there is also a problem identifying the earth. Nest says the earth is only required when using the T1 and T2, this is likely to comply with IET regulations, which state an earth shall be terminated at each fixed appliance. And will likely work without one.

Be careful, the cylinder thermostat needs three wires with Y Plan, I have seen too many times when the cable did not have three power wires, so someone has used a yellow/green wire as a line. So it is easy to in error use what should be earth but is in fact a line.
 
View attachment 374503 This is the basic diagram for Y Plan.
I can't see the white wire where the motorised valve is, so can't see how to identify cables to the thermostat. I would agree using the T1 and T2 connection is best, but there is also a problem identifying the earth. Nest says the earth is only required when using the T1 and T2, this is likely to comply with IET regulations, which state an earth shall be terminated at each fixed appliance. And will likely work without one.

Be careful, the cylinder thermostat needs three wires with Y Plan, I have seen too many times when the cable did not have three power wires, so someone has used a yellow/green wire as a line. So it is easy to in error use what should be earth but is in fact a line.
I’ll have a look again in the wiring for a white wire I think it maybe going into the wago

There is an earth behind the Honeywell programmer and there is a metal back box it would do no harm if I took this earth and also connected it to the nest surely?

I mean could I wire the nest heat link next to the hot water cylinder would this be a better option?


I could trace back and find the original Honeywell stat wires of which there’s only two going into it and use the T1 and T2 connections on the heat link to power and charge the best thermostat ?
 
I’ll have a look again in the wiring for a white wire I think it maybe going into the wago
I believe it isn't a white wire in your case, but instead it's this brown one...
Screenshot_20250226_232521_Chrome.jpg

I could trace back and find the original Honeywell stat wires of which there’s only two going into it and use the T1 and T2 connections on the heat link to power and charge the best thermostat ?
Could you show us the wiring behind the thermostat?
I believe the stat wires are probably connected to the ST6400c, with a triple and earth cable - blue being neutral, red being live and yellow being the switched live - this being connected to another yellow in the terminal block behind the ST6400c?
 
Yes course I relocated the stat so extended the wires a few years ago so it’s yellow and red that are being used and fed over to the blue and brown

Let me know if you need anything else
 

Attachments

  • IMG_0712.jpeg
    IMG_0712.jpeg
    197.3 KB · Views: 13
  • IMG_0713.jpeg
    IMG_0713.jpeg
    141.6 KB · Views: 15
so it’s yellow and red that are being used and fed over to the blue and brown
Then behind the ST6400C, if you follow the red wire from terminal 4, it should come out of a red, yellow and blue triple and earth cable.
If you follow the yellow wire from this cable, I believe it links to another (yellow?) wire in a separate terminal block.
As proof that this cable is the one to the stat, you could disconnect the red wire from terminal 4 (safely isolate it), and place the other wire from the separate block into terminal 4.
Theoretically, this should fire the boiler when the heating is timed at the ST6400C, without any input from the stat.

If the above doesn't make sense, or the wire colours are different, let us know before proceeding with anything.

Just to note...
When you extended the wiring to the existing stat, the blue wire should have also been wago'd as it is still connected to Neutral at the ST6400C, this could lead to nuisance trips, the dial stat also would have performed slightly better if it had a neutral connection.
 
ld fire the boiler when
Then behind the ST6400C, if you follow the red wire from terminal 4, it should come out of a red, yellow and blue triple and earth cable.
If you follow the yellow wire from this cable, I believe it links to another (yellow?) wire in a separate terminal block.
As proof that this cable is the one to the stat, you could disconnect the red wire from terminal 4 (safely isolate it), and place the other wire from the separate block into terminal 4.
Theoretically, this should fire the boiler when the heating is timed at the ST6400C, without any input from the stat.

If the above doesn't make sense, or the wire colours are different, let us know before proceeding with anything.

Just to note...
When you extended the wiring to the existing stat, the blue wire should have also been wago'd as it is still connected to Neutral at the ST6400C, this could lead to nuisance trips, the dial stat also would have performed slightly better if it had a neutral connection.
OK - The Stat only ever had the two cables connected so i just copied the ones it was using.

So if i can trace the cables back to the Stat that are behind the ST6400 i assume I should be able to use these as my T1 / T2 to the new NEST stat?
 
I'll report back and photograph it for anyone who may need it for future ref! Thanks for your help!
 
Ok here’s where I am with it

I’ve Wago’d all the Neutrals into one and all the Lives into another

I am certain that the blue and yellow wires here are going to the wall stat but what is the grey white cable and where will that eventually go

There is also two yellow cables I know one will be for the wall stat but what about the remaining one?
IMG_0734.jpeg
 
Ok here’s where I am with it
Well, you seemed to have jumped a few steps from what has been suggested!

Let's try and confirm a few things before going any further....
Then behind the ST6400C, if you follow the red wire from terminal 4, it should come out of a red, yellow and blue triple and earth cable.
If you follow the yellow wire from this cable, I believe it links to another (yellow?) wire in a separate terminal block.
I.e. does the red wire from terminal 4, come from the same cable as one of the yellows in the terminal block?

There is also two yellow cables I know one will be for the wall stat but what about the remaining one?
If the above can be confirmed, the other yellow wire probably connects to the brown wire in the second terminal of the wiring centre (refer to @ericmark's wiring diagram) - if you can also confirm...
I believe it isn't a white wire in your case, but instead it's this brown one...
I.e. is there a brown wire from your motorised valve, and not a white one?

But rather than jump ahead, I still would have tried the following to prove the wiring is correct...
As proof that this cable is the one to the stat, you could disconnect the red wire from terminal 4 (safely isolate it), and place the other wire from the separate block into terminal 4.
Theoretically, this should fire the boiler when the heating is timed at the ST6400C, without any input from the stat.


what is the grey white cable and where will that eventually go
The grey wire appears to be the switched live going to the boiler. The red wire connected to it in the terminal block, probably joins to the orange wire in the first terminal of the wiring centre.
 

DIYnot Local

Staff member

If you need to find a tradesperson to get your job done, please try our local search below, or if you are doing it yourself you can find suppliers local to you.

Select the supplier or trade you require, enter your location to begin your search.


Are you a trade or supplier? You can create your listing free at DIYnot Local

 
Sponsored Links
Back
Top