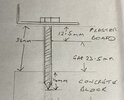
Have just purchased a new and very heavy vertical radiator complete with fixings and have got to hang it before the plumber comes to connect it in a few weeks time. The plasterboard is fixed to the wall with what appears to be random blobs of adhesive but at the height the brackets have to be fitted there are no adhesive blobs just a space between the concrete blocks and the plasterboard. I'm not quite sure how to tackle this and would welcome advice.
You are using an out of date browser. It may not display this or other websites correctly.
You should upgrade or use an alternative browser.
You should upgrade or use an alternative browser.
Installing a Vertical Radiator
- Thread starter bolo 2
- Start date
Sponsored Links
- Joined
- 8 May 2017
- Messages
- 9,812
- Reaction score
- 2,498
- Country

Drill thru p/ board and into block ,and resin bond anchors into the block .
As terryplumb said.
Throw away whatever fixings came with the radiator and use anchors with resin.
You don't want that big mf to fall off the wall!
Throw away whatever fixings came with the radiator and use anchors with resin.
You don't want that big mf to fall off the wall!
You have what is called dot and dab, dont even think about using plasterboard fixings, as everyone else drill through and fix into the blocks
Sponsored Links
Send the rad back, they're a waste of time as far as space heating is concerned.Have just purchased a new and very heavy vertical radiator complete with fixings and have got to hang it before the plumber comes to connect it in a few weeks time.
Only way I've ever found to be absolutely sure with fixing these heavy buggers is to cut a letterbox section out of the plasterboard where the brackets will sit, then screw plywood or an other suitably sized wood section to fill the gap so it sits back almost level with the plasterboard. Cover with some plaster/filler so the cuts are hidden and it's back level, then paint. That then gives a really secure and stable fixing/mounting point.
I've found that other methods still leave a void between the wall and the plasterboard, then in my experience it is very easy to overtighten the brackets and then crack/burst through the plasterboard and then the brackets become loose or even when the rad is placed onto the bracket then the bracket bursts through the wall of it's own accord. Repaired quite a few like that.
Do make sure its sized correctly for the room at the ΔT your heating system is set to. Eg my condensing systems is ΔT 40°C so look at the correct heat output for the rad and ensure it throws enough heat out. My tiny bathroom needed a 6ft double vertical radSend the rad back, they're a waste of time as far as space heating is concerned.
Drylinepro fixings. They're designed to allow your fixing to be secured to the blockwork behind the plasterboard but fill the gap between the plasterboard and the blockwork to prevent the plasterboard being crushed.

 www.drylinepro.com
DrylinePro™ :: The complete dry lined wall fixing solution
Fix items to dry lined walls quickly, easily and securely with DrylinePro.DrylinePro™ is the ultimate fixing for dry lined walls. With an incredible strength, this fixing is what you need for fixing
If it is a column radiator, then depending on the size of the room, it will take a lot longer to heat the space compared to a convection radiator. Especially in larger spaces they less efficient when it comes to space heating. The usual is to match the heat output to the heir old convection rads or through a heat loss calculation though pound for pound the output might be the same/correct but the time it takes to heat the room space is vastly different.ensure it throws enough heat out
Column rads run at 70>80% radiation 20>30% convection, standard radiators are 90% convection 10% radiation, the latter will heat the space faster. Don't get me wrong column rads do heat the space, they're just not as efficient at doing it. A lot of sellers claim that due to the larger surface area they are efficient but I can cite many real life cases where column rads replaced convection against advice and I've been back months later to pull them out and replace them with flat panel convection rads because the customer wasn't happy about how long it took to heat the space.
The old large cast columns were great at heating but they were huge for a reason
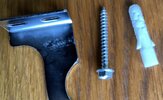
Thanks for all the replies.I have attached 2 images, the first showing the fittings supplied and the second my attempt to show the situ diagrammatically. With my limited ability, I have decided to go for the cutting of a letter box section using plywood to bridge the gap and using a longer screw to add strength to the fixing. I won't be tackling this until next week and would therefore welcome any further comments.


14mm screw in the block will pull straight out.
Either use the corefix fixings mentioned above or if your cutting the board make an opening big enough to put a bit of 3x2 cls in, screw the cls to the block with 80mm screws into brown plugs, glue or screw the piece of plasterboard back in then screw your rad brackets to the cls with the supplied fixings, then make good the cuts with filler
Either use the corefix fixings mentioned above or if your cutting the board make an opening big enough to put a bit of 3x2 cls in, screw the cls to the block with 80mm screws into brown plugs, glue or screw the piece of plasterboard back in then screw your rad brackets to the cls with the supplied fixings, then make good the cuts with filler
Those corefix look ok, never used them though so can't comment on how good they are.
Cant agree with the 3x2 tho - a 3x2 is 50mm wide and you only have 35mm to play with - even 2x1 might be too wide and still use the cut P/Board ... I'd use a piece of 22mm ply with 4 of 5x60mm screws into blue plugs in the block will give you plenty of support. Then fit the plasterboard back on top of that and cover the couple of mm left with filler.
Then drill 8mm x 70mm holes through the P/board>wood into the block behind, knock in blue plugs and then punch them through the wood into the block with 5x70mm screws, that will end up plenty strong to hold the rad.
DIYnot Local
Staff member
If you need to find a tradesperson to get your job done, please try our local search below, or if you are doing it yourself you can find suppliers local to you.
Select the supplier or trade you require, enter your location to begin your search.
Please select a service and enter a location to continue...
Are you a trade or supplier? You can create your listing free at DIYnot Local
Sponsored Links
Similar threads
- Replies
- 10
- Views
- 4K
G
- Replies
- 7
- Views
- 3K
- Replies
- 1
- Views
- 1K
