OP,
1. Ref the plates, I had earlier noticed & referred to them - I was of the understanding that you were going to do more clearance/digging work, & then post fresh pics?
2. The plates will have to be removed - demolish the "humped wall" & plate at the bay, & replace with a carrier beam spanning the bay opening.
3. Demolish the room centred plate, and replace it with a carrier beam.
4. Dig out under the new beams to allow for more ventilation. Three a/b's are needed in the bay.
5. The finished hearth is sitting on soil - it will need trimming - & possibly, your call, digging out?
6. The last two pics show dry rot - remove bricks & mortar either side of the pocket, and clean out and soak with fungicide - do this with any suspect pockets.
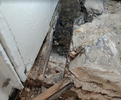
7. There's a ground, a nailing length of timber running at skirting height, close up pics needed near the door?
8. If you disturb the door frame - even a few mm's you might then have opening & closing difficulties.
The nail puller or "Cat's Paw" has been a standard in framing carpenters tool bags for many years. They are made by all the large tool Mfr's. A cats paw & a mini flat bar in the tool bag will deal with most difficulties.
1. Ref the plates, I had earlier noticed & referred to them - I was of the understanding that you were going to do more clearance/digging work, & then post fresh pics?
2. The plates will have to be removed - demolish the "humped wall" & plate at the bay, & replace with a carrier beam spanning the bay opening.
3. Demolish the room centred plate, and replace it with a carrier beam.
4. Dig out under the new beams to allow for more ventilation. Three a/b's are needed in the bay.
5. The finished hearth is sitting on soil - it will need trimming - & possibly, your call, digging out?
6. The last two pics show dry rot - remove bricks & mortar either side of the pocket, and clean out and soak with fungicide - do this with any suspect pockets.
7. There's a ground, a nailing length of timber running at skirting height, close up pics needed near the door?
8. If you disturb the door frame - even a few mm's you might then have opening & closing difficulties.
The nail puller or "Cat's Paw" has been a standard in framing carpenters tool bags for many years. They are made by all the large tool Mfr's. A cats paw & a mini flat bar in the tool bag will deal with most difficulties.