
Can anyone help. Our shower is leaking I’ve removed the bath panel and it’s dripping. When the shower is turned on it does not leak it’s only when you spray it on the tiles. I got someone out who removed all the silicone and replaced it all, it’s still leaking, he came back and removed the corner section but it’s still leaking. If I spray water up to the top of the silicone it doesn’t leak but as soon as it hit the tiles it starts again. He has been out again and taken the silicone higher but it is still doing it as soon as it hits the tiles. The grouting is all fine we are totally confused. The guy says he will come back again and strip the whole lot out but I can’t see how it would help. Has anyone come across this before? Any advice would be gratefully appreciated

Leaking shower
- Thread starter Corinnem
- Start date
Sounds like you've got a clown on the job, redid some silicone and then came back and redid a bit and then added even more. Clearly either the grout or the silicone is leaking. Got some photos?
He seems genuine to be fair, says he will strip the whole lot out and do it again.
The house is a new build and didn’t have a shower over the bath we got a shower put in and now I’ve got a horrible feeling they just plonked the tiles straight onto the plasterboard

The house is a new build and didn’t have a shower over the bath we got a shower put in and now I’ve got a horrible feeling they just plonked the tiles straight onto the plasterboard
Attachments
Wow that silicone is a sure sign he is not very capable, that silicone joint should only be 2-3mm or thereabouts. Where is it leaking from underneath? Are you saying it only starts leaking once you spray into the grout lines?
Have a proper read through this thread especially my first post on the second page https://www.diynot.com/diy/threads/mystery-leaking-tiles-any-advice.632863/
Have a proper read through this thread especially my first post on the second page https://www.diynot.com/diy/threads/mystery-leaking-tiles-any-advice.632863/
Yeah it’s leaking underneath. He did put a small amount of silicone on then took it all out and put a deeper layer.
As soon as I spray water straight onto the tile that’s when it comes through, I’ve even just sprayed it on to the tiles directly making sure I didn’t get any on the grout and it comes through immediately. Would water come through instantly as soon as it hits the tile?
I’m guessing it could be the fact that there was no waterproofing done before the tiles were put on. Could you recommend a spray that I could get to see if that stops it, and if it does I guess I’ll have to get them taken off and done again. Thanks for your help by the way
Firstly, and I know I’m going to be controversial here, there is nothing wrong with tiling straight onto Plasterboard. IF the proper procedures are applied correctly, and the new Plasterboard is SBR’d, then the correct adhesive used and applied correctly, the tiles applied correctly, and the correct grout mixed and applied properly, then the resulting job will be waterproof.
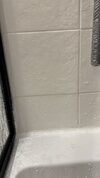
Sure, the siliconing looks a bit messy, but the top leg and the bottom leg of it look stuck to the tile and bath respectively, so that’s not leaking. ( and the correct throat thickness siliconing tool to use is 8mm - forget the 2 to 3 mm nonsense)
I would say its quite obvious what the cause of the leak is here - if you look at the bottom 3 rows of tiles in the first photo, given the ‘lipping’ and the shadows it is throwing, the tiles around that lower valve are NOT STUCK to the wall.
Give all the tiles on that wall a tap with your knuckles - the bottom rows will sound hollow.
A bit messy, 8mm lol! 2-3mm is perfectly doable assuming the gap is minimal.Sure, the siliconing looks a bit messy, but the top leg and the bottom leg of it look stuck to the tile and bath respectively, so that’s not leaking. ( and the correct throat thickness siliconing tool to use is 8mm - forget the 2 to 3 mm nonsense)
Yes, the bottom half needs retiled. Now that we’ve established the ‘how’ is this leaking, we need to address the ‘why’ ?
It’s hard to say being remote, but my money is on that copper ( I hope ) connection for the lower valve being ‘ too proud’. The tiler is trying to help the plumber out, but the set up is all wrong. Unfortunately the bottom three rows, and the valve, have to come off.
It’s hard to say being remote, but my money is on that copper ( I hope ) connection for the lower valve being ‘ too proud’. The tiler is trying to help the plumber out, but the set up is all wrong. Unfortunately the bottom three rows, and the valve, have to come off.
And if it’s re-siliconed at 2-3 mm then it’s not done properly
It appears you may already have found the source of the leak but if not it would be useful to use a process of elimination to determine exactly where the leak is.
1. Using the hand held shower carefully apply water to the silicone area where the bath meets the tiles - if no leak try 2
2. Carefully apply water to the area where the shower screen meets the tiles - if no leak try 3
3. Apply water to the lower valve area - if no leak try 4
5. Apply water to shower valve
Good luck and hope you get it sorted.
DIYnot Local
Staff member
If you need to find a tradesperson to get your job done, please try our local search below, or if you are doing it yourself you can find suppliers local to you.
Select the supplier or trade you require, enter your location to begin your search.
Please select a service and enter a location to continue...
Are you a trade or supplier? You can create your listing free at DIYnot Local