You are using an out of date browser. It may not display this or other websites correctly.
You should upgrade or use an alternative browser.
You should upgrade or use an alternative browser.
Screed over fresh concrete
- Thread starter Tonythecat
- Start date
- Joined
- 2 Feb 2024
- Messages
- 94
- Reaction score
- 3
- Country

Ok so my head is full of dilemmas. So I used sbs bond to reface some crumbling concrete window sills and applied a thin skip of screed (about 3mm) before painting. This has held for years so I know it's a good product my issue is that because the hearth will go right back and the stove will sit on top then will the bond be afected by the heat in anywayDamp concrete will actually help screed to stick to it by controlling the initial drying and then setting.
However 30mm thick is a bit thin. You'll need to ensure it's given extra help by way of SBR or a proprietary bonding agent, and maybe cover it to prevent rapid drying.
- Joined
- 2 Feb 2024
- Messages
- 94
- Reaction score
- 3
- Country

Thanks for the reply. Ok so the stove is a cassette type. Most of these heat the hearth to 100 degrees or above. (As opposed to stoves in legs which don't heat to above 100) So this is what is worrying me having said that the bond layer would be approx 50mm below the surface as the screed will be 30mm plus tile and adhesive on top. Also that is a good point about open fires. I'm prone to overthinking things so maybe bond and then a 4.1 screed will be absolutely fineThe heat from a stove on legs shouldn't be a problem. Sand/cement was used for the back hearth for open fires, and the heat from those was directly on them.
- Joined
- 2 Feb 2024
- Messages
- 94
- Reaction score
- 3
- Country

Thanks for the reply. Ok so the stove is a cassette type. Most of these heat the hearth to 100 degrees or above. (As opposed to stoves in legs which don't heat to above 100) So this is what is worrying me having said that the bond layer would be approx 50mm below the surface as the screed will be 30mm plus tile and adhesive on top. Also that is a good point about open fires. I'm prone to overthinking things so maybe bond and then a 4.1 screed will be absolutely fine
Yes I have someHave you got any SBR handy?
Oh, a hearth.
Vaccuum the surface with a brush attachment remove all loose stuff, brush your SBR on, and I'd be inclined to brush on a cement slurry too to fill the uneven surface that screed would not get into. Mix your screed a bit wetter than normal with what, half a cup of SBR and just lay it. Compact the base layer to ensure its all even and in contact with the concrete.
When it's starting to set and the surface has hardened, throw a bit of polythene over it for a week or so, or a cotton sheet but keep it damp.
- Joined
- 2 Feb 2024
- Messages
- 94
- Reaction score
- 3
- Country

Thanks very much for the info it's much appreciated I'll use a straight edge to level it off but should I float the surface as it starts to stiffen of just leave it.would floating give a harder final surface plus is 4.1 the best ratio for thisOh, a hearth.
Vaccuum the surface with a brush attachment remove all loose stuff, brush your SBR on, and I'd be inclined to brush on a cement slurry too to fill the uneven surface that screed would not get into. Mix your screed a bit wetter than normal with what, half a cup of SBR and just lay it. Compact the base layer to ensure its all even and in contact with the concrete.
When it's starting to set and the surface has hardened, throw a bit of polythene over it for a week or so, or a cotton sheet but keep it damp.
Last edited:
It wont really matter for this little bit of floor. The hardness of the surface is not the issue, rather it's the bonding. Do whatever you feel comfortable with or able to do to get a flat surface - if you have a wooden or plastic screed float fine use that, if not use a metal float. 4:1 will be OK, just make sure its well mixed.Thanks very much for the info it's much appreciated I'll use a straight edge to level it off but should I float the surface as it starts to stiffen of just leave it.would floating give a harder final surface plus is 4.1 the best ratio for this
- Joined
- 2 Feb 2024
- Messages
- 94
- Reaction score
- 3
- Country

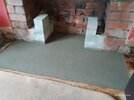
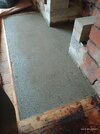
Just got round to sorting this. Did 4.1 mix. Fairly wet with cement and SBS slurry first. Left it to stiffen up a bit and then leveled off the surface with a straight edge. Had wet towels over it for last four days to stop it drying too quickly. All looking good so far so thanks for all the advice that was previously given to me it's much appreciated
Attachments
DIYnot Local
Staff member
If you need to find a tradesperson to get your job done, please try our local search below, or if you are doing it yourself you can find suppliers local to you.
Select the supplier or trade you require, enter your location to begin your search.
Please select a service and enter a location to continue...
Are you a trade or supplier? You can create your listing free at DIYnot Local


