Hi all
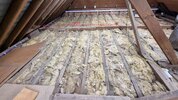
I’m trying to make the loft ready for light storage but have seen that a few of the ceiling joists have pulled away from one ceiling binder. It’s a 1930s bungalow, so guessing this is due to movement in timbers and possibly joists being walked on over the years. The binder in question (Binder 3 in Floor Plan) is 6.4M long and it traverses two bedrooms with an internal wall supporting the middle of its span, but essentially the section with issues that spans Bedroom 1 is only 3.2M. It’s only the Bedroom 1 area I’m concerned with.
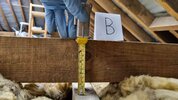
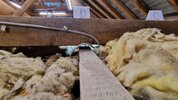
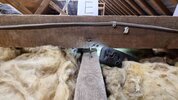
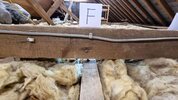
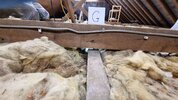
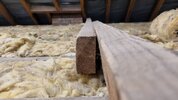
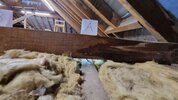
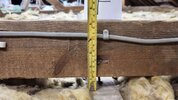
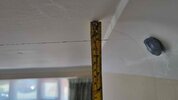
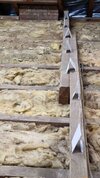
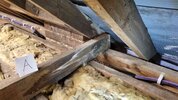
The binder is constructed from 2 lengths of 4 x 2 with one 5.2M length overlap joined to a second shorter piece. The largest section is still nailed down tight to the Joists over Bedroom 2, but it starts to warp when it gets to Bedroom 1, ending up with a 13° twist at its end, also probably contributing to the binder separating. The overlap joint also now looks a bit out of line/ropey also partly due to the twisting action perhaps. The worst gap between the binder and a one joist is about 28mm (# 4 in plan and ”B” in photo). There is also a deflection in the ceiling plasterboard underneath where the binder runs.
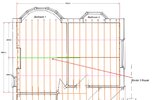
Luckily, I was able to get hold the floor plan which I’ve added all the joists and binders to, illustrating the layout pretty accurately. The joists are light brown and the binders are dark brown in the plan.
I was planning to install a couple of additional binders either side (marked in violate) to help stiffen the bedrooms' joists up before I realised this binder would be an issue. However, I now think sorting this binder out is priority before any additional reinforcement is added.
I know 4 x 2 joists spanning 4.8M isn’t ideal but it doesn’t seem too hollow sounding under foot and the joist centres are just under 400mm at 14 ¾”. I was reckoning that with two more binders and maybe some lightish 15mm ply as loft flooring to reduce flex, it might be adequate as it's not a habitable space.
Also, presumably if the suspect binder is under tension and acting to prevent roof spread, it would be an advantage to install the additional binders while the ceiling was still jacked up to “level”?
I’d be interested in anyone’s take on a good way to deal with this binder or anything else for that matter? In my head, I’m wondering if you’d be able to do the following:
(Please see Binder 3 Repair.jpg – new timber added is coloured green)
Apologies for the mammoth post, but would appreciate your thoughts.
Cheers
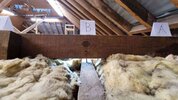
General Background - It’s a Purlin Roof, 6 X 4 Purlins, 4 x 2 ceiling joists spaced at 14 ¾” running at 90° to the 4 x 2 rafters. There are two diagonal struts from the tops of central internal walls to near the midpoint of each the two longest purlins and two more struts at each end supporting the two shortest purlins in the same way. There is also one collar tie at each end of the roof. One end of Binder 3 is nailed to one rafter and joists 1 & 2, the other end, to one rafter and joists 18 and 19.
I’m trying to make the loft ready for light storage but have seen that a few of the ceiling joists have pulled away from one ceiling binder. It’s a 1930s bungalow, so guessing this is due to movement in timbers and possibly joists being walked on over the years. The binder in question (Binder 3 in Floor Plan) is 6.4M long and it traverses two bedrooms with an internal wall supporting the middle of its span, but essentially the section with issues that spans Bedroom 1 is only 3.2M. It’s only the Bedroom 1 area I’m concerned with.
The binder is constructed from 2 lengths of 4 x 2 with one 5.2M length overlap joined to a second shorter piece. The largest section is still nailed down tight to the Joists over Bedroom 2, but it starts to warp when it gets to Bedroom 1, ending up with a 13° twist at its end, also probably contributing to the binder separating. The overlap joint also now looks a bit out of line/ropey also partly due to the twisting action perhaps. The worst gap between the binder and a one joist is about 28mm (# 4 in plan and ”B” in photo). There is also a deflection in the ceiling plasterboard underneath where the binder runs.
Luckily, I was able to get hold the floor plan which I’ve added all the joists and binders to, illustrating the layout pretty accurately. The joists are light brown and the binders are dark brown in the plan.
I was planning to install a couple of additional binders either side (marked in violate) to help stiffen the bedrooms' joists up before I realised this binder would be an issue. However, I now think sorting this binder out is priority before any additional reinforcement is added.
I know 4 x 2 joists spanning 4.8M isn’t ideal but it doesn’t seem too hollow sounding under foot and the joist centres are just under 400mm at 14 ¾”. I was reckoning that with two more binders and maybe some lightish 15mm ply as loft flooring to reduce flex, it might be adequate as it's not a habitable space.
Also, presumably if the suspect binder is under tension and acting to prevent roof spread, it would be an advantage to install the additional binders while the ceiling was still jacked up to “level”?
I’d be interested in anyone’s take on a good way to deal with this binder or anything else for that matter? In my head, I’m wondering if you’d be able to do the following:
(Please see Binder 3 Repair.jpg – new timber added is coloured green)
- Support (acrow up) the ceiling of Bedroom 1 from below along the line of the binder
- Cut the binder between joist 8 and 9 (where it’s only very slightly twisted)
- Remove the old section to the left of the cut (sitting on joists 1-8) over bedroom 1
- Replace the removed section with a new piece of 4 x 2 C24 with a sufficiently long overlap joint located above the central wall, using the appropriate fixings/hardware
Apologies for the mammoth post, but would appreciate your thoughts.
Cheers
General Background - It’s a Purlin Roof, 6 X 4 Purlins, 4 x 2 ceiling joists spaced at 14 ¾” running at 90° to the 4 x 2 rafters. There are two diagonal struts from the tops of central internal walls to near the midpoint of each the two longest purlins and two more struts at each end supporting the two shortest purlins in the same way. There is also one collar tie at each end of the roof. One end of Binder 3 is nailed to one rafter and joists 1 & 2, the other end, to one rafter and joists 18 and 19.
Attachments
-
 Loftspace - 3.jpg401 KB · Views: 88
 -
 Bindgap - 8.jpg240 KB · Views: 75
 -
 Bindgap - 9.jpg269.8 KB · Views: 60
 -
 Bindgap - 13a.jpg232.7 KB · Views: 61
 -
 CeilingDeflect - 3.jpg120.7 KB · Views: 64
 -
 CeilingDeflect - 5.jpg123.7 KB · Views: 59
 -
 Bindtwist - 4.jpg355.1 KB · Views: 62
 -
 Bindend - 2.jpg345.8 KB · Views: 69
 -
 Binder 3 Repair.JPG105.9 KB · Views: 72
 -
Floor Plan.pdf256.6 KB · Views: 72