Suspended floor joists and damp

OP,
Why not post pics of the outside showing air bricks, ground levels, DPC line & gullies?
And show the damaged corners of the room on your floor plan?
Did you knock off wall plaster well above any dry rot signs on the bricks?
Have you yet treated anything - masonry or timber with anti-fungal chemicals?
The treated room FFL must end up level with the FFL in the next room.
All joist carcassing is typical 400mm c/c - have you replaced all the joists? Do you intend to?

As regards the c/breast front hearth from your other post pic it seems best to lift out all the loose hearth brickwork and any filler.
Clean up all the debris and rubble and post a pic of whats exposed - it looks like some version of a timber joist trimmed hearth/chimney breast?
 
Last edited:
Sponsored Links
1681314812638.png


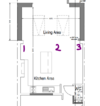
Here is another floorplan. Corner 1 is the area that was damaged, but shows no signs of damp since I cleared out the mess that was down there. Corner 2 continues to have a damp issue, though I think I have figured out why. More on this later.

There is only one air brick, which I have marked on the floor plan with the purple dash under the dining room window. You can just about make this out from the outside, under the window.

IMG_2433.jpg


Here are some more pictures from the outside, with the "Not Surveyed" being the original outside WC (which has no roof or door, so is pretty much 'outside'). The exposed WC is raised as can be seen in these pictures.

IMG_2434.jpg

IMG_2435.jpg


The above image of the outside WC backs on to corner 1 of the floorplan - despite there being a lot of rot in the joists there, I think this was down the rubble/concrete/general crap build up and resulting poor air circulation - and now I have taken this all out, there doesn't seem to be much damp in the floor area (there is some, but it doesn't seem to spread across the dirt floor, its just a bit damp up to DPC level and on the soil behind the dwarf wall).

This is not the case in corner 2, where the inside is visibly damp these last few weeks with the rain. You will see in the below image, I have now removed the joists - it looks like that dwarf/sleeper wall (can somebody put me out of my misery and let me know what I should call it please?) will need rebuilding as when I removed the timber from the top, the bricks were very loose. In fact, most of the area has a serious lack of cement between the bricks... 100 years of damp perhaps caused it to crumble out?

IMG_2274.jpg
 
In terms of what is causing this damp.. you will have seen the puddle on the concrete slab in my first picture of the previous post - there is also some kind of drainage that is open to the right of the back door, runs under concrete for a short while, then open again and is supposed to drain into the soil/waste drain.
IMG_2364.jpg

The covered bit is definitely blocked..
IMG_2365.jpg


I tried to push the dirt through but it wasn't moving, so got the angle grinder out and can see that under the cement there is a slate layer, with compacted soil underneath it.

IMG_2367.jpg
IMG_2436.jpg


It is raining now, and as you can see, that trough is full of water - which is surely soaking through into the kitchen (which has a cement floor), up the adjoining wall into the dining room and troublesome corner 2? I am thinking I should continue cutting away the cement parallel with to door to create an open gutter and see if this reduces the damp in corner 2?

Incidentally, the wall separating the kitchen and dining room at corner 2 is in a bad way.

IMG_2276.jpg


Which probably explains the big cracks in that wall, and the in the room above it.

Somewhere in there there I found the rotted remains of an upright piece of timber that looks like it goes up through the wall- around about where those bricks are collapsed.

I should probably also mention that the soil pipe collar is also cracked which is causing a leak, which I also think is soaking through into the other corner of the kitchen (Corner 3 if you will) AND that all of this will be addressed - the plan is for the entire rear of the house to come off, as well as the wall separating the kitchen and dining room, as per the below.

1681317111999.png
 

Attachments

  • 1681316939458.png
    1681316939458.png
    41.6 KB · Views: 61
Last edited:
You’ve got a few things going on, all of which I’ve had in a previous old house.

Firstly, think your new floor, will need a deeper timber size than the 100mm you are proposing. You can stop some of the bounce by putting spurs/posts down, similar to decking and or building a honeycombed sleeper wall to make the spans shorter and reduce bounce.

Maybe putting in solid floors might be an option (are you doing all downstairs?)

The shonky brickwork can be expected in older properties, something could have dropped, but it just looks like they couldn’t be bothered!

Outside, the concrete patio wants either chopping back from the house, or removing entirely, as it’s probably above the recommended 150mm from DPC to ground level. You may have leaking drains, not costly to redo yourself.

There’s a lot to look at, and it’s easy to get ‘down’ about it all, this happened to me on my last renovation, but keep chipping away, you can turn this around.
 
Sponsored Links
That’s reassuring, appreciate it! To be honest I’m not too down yet; I had a fairly good idea of the size and kind of task I was taking on, even if I’m still working out exactly what the issues are.

Somebody else has suggested posts to support the midspan and reduce bounce, though now I know I’m rebuilding the dwarf wall, maybe better and studier just to build two more at the same time. Would I need to dig out a foundation for this, or okay to just go straight into the compacted dirt? The original dwarf walls appear to just be on the dirt. I was then planning to lay down some DPM and I happen to have about 1000kg of round stones and pebbles I’ve sieved out of my garden so was thinking of laying that on top of the DPM rather than pouring 50mm concrete? I’m not doing the whole downstairs yet, maybe at all (it feels a lot more solid at the front so hoping I won’t need to strip it back quite so far!), and the cavity I’d need to fill is huge so I prefer not to go for a solid floor.

Interesting you say about about the brickwork - I did think it looked like there’s a half brick in there and no signs anything fell out recently so suspected it may have always been like that - but wasn’t sure and some of the brickwork is very loose to the touch so I’m glad that wall will be coming down quite soon.

It sounds like you agree with my theories about where the damp is coming from. I will cut a strip between the ‘patio’ and the house and see if we see some improvement on corner 2.

Patio will eventually come out when extension goes in, likewise drain repaired when it is moved.

Thanks for the advice and reassurance, it’s much appreciated!
 
Last edited:
Think the reason for oversite concrete is to stop weeds and vermin coming up under your floor.
Thousands of houses are just soil underneath, so DPM and stones would be an improvement to leaving it.

Good luck with it all.
 
I lowered the suspended floor in a room by knocking off the top layer of bricks on the sleeper walls and re-levelling - I'd recommend doing that to get deeper joists in, and put in a new sleeper wall where it's shared, or cut out the top of one side of the existing shared wall. Make sure you've DPM between every timber and brickwork connection.

I'd increase ventilation under the floor if you can, especially in damper corners.

Make sure whatever you go with in terms of insulation, that you stop draughts coming up - I used loft roll, with a membrane between floorboards and and joists - it works well.
 
I’ll asses the feasibility of doing that with the sleeper walls, whether rebuilding shorter or adjusting what’s already there. I guess removing one brick and some mortar would mean about 70mm more so you could pretty much get a 7” joist in.. also means more space for insulation.

So did you do netting, loft roll, and then a membrane (life a roofing membrane I assume?) over the top? I was planning to put sheets of osb or ply down with an engineered floor on top so don’t think draughts will be too much of an issue to be honest.
 
Think the reason for oversite concrete is to stop weeds and vermin coming up under your floor.
Thousands of houses are just soil underneath, so DPM and stones would be an improvement to leaving it.

Good luck with it all.

Hmm I wonder if the garden stones aren't a great idea then due to roots/weeds amongst them. Somebody previously mentioned using gravel instead of concrete so I thought this was a great way to avoid paying for a skip and buying gravel - guess I could toast them with a weed burner before bringing them inside!
 
Hmm I wonder if the garden stones aren't a great idea then due to roots/weeds amongst them. Somebody previously mentioned using gravel instead of concrete so I thought this was a great way to avoid paying for a skip and buying gravel - guess I could toast them with a weed burner before bringing them inside!
Sorry, I was assuming they were clean pebbles.

Yes, if there is soil/weeds in it, don’t use those.

Find a local aggregate geezer who can drop you a tonne or two of aggregate or something, it works out cheaper than the bulk bags that are not a tonne.

With regard to insulation, I used orange barrier mesh fixed to underside of joists, then full fill of rockwool, try not to compress it. Then used a building paper on top, before floorboards went down. I would have used PIR if it was cheaper, but probably some rockwool around the edges where PIR is difficult to install.

I also added airvents and unblocked the others, I also knocked the odd brick out of internal walls, so ventilation can enter on any wall and exit via any wall. I used 147x47 joists, and the odd post here and there, and added some brick sleeper walls, with a spade’s depth footing (overkill probably).

Use DPM/DPC before you sit any wood onto or into any masonry, especially joist ends in the wall.
 
Looks a lot like my 1930s bungalow.
All one side with rotten and worm ridden. Air bricks were blocked up, loads of dirt on the floors, and concrete path built up.
I removed the concrete and dug down to original levels, then dug a deeper trench along the side of the house, and filled all with shingle.
Added more air bricks too.
Changed some brick ones for new plastic, which apparently have improved airflow.
And replaced a load of joists, then treated all wood with loads of Everbuild triple action wood treatment.

Key is to stop the dampness getting in, so that is lowering outside levels and improving ventilation.

The end result might not be 100% perfect, but should last another 80 years.

I insulated with a combination of PIR boards and rockwool in places - I think the best combo was 50mm PIR and 50mm acoustic insulation rockwool (acoustic wasn't important, just the thickness was handy).

Happy memories!

AJFCJaUnQtoP3Y844P3Z6rtFMn5HkCwYbtl6Puy0Txm-QK-Hj3qkLHgzr6iI24tSucyyRudcj80W8OE4hZBIJWKOEWF_PDKZzJQfjKLRsBvGDKDW27JXSPNRu5y4obV3C4pxc5DOsy0VGeqjxSuVWbmlA37Zl526nfo5SP3hgmsi1vF8FX2gIznj7Phd6gKSnPgTf4TSSLhg8xyH1qr_Vagg5nVdZIgKAAG-6mLMMPPj7bP5QcSvr9YFobpNiUb4_dbGlbVtWKPU0t9DRelJLTHm66WJl_CmcRlj2j-l-p5jDLXYQpD8CoBm_HFLAp3H-Aknop8j_Pd5P9pLP6xT64lNJXoD9KC03CFW8INAlWDT3oKMg1i34PhQc0RpyJ0dhgsTMevVV0mIT8DJh7VINzwsa7JtzXqTagILlbDCjm2Rnt9KkVbkXFUClcw4213qPK7hh8LwPXQRaQCXPjjyQ7ubGG5wbd-ZF8yc4epcYJRsuUWq35rM9frl1_-v9tAmYEYOiDqi4eOKqt0nNAd6RVUw0osOdSLLojRyyvphrMZcnVpoHWSe4hD-Dd8ItYPk8JRNCax__5rEBTXJ7254Z51xa53RtO62UwH9MnPNPcGWgVjUaQvrrxlHFlrF_O9ZnItRgksRsRHPGCPo4Jd9xMj6FqC2HlJJrZJcLHF9wjJg2JeEUafRAHoKvHleoOg8fAm6wID8Sn9x2carHkqySBcRw7e5qGEceU4m3S39cFqhq03AD8QKXu92wXi6txylEJ6krcyx7jI6C67Fl9JpiDI-2qmA-uiIs7E_FEKk3kR3VGbKHQMf_ZGT1pkPY-jA1up1bBvsbfpRuGdEqE-iUtyzAIX6ZwnDwjyq6uubZQZG83ACluc-I8Nheu_JvWDeSyU_pVSREGlSwxyOIdNW0KB2vkx0lK9vETkVVSm225Rr3bZIFl58GuBsV9vX8hso=w1249-h937-s-no

AJFCJaXYn4qoFsgskw3hNA6LpC-D1CK5unQl-7FTX__I5lT_bLmmX7APDkPL9lccEW8qtG-5Fyxzmf859RVxJYZ8QyWjkFLnE7jFkizqzJZaOInDyer2weQjhITF4sQdtDnjSXeSCDy0ASK0s6xCSQRt_arGPcgCO9WzcGjsgvdCyCPaJ8k5mbFOC20TRFEiO8qLLqo8Qoyq-bHka0ULVdxEVVfULMzxTI78AVxVf30QNJvpH3YndbZmqJQwSfkiNq0Ry2O1KVicofmZou014H1iNb65c4Ol7g1kmUMjwR8iqmUhc4RCb5a1hYteL8Srugj9Bh8WFeTp52lsSvHgRIogxboLh9lA9E9mGWV0G_ZoG4m5mEHrKmuUQnfpPB0ndvKdqDuKSJZpOwNwVXAlRU4aEnwVEExLH3uE1iMLnw08zlRHFO2ANxHZFHJntFkOMo-4VSF-CDLNNVEGxqcD85o5zqhkOnwUP0VBvDfkBWnN1E2x1b3MgZ3nIBO-3e5aGDEBzF8Qjo6FEa_k2rxU7VysFnkH-tXVNTV96dpyqadDU89f-o6OX0ZnOpurn6YM_ChyMitIvLz-iAGc-zzIg9SjU1UyJiG20SB6DfxbAHtj_CUR01Uhybh0vZFyAMEjW_YJHpqrZHRM3wO48q7zIH1a_0XtQqrPnWzp5f1Pjrhjfc52mub46reS9Uqw1PBjwKGwbb1tM5THnbZcFN0yjWm1E8QSYbBiLCSNulVwkXJurmICRmTVrNm4d-D1pdZ_mhcceehXnp9eTQUEAFY7bojSgaU0vtyhRWM7uwdCWU_C7urlodjixPNRBIY90djLTC3up4cEZ_q9XO6DnuNNJZb9qMT088iPfqJ1fNJRg4L6iHkEI-sLeiQVDF21OqDw-ULTkUnnh6WfBLpWR5h0BRpuciMG_Nj3EgudKfJ8IouHSefmK2tJJF7q1hN34qXj=w666-h888-s-no
 
Last edited:
That could be the same room! I’ve even got that Bosch SDS

I cut a channel to separate the concrete slab from the side of the house earlier today so will see what this does to the dampness in corner 2 over the next few days.
403548A5-449A-43D2-AB29-5EBF17785F6F.jpeg


When I rebuild my sleepers I will add more holes in them for airflow - and ensure when the extension is added that there are plenty of air bricks to the new rear wall - the corners of my room suggest the singular one in the middle was not enough!
 
Hi, wonder if anyone can help me; I’ve rebuilt the dwarf walls, does the piece of timber that sits on top of the dwarf walls need to be a certain thickness or specification? Is this piece of timber called the wall plate?

I’ve bought a roll of DPC - so on top of the honeycomb wall, is it concrete, dpc, concrete and then the wall plate?

Thanks
 
Depends how you've done the wall
If there are big gaps between bricks/blocks on the top course you need something structural like C16 4 x 2.
If the top course is continuous you could just use a couple of slating battens.
Whatever you use, make sure it's treated (if you buy treated and cut it you need to treat the cut ends, get yourself a can from Toolstation or Screwfix or wherever and follow any PPE and environment advice).
If the top of your wall is flat and level you can put dpc then timber down.
Otherwise, mortar then dpc then timber
 

DIYnot Local

Staff member

If you need to find a tradesperson to get your job done, please try our local search below, or if you are doing it yourself you can find suppliers local to you.

Select the supplier or trade you require, enter your location to begin your search.


Are you a trade or supplier? You can create your listing free at DIYnot Local

 
Sponsored Links
Back
Top