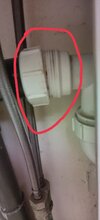
If you're ever wondering this and you can see the screw thread, look at it closely:
View attachment 379633
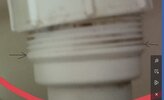
You see where I put the black arrows? That part of the thread tells you which way the thread runs. I'll just rotate the image to make the next part easier to explain:
View attachment 379636
So imagine the thread as like a very slight hill, and if you got your fingernail and followed the thread "up hill" (from left to right in the rotated image, from bottom to top in your image), round the back, carry on, round the front, keep going round and round, your nail will eventually come out of the thread
The plastic ring that is presently screwed on needs rotating in the same uphill direction as your nail travels, so it must be turned so the front is travelling upwards
As it's badly cross threaded it might be that either one of the threads is ruined so you'll probably also need to exert some effort pulling the ring leftwards while you rotate it upwards. I dare say it's really near the end of the thread anyway and about to come off so you may find it all just comes apart with some determined pulling/twisting/levering
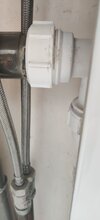
Rotate in the direction of the black arrow while also pulling/forcing in the direction of the blue:
View attachment 379635
Make sure you protect yourself so if it all suddenly slips apart you don't bash yourself on anything sharp under the sink
I dare say it's ended up the way it has because the angle on the black pipe meeting it is poor; it should form a more straight connection and make it easier to get the sealing washer pressed into place
When you get this apart you should ideally find the thing you turn, a plastic washer and a sloping rubber washer (in that order on the black pipe from left to right) with the thickest part of the rubber washer next to the plastic washer . When all assembled nicely and straight the thing you turn should press on the plastic washer which pushes the sloping washer into the gap between black pipe and white receptacle
View attachment 379637
Probably some careful reassembly will be enough to see you right, as is it likely leaks because the seal at the top is poor due to the cross threading and letting a lot of water down the sink floods it up enough to leak past