Zinsser BIN stain blocker

Sorry, I meant to say “is there a technique to painting window panes”
Better to mask off each square or just paint and scrape off excess on the glass?

I don't use tape, but as a DIYer if might make sense. A down side of tape is that people then apply copious amounts of paint, when removing the tape it may pull the paint off the surface.

One could however use a sharp 9mm knife to cut through the paint line though.

Please do not use regular "white" masking tape if you plan to leave it on for a week or so. The UV light makes the glue go rock hard. Blue masking tape can be left on for much longer.

 
Sponsored Links
@opps

Sorry… more questions.

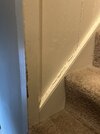
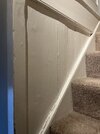
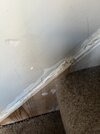
The old skirting board on the staircase seems to have been painted over many times. You can see it’s peeling away from the wall (no idea why?!!) also the panelling up the staircase looks to be painted each time. Would sanding this all down be ok, or does it need to something stronger like paint stripper? Am I going to need to lift the carpet to get to it all?!

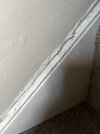
I had to have some of the skirting replaced (see photo) can that be painted straight on it or does it need priming?
Thank you.
 

Attachments

  • IMG_9042.jpeg
    IMG_9042.jpeg
    312.7 KB · Views: 60
  • IMG_9043.jpeg
    IMG_9043.jpeg
    334.2 KB · Views: 60
  • IMG_9039.jpeg
    IMG_9039.jpeg
    254.3 KB · Views: 67
  • IMG_9038.jpeg
    IMG_9038.jpeg
    267.8 KB · Views: 60
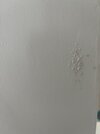
Image 1.- Try 80 grit paper wrapped around a cork sanding block.

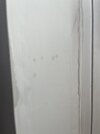
Image 2 and 3- it looks like there may be some bounce where the timber wall meets the timber stair strings. Use a sharp utility knife to cut through the paint where the wall meets the top of the stair string. You should then be able to lift the chipped paint out. Backfill with the Red Devil.

Image 4 - yeah you need acrylic primer/undercoat.

Regarding the carpet, you can tuck masking tape down the edge of the carpet prior to painting. Depending on the thickness of the carpet, I run tape along the edge of the carpet and left it stray about 8mm past the edge of the carpet. Then tuck the excess down the gap.
 
@opps
Help. I caught some of the ceiling when cleaning the walls in preparation for painting and this happened.
Dirt and soot smears. What do I do?! Will emulsion in a similar colour cover it?!


IMG_9294.jpeg
 
Sponsored Links
Ideally, you would remove as much as possible before repainting.

Unfortunately, you might not get away with trying you touch in the ceiling and may need to coat the whole ceiling.
 
Image 1.- Try 80 grit paper wrapped around a cork sanding block.

Image 2 and 3- it looks like there may be some bounce where the timber wall meets the timber stair strings. Use a sharp utility knife to cut through the paint where the wall meets the top of the stair string. You should then be able to lift the chipped paint out. Backfill with the Red Devil.

Image 4 - yeah you need acrylic primer/undercoat.

Regarding the carpet, you can tuck masking tape down the edge of the carpet prior to painting. Depending on the thickness of the carpet, I run tape along the edge of the carpet and left it stray about 8mm past the edge of the carpet. Then tuck the excess down the gap.

Hi. So I managed to paint the spare bedroom. It took me 3 days , but I feel more confident in doing the rest of the house. Even if my dominant arm feels like it’s going to drop off.

I accidentally bought this instead of Red Devil. It will do the same thing won’t it?? (See your quote above where you suggested using it)

IMG_9580.jpeg


there are chunks of plaster have have dropped out of the ceiling in the kitchen, mostly around screws and there’s long cracks. See photos. What do I need to use to fill them?

IMG_9581.jpeg

IMG_9582.jpeg


Then there’s this where it’s coming away from the wall. What’s the best way to deal with this?
Thank you

IMG_9584.jpeg

IMG_9583.jpeg
 
Sorry, for the tardy reply.

I haven't used that particular filler. I suspect that it a regular premixed filler- but hey, if that is what you have then use it.

Popped screws in plasterboard. In most cases they were either driven in too deep or not deep enough. You can try using a hand screwdriver to tighten the screw, if when you push the plasterboard you still see very slight movement, you may need to use a new screw next to it. Unfortunately, the plaster is much harder than the plasterboard. On the balance of probability, you will need to use a countersink to bury the head under the plaster skim.

The cracks in your images look as though they are at the edges of the angle bead. It may well be the case that the timber framing has shifted very slightly. They can be problematic if the angle bead had not been screwed hammered in properly. Faced with that, I would gingerly chip away the damaged plaster. I would then use some Toupret Flex and Fill filler. It is like a caulk but has (mocro) fibres in it. It will shrink back (like all waterbased caulks). The next day, I would fill it with the Red Devil filler (or whatever you have).
 
Thanks @opps

There’s damage around a light fitting when they have to be completely replaced. What can be used to repair it? Is it easy enough to do? Or does it need to be someone who knows what they’re doing?


I’ve noticed hard bubbles appear in the room that was redecorated in December. I think the spots are possibly damp as the guttering has been leaking down the wall. Can the hard bubbles be sanded off and painted over?
IMG_0325.jpeg
IMG_0324.jpeg
IMG_0332.jpeg
IMG_0331.jpeg


Also, there’s some patches on the ceiling that need touching up that the decorator did in December. There were water stains in the ceiling way before I moved in from the bathroom above, but when he’s painted it, it’s like the dirt has been smeared. I asked him what he used and its armstead trade. I don’t really want to spend £20 on paint to do touch ups that I will never use again (but seems easier than to ask him to come back and do it himself)
can I just buy any small pot of Matt white or is it going to be noticeable?!


Thank you. Sorry the pics aren’t in order.
IMG_0329.jpeg
IMG_0330.jpeg
 

Attachments

  • IMG_0326.jpeg
    IMG_0326.jpeg
    77 KB · Views: 42
The hard bubbles are probably down to water damage. Assuming that the water ingress has been resolved- on the balance of probability, yeah, you can knock off the high spots, sand back, then fill prior to painting.

The image of the damage to the side of the spotlight. That is very common. I come across it quite often when I "drop" light fittings to repaint ceilings. Those fittings often use mouse trap type springs to hold the lights in place. Unfortunately, it is often the case that the electrician uses a hole cutter that is nearly, but not quite the correct size, then the plasterer skims and there is a slight overlap.

You might be able to drop the light fitting, fill and twist it by 90 degrees. If you don't twist it, the filler may fall out as you push the fitting up.

I am in the pub and haven't looked at all of the images- sorry.
 

DIYnot Local

Staff member

If you need to find a tradesperson to get your job done, please try our local search below, or if you are doing it yourself you can find suppliers local to you.

Select the supplier or trade you require, enter your location to begin your search.


Are you a trade or supplier? You can create your listing free at DIYnot Local

 
Sponsored Links
Back
Top