HIVE and ESI Controls - HELP

Joined
27 Apr 2024
Messages
11
Reaction score
0
Country
United Kingdom
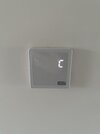
Hi! I’m looking on getting HIVE installed in my new build home. I’ve bought 2 Hive thermostats, one dual channel and one single channel.

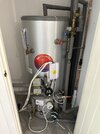
I have 2 zones, up and down stairs with a hot water tank.

Currently I have ESI wired thermostats but want to remove these completely and rely solely on the 2 wireless HIVE ones.

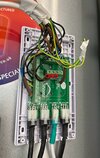
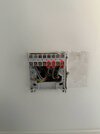
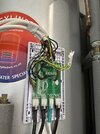
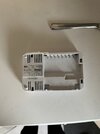
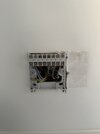
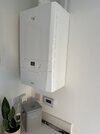
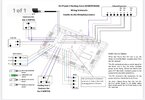
These are the images of my programmer (next to the boiler downstairs) and wiring box (on the water tank upstairs).

I have followed some videos on how to do this, however upon opening the wiring box, I was presented with a motherboard like connection rather than the one shown on pics and videos.

If I just disconnect the L,N,N/O wires from the existing thermostats on both CH1 & CH2, would the live feed from the programmer just bypass thermostats and turn it on? Considering HIVE thermostat would be the one to make the call?

Could anyone please help me here? Any diagrams would be great!

I know at the programmer side, I need to get a L & N to the second receiver, and have the corresponding wires for HW, CH1 and 2 in their corresponding points. It’s the decommissioning of the thermostats and having it wired at the wiring box I’m stuck at!
 

Attachments

  • IMG_3515.jpeg
    IMG_3515.jpeg
    309 KB · Views: 50
  • IMG_3398.jpeg
    IMG_3398.jpeg
    236.3 KB · Views: 44
  • IMG_3397.jpeg
    IMG_3397.jpeg
    128.1 KB · Views: 41
  • IMG_3396.jpeg
    IMG_3396.jpeg
    287.5 KB · Views: 41
  • IMG_3395.jpeg
    IMG_3395.jpeg
    133.7 KB · Views: 36
  • IMG_3394.jpeg
    IMG_3394.jpeg
    150.8 KB · Views: 51
Last edited:
Sponsored Links
Either join the link wires up at the thermostat end or wiring center end. You would need x2 L and x2 N for each hive then N/O wires to each Hive receiver.
 
Either join the link wires up at the thermostat end or wiring center end. You would need x2 L and x2 N for each hive then N/O wires to each Hive receiver.
What do you mean by, link the wires up.

The receivers will have, L,N and corresponding HW, CH1 or CH2.

I’m more stuck on the wiring centre, I’m wanting to remove the wired thermostats, but unsure where I need to bridge if I take them out? Because if i dont won’t the call for heat not go to the xorriaponding channel?
 
Provide a circuit diagram for the wiring centre or at least take pictures of the terminal notations.
 
Sponsored Links
Here is the best thing I could find, ESI don’t make it easy for me to find it!
 

Attachments

  • IMG_3517.jpeg
    IMG_3517.jpeg
    252.1 KB · Views: 26
What do you mean by, link the wires up.

The receivers will have, L,N and corresponding HW, CH1 or CH2.

I’m more stuck on the wiring centre, I’m wanting to remove the wired thermostats, but unsure where I need to bridge if I take them out? Because if i dont won’t the call for heat not go to the xorriaponding channel?
Your thermostat has a live and switched live, link the 2 together, this completes the circuit, and the Hive takes over.
 
Your thermostat has a live and switched live, link the 2 together, this completes the circuit, and the Hive takes over.
So are you saying, remove the two existing thermostats on STAT1 (L,N,N/O) and STAT2 (L,N,N/O) from the image attached.

Then place a wire in STAT1 from L to N/O and the same for STAT2? That way when connecting HIVE receivers to the programmer it’ll work?

I take it you disconnected the mains cable to this?
I had removed fuse from boiler switch and had mains powered off. Yes.
 

Attachments

  • IMG_3515.jpeg
    IMG_3515.jpeg
    309 KB · Views: 17
There's no cable in the mains connections, it must be getting backfed from the boiler.
Yeah, I’ve just noticed that. Do you think it’s getting power from the programmers end? It’s the only end where there is power… does that change things?
 
No I think it's getting power from the boiler.
Right, with that being said. What’s the best way to remove the old thermostats, and have Hive work?

Do I need to bridge anything like CBW said above? Or removing thermostats from PCB do the trick?
 
That’s amazing, one thing I have to mention. I have the wiring box upstairs on my water tank, and my programmer is downstairs under my boiler.

Now if I were to follow your diagram, how do I get the black from STAT1 down to CH1(HO). The only connection I have going down to the programmer are those circled in red.

Are you suggesting I put the receivers up in the water tank cupboard?

Also the links on the PCB, do you mean I take out the cables going in and link? Or link it with the cables already in?

I know these may be stupid questions, I just want to be sure :) I really appreciate the help!
 

Attachments

  • IMG_3515.jpeg
    IMG_3515.jpeg
    286.3 KB · Views: 19
  • IMG_3397.jpeg
    IMG_3397.jpeg
    138.5 KB · Views: 14
Are you suggesting I put the receivers up in the water tank cupboard?
That's what it was based on, if you would rather they replace the programmer that could be done as well.
Also the links on the PCB, do you mean I take out the cables going in and link? Or link it with the cables already in?
That was with cables removed.
Now if I were to follow your diagram, how do I get the black from STAT1 down to CH1(HO). The only connection I have going down to the programmer are those circled in red.
You can either run a 4-core flex from receiver 2 > wiring centre and 3-core from receiver 1 > wiring centre or run a 5 core from receiver 2 > wiring centre and a 3 core between receiver 1 > 2, with a wago to connect the spare core inside stat 2 for the heat call. Use red tape and brown sleeving for the earth core to be repurposed as a switched live.

If you want the 2 receivers to replace the programmer disconnect the thermostats from wiring centre, link the L and NO terminals on the wiring centre for heat 1 and heat 2, and run a 3 core and earth between the 2 receivers. Again, 1 core will be wago'd in the dual channel receiver.
 

DIYnot Local

Staff member

If you need to find a tradesperson to get your job done, please try our local search below, or if you are doing it yourself you can find suppliers local to you.

Select the supplier or trade you require, enter your location to begin your search.


Are you a trade or supplier? You can create your listing free at DIYnot Local

 
Sponsored Links
Back
Top