Bay window roofing lead detached from wall. Help tips on how to make better job

Joined
22 Nov 2019
Messages
660
Reaction score
12
Country
United Kingdom
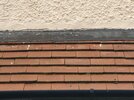
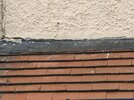
I have just seen my lead job on the bay window has detchaded from wall. Look like previous owner didn't make a good job.

As this is on semidetached side what would be the best things to do to make a long lasting job?

Thanks
 

Attachments

  • 20241012_171351.jpg
    20241012_171351.jpg
    258.4 KB · Views: 68
  • 20241012_171343.jpg
    20241012_171343.jpg
    315.3 KB · Views: 72
Sponsored Links
I know nothing, but as no-one else has said anything yet, I wonder whether the lead is fine but the mortar, or whatever the white stuff is, looks like it's breaking up. I think it might be quite easy to remove that and replace it... properly.
Anyway, someone who knows what they're talking about will probably turn up before long!
 
Sponsored Links
As this is on semidetached side what would be the best things to do to make a long lasting job?
Looks like most of it is ok, I’d guess the gap is the mortar repair rather than the lead.

The bit on LHS of left image looks a bit ropey, it might be best to cut a section of say 2 foot, re cut the slot, then push in lead, dress down and use some lead mate to seal.

If you can’t get the lead to stay deep in the slot, then either use some offcuts of lead and bang in or get some lead flashing clips.

The lead looks quite old it might all need replacing, hard to tell from pics
 
OP'
1. The render immediately above the lead has been worked on previously. A Bell Cast should have been fitted.
2. The long single length of flashing has expanded & pulled itself out of the chase. 1.5m is the max length.
3. The lead should have been installed in at least two separate lengths with a 100mm overlap at the join.
4. Remove the lead & cut it in two pieces - a pic showing the full width of the roof/flashing would help?
5. The chase needs grinding out to a 25mm depth - the 20mm turnover should be wedged into the chase.
 
I have just seen my lead job on the bay window has detchaded from wall. Look like previous owner didn't make a good job.

As this is on semidetached side what would be the best things to do to make a long lasting job?

Thanks
Looks to me like there is zero upstand on the lead. Any ex/con movement is having a more direct effect on the mortar chase joint, rather than a larger body (better shaped) piece of lead being able to absorb the movement.
 
Has the lead detached, or is it differential movement between two materials, with the weaker material (the render) having “split” from the lead? You could re render/ fill the gap over the lead and keep under review.
 
I think I'd look to cut a new chase further up, remove the render below the chase, and fit new lead if the existing cannot be repurposed. A new chase would helpget rid of the odd looking smooth slathered render at the bottom of the dash area
 
It looks to me that it has been replaced once before, probably 20yrs ago. If its not giving you any problems then fill the gaps the best you can, otherwise you will need to cut out the lot to make it look neat and not like a patch up.
 
OP'
1. The render immediately above the lead has been worked on previously. A Bell Cast should have been fitted.
2. The long single length of flashing has expanded & pulled itself out of the chase. 1.5m is the max length.
3. The lead should have been installed in at least two separate lengths with a 100mm overlap at the join.
4. Remove the lead & cut it in two pieces - a pic showing the full width of the roof/flashing would help?
5. The chase needs grinding out to a 25mm depth - the 20mm turnover should be wedged into the chase.

Full photos of my side attached
 

Attachments

  • 20241013_090230.jpg
    20241013_090230.jpg
    159.2 KB · Views: 39
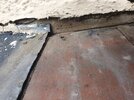
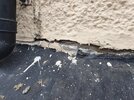
Doesn't look like a good job done previously.

I'm open to buy new code 4 lead and make job done properly.

Happy to hear how to do it.

Thanks
 

Attachments

  • 20241013_103200.jpg
    20241013_103200.jpg
    439.1 KB · Views: 40
  • 20241013_103155.jpg
    20241013_103155.jpg
    521.4 KB · Views: 39
Doesn't look like a good job done previously.

I'm open to buy new code 4 lead and make job done properly.

Happy to hear how to do it.

Thanks
Yeah that close up shows it’s best to redo it all.

Cut a chase higher up, deep enough to go into the blockwork, you would probably need to chisel off the pebbledash render below the cut.

Then get a roll of lead wide enough.

You can use clips to hold the lead tight in the chase


Then use lead mate to seal.

The secret to working with lead is to treat it very gently, do as little as you can to it so it retains its original flatness.

You might find it easier to lift it onto the roof on a board of wood, carrying it up and letting it dangle will stretch it.
Folds are best done on the ground bending it around a board of wood as a former.
It’s sometimes easier to work with short lengths than try and handle a long length. In any case max recommended is 1500 in one length due to expansion.


When you buy, be careful to get a roll that is not buckled or dented.
 
All,

very good advise from everyone.

That's my plan.

I will order a new roll of lead 4 300mm 3 meters lenght and some clips with lead mate.

Only doubt is when I removed the odd render below the pebbledash how I'm going to make good again? Do I need some sort of stop bead?

Sorry for the silly question but I would like to have all material ready because once I have removed it need to finish job due of the rainy weather.

As always any help with link to material or image or simalar job to help me understand would help.

Thanks
 
All,

I guess to finish the render I need something like this


Better plastic or galvanized?

Thanks
 

DIYnot Local

Staff member

If you need to find a tradesperson to get your job done, please try our local search below, or if you are doing it yourself you can find suppliers local to you.

Select the supplier or trade you require, enter your location to begin your search.


Are you a trade or supplier? You can create your listing free at DIYnot Local

 
Sponsored Links
Back
Top