Constructing a vehicle Inspection Pit

We don't use any sealing membranes on a garage pit.
And don't see the need for one on an outside pit either. If any leaks occur we can stop them.
We pour a base with folded 393 mesh, part in the floor and up the walls.
Then kicker pegs using reinforcing or stainless bar section, shutter round, fit the shoring props and pour.
A concrete kicker is better though and would recommend it.
The joint between the floor and wall wil be fine without any sealer but if you want, nail on some benonite.
Just be sure to have a minimum of 100mm of cover either side as it eventually pushes with quite a lot of pressure.
 
Sponsored Links
LOL ... this service pit is turning into a major civil engineering job.

If the OP has all this time on his hands, may I suggest that he pops around to my house as there are lots of things to do ..... some of it is concreting too :cool:
 
LOL ... this service pit is turning into a major civil engineering job.

If the OP has all this time on his hands, may I suggest that he pops around to my house as there are lots of things to do ..... some of it is concreting too :cool:

Too true Woody, I must admit to getting bored and enjoy my 'projects' lol
 
We don't use any sealing membranes on a garage pit.
And don't see the need for one on an outside pit either. If any leaks occur we can stop them.
We pour a base with folded 393 mesh, part in the floor and up the walls.
Then kicker pegs using reinforcing or stainless bar section, shutter round, fit the shoring props and pour.
A concrete kicker is better though and would recommend it.
The joint between the floor and wall wil be fine without any sealer but if you want, nail on some benonite.
Just be sure to have a minimum of 100mm of cover either side as it eventually pushes with quite a lot of pressure.

Norcon,

Great info, I'll post up a rough drawing for scutiny and comment and to see how wide of the mark I am when compared to 'professionals'
 
Sponsored Links
Just out of interest, what sort of vehicle do you intend to use the pit for, if its for modern front wheel drive cars, you might find a pit is of limited use, and might not be worth the expense of building.
 
Just out of interest, what sort of vehicle do you intend to use the pit for, if its for modern front wheel drive cars, you might find a pit is of limited use, and might not be worth the expense of building.

Andy,

I'm not a mechanic, so the sorts of work will be the general maintenance, changing oil, maintaining underseal and general tinkering.

The house has three vehicles all fiat, stilo, punto and Ducato chassis motorhome, the weight of the motorhome is the main driver for the pit, this is the one I need to get under regularly as the underfloor is wood.

Ian
 
We don't use any sealing membranes on a garage pit.
And don't see the need for one on an outside pit either. If any leaks occur we can stop them.
We pour a base with folded 393 mesh, part in the floor and up the walls.
Then kicker pegs using reinforcing or stainless bar section, shutter round, fit the shoring props and pour.
A concrete kicker is better though and would recommend it.
The joint between the floor and wall wil be fine without any sealer but if you want, nail on some benonite.
Just be sure to have a minimum of 100mm of cover either side as it eventually pushes with quite a lot of pressure.
With all due respect this is carp advice for a DIYer, for the sake of a little extra work and a few quid spent its is foolhardy to avoid using any waterproofing methods for a domestic garage pit. If the OP pursues this with no waterproofing in place it could easily turn into a complete nightmare.
 
We don't use any sealing membranes on a garage pit.
And don't see the need for one on an outside pit either. If any leaks occur we can stop them.
We pour a base with folded 393 mesh, part in the floor and up the walls.
Then kicker pegs using reinforcing or stainless bar section, shutter round, fit the shoring props and pour.
A concrete kicker is better though and would recommend it.
The joint between the floor and wall wil be fine without any sealer but if you want, nail on some benonite.
Just be sure to have a minimum of 100mm of cover either side as it eventually pushes with quite a lot of pressure.

Norcon,

To clarify, would that make the walls a total thickness of 200mm and to reduce the chance of seapage between the kicker/wall join use just one or two strips of benonite?

To show my ignorance, is it possible to cast in situ the whole pit in one go, or does it have to be in two pours?

Cheers
 
You're excavation will determine the wall thickness. So depending on the ground it may vary. But 200mm is fine.

We've had walls vary from .2m to 2m with single face shutter where the banks have collapsed.
One strip of benonite is fine but again we don't use it (unless a builder or se specs it) and have no problems. We don't even scabble. Just be sure the base is clean.

If you're concerned about water seepage through mass concrete in an outside garage pit with a drain off (and I expect it will be open to the elements anyway, ground water run off, rain etc) then ask your concrete supplier if he will add a water proofing agent. Again not necessary imo.
And yes the entire pour in one go. Job finished. :D
 
I built one
dug out blinded with sand, about six folds of heavy dpc sheets, got aload real cheap

150 mm base of concrete, built using block 11nm or something like that could hardly lift the little blighters

put some rsj's as a lifting/jacking point
and my best find for covering the pit not in use, pedestrian trench covers four off

used it 6 times in as many weeks


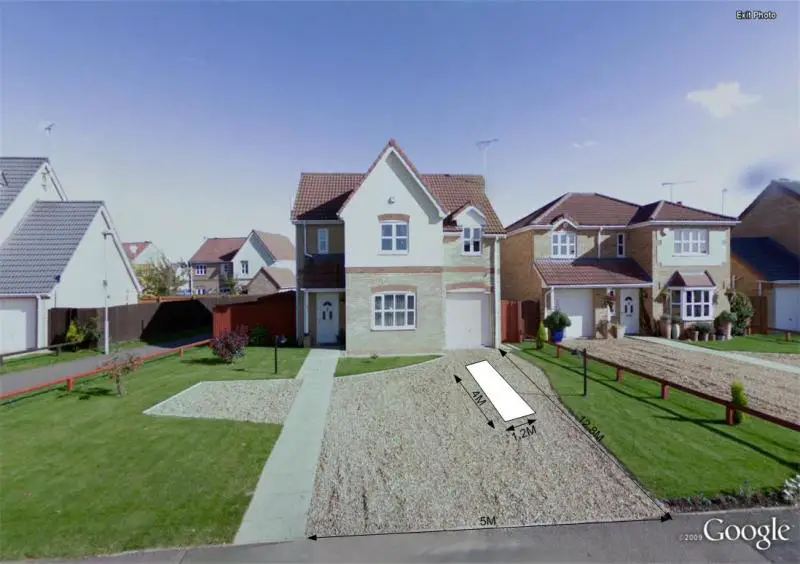
The first pic shows the rough location of the pit, the idea is to cast the base level with the drive, this will allow me to cover with a thin guage, sectional, steel lipped plate with gravel, effectivly making the pit disappear, this will also act as a waterproofing cover.

The pit will have 75mm thick timber planks bridging the hole when not in use.

The second drawing is me going over the top as usual, my rational is:
The geotextile will transfer any water from the clay walls down into a sump and vented pump, which will be installed outside of the main pit, and will hopefully reduce any hydrostatic pressure on the pit.

DPM each side of a polystyrene bat as first and second line water protection, the polystyrene will take up any expansion of the clay rather transfer it directly to the concrete walls.

Is the above over the top, what do others think.
 
You're excavation will determine the wall thickness. So depending on the ground it may vary. But 200mm is fine.

We've had walls vary from .2m to 2m with single face shutter where the banks have collapsed.
One strip of benonite is fine but again we don't use it (unless a builder or se specs it) and have no problems. We don't even scabble. Just be sure the base is clean.

If you're concerned about water seepage through mass concrete in an outside garage pit with a drain off (and I expect it will be open to the elements anyway, ground water run off, rain etc) then ask your concrete supplier if he will add a water proofing agent. Again not necessary imo.
And yes the entire pour in one go. Job finished. :D

Thanks Norcon, we have a really high water table where I live and am a bit worried that it might leak (not a massive problem as I can pump it out, but would rather prevent rather than cure).

Re the single pour, yet another daft question, if I shutter the sides with mesh sandwiched, the sides would be raised by 150mm to allow for the floor (maybe deeper with the cast in sump), what would stop the base from filling deeper when I pour in the sides (ie the concrete trying to find its own level, especially when I vibrate it)

Cheers mate
 
By "one pour" I meant the walls.
The floor first and you have a stable base to work from.
Nice looking area. What will your neighbours think?
 
If you cost this up, would it not be less hassle to go to a mechanic or upgrade the motorhome than ripping up that nice drive?

All sorts of services could be down there. (electrical, sewers, drainage etc)
 

DIYnot Local

Staff member

If you need to find a tradesperson to get your job done, please try our local search below, or if you are doing it yourself you can find suppliers local to you.

Select the supplier or trade you require, enter your location to begin your search.


Are you a trade or supplier? You can create your listing free at DIYnot Local

 
Sponsored Links
Back
Top