Help needed: UK, Dimmer switch fitting.

Joined
26 Nov 2015
Messages
7
Reaction score
0
Country
United Kingdom
Hello,
I'm having a bit of a problem in fitting a dimmer switch and would very much appreciate some guidance.

In my lounge I have 2 ceiling lights which are controlled by a single on/off switch on one wall - there are no other switches in the lounge (or elsewhere) that controls these lights.
The house is circa 1993 and there is a steel-box in the plaster wall where the light switch is mounted.

When I open the light switch box, I see that there is the following:
1 - an Earth wire, yellow/green, that is terminated onto the steel box via a brass screw.
2 - a grey, 2-core cable, with black and red wire inside it.
3 - ANOTHER grey, 2-core cable, also with black and red wire inside it.

The wiring to the on/off switch is as follows:
- BOTH of the black wires from the 2 grey cables are joined and in a connector block, they are not wired into any part of the on/off switch.
- BOTH of the RED wires from the 2 grey cables are connected to the on/off switch connection points.

So, now I am trying to fit a 400w"2-way dimmer". This has the standard 3 connection points 'Common', 'L1' and 'L2'.

I have tried what I thought would be the logical way to connect this dimmer, and then every other way that I could think of, and nothing works! To make matters worse, now I cannot seem to connect the two red wire back correctly either.

What am I doing wrong?!?
 
Sponsored Links
I have tried what I thought would be the logical way to connect this dimmer,
What was that way?

Was it the same way that the switch was connected?


and then every other way that I could think of
Electricity-by-guesswork is a remarkably foolish idea.

But there are only 3 ways to connect two wires to 3 terminals, and ⅔ of them work, so....


and nothing works!
Before deciding to install a dimmer switch you did make sure that the light was dimmable, and is compatible with the type of dimmer you bought?


To make matters worse, now I cannot seem to connect the two red wire back correctly either.
What does that mean?


What am I doing wrong?!?
Given that you only had 2 wires to put into a switch, I can't imagine what could go wrong, barring mechanical problems like screwing onto the insulation rather than the copper, breaking a conductor, etc.

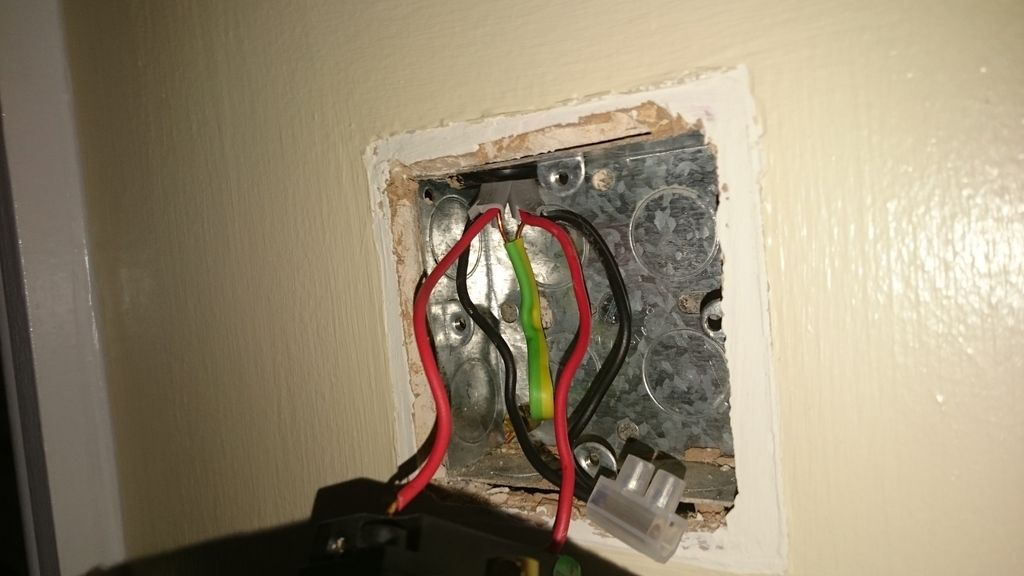
Photos....
 
DSC_0102_zpstce0dyje.jpg
 
Thank you for your comments Ban-All-Sheds. In answer to yours:

- I thought the logical way would be that as described in the fitments guide, from the dimmer switch manufacturer. Evidently logic does not apply in this case.

- I should have said "every way that a dimmer switch could be fitted, again according to the instructions in various fitting guides from other manufacturers". Ditto re: that logic too.

- At this point, rewiring the on/off switch as it was before does not restore its functionality.

- 2 wires? in the picture above, if you look carefully there are actually 5. I will detail them again. There are 2 red wires, and 2 black wires. There are 2 earth, wires within the grey cables that have had the green/yellow earth sheath wrapped around them. So strictly speaking, there are 6 individual wires, but for the purposes of this discussion, it would be logical to say this earth wire could be considered as 1.

Note that this picture is how the on/off switch is wired.
Thanks again for your help.
 
Sponsored Links
If you have tried to connect any of the black wires to the switch then put the switch in the bin. Other wise one red to com the other to either of the remaining terminals getting L1 and L2 swapped will cause push in to be one instead of pull out but it will still work.
 
If you have tried to connect any of the black wires to the switch then put the switch in the bin. Other wise one red to com the other to either of the remaining terminals getting L1 and L2 swapped will cause push in to be one instead of pull out but it will still work.

Hi,
Thanks for that information. I understand when you say "com" that you are talking about the terminal marked "Common" or "C".
I did try exactly that, as that is what the manufacturer said on the fitment guide. It didn't work.
This is what I have tried:
- Red1 into Common, Red2 into L1 - result: Not working
- Red1 into Common, Red2 into L2 - result: Not working
- Red2 into Common, Red1 into L1 - result: Not working
- Red2 into Common, Red1 into L2 - result: Not working

What I'm not understanding is:
- When both Black wires are joined via the block, is this a supported, functional configuration?
- On the videos on YouTube, the electricians only ever seem to have ONE red and ONE black wire (and an earth), which they wire up as you have mentioned above. Is my configuration in that steel box correct?
- Does it look like there was another light switch that may have been plastered over at some point?

thanks again.
 
What I'm not understanding is:
- When both Black wires are joined via the block, is this a supported, functional configuration?
Yes, it's the arrangement in which power is being brought into the box on one cable (red live, black neutral) and the other cable runs from the box to the light. The neutrals (blacks) are connected directly together leaving the live (reds) to be controlled by the switch.

All you had to do in your case was remove the two red wires from the existing switch and connect them to the Common & L1 terminals on the dimmer - Assuming, as has already been mentioned, that the light is suitable for dimming and the dimmer rated for the wattage of the lights.

- On the videos on YouTube, the electricians only ever seem to have ONE red and ONE black wire (and an earth), which they wire up as you have mentioned above.
That is a different method of wiring in which the power is taken to the light fitting, the neutral connected directly to the light at that point, and a single cable (with red, black and earth) taken to the switch. Normally in the U.K. the red wire is bringing the live supply to the switch and the black is the switched return taking power to the light when turned on.

Either method is perfectly acceptable; they're just different ways of accomplishing the same thing.

This is what I have tried:
- Red1 into Common, Red2 into L1 - result: Not working
- Red1 into Common, Red2 into L2 - result: Not working
- Red2 into Common, Red1 into L1 - result: Not working
- Red2 into Common, Red1 into L2 - result: Not working
Any one of those arrangements should have left you with a working light. Either you've damaged the new dimmer (as described already), or you've left something else not connected properly. Or it's possible that the dimmer was faulty from new - It's not unknown.

Have you tried replacing the original switch as it was and checking if the light works with that?

- Does it look like there was another light switch that may have been plastered over at some point?
From what we can see in your picture, no.
 
Ok, this clears it up a bit. I will try a new dimmer and see what happens.
Thanks to all for the help.
 
I thought the logical way would be that as described in the fitments guide, from the dimmer switch manufacturer. Evidently logic does not apply in this case.
Well, if their logic is that the only scenario you'd find would be a single red&black cable, that would not apply.


At this point, rewiring the on/off switch as it was before does not restore its functionality.
Then something other than the switch has gone t*** up. No point buying a new dimmer switch until you've resolved that, as clearly it isn't the switch that is now the reason for the light not working.


2 wires? in the picture above, if you look carefully there are actually 5. I will detail them again. There are 2 red wires, and 2 black wires. There are 2 earth, wires within the grey cables that have had the green/yellow earth sheath wrapped around them. So strictly speaking, there are 6 individual wires, but for the purposes of this discussion, it would be logical to say this earth wire could be considered as 1.
I meant wrt connecting to the switch - there are only two reds.

  1. - Red1 into Common, Red2 into L1 - result: Not working
  2. - Red1 into Common, Red2 into L2 - result: Not working
  3. - Red2 into Common, Red1 into L1 - result: Not working
  4. - Red2 into Common, Red1 into L2 - result: Not working
FYI, 1 & 3 are the same. 2 & 4 are the same. All should work.

Logically, they are the same, physically they aren't. Never mind, the problem is still there, and just on this switch. The 5 other lights that are on the same circuit, all work fine. The lights that I'm trying to dim have been tested and are of the dimming type. Really odd. Guess its best to call a professional.
 
So have you tried just connecting the two reds together with a terminal block and switching on the power to see if the lights come on?
 

DIYnot Local

Staff member

If you need to find a tradesperson to get your job done, please try our local search below, or if you are doing it yourself you can find suppliers local to you.

Select the supplier or trade you require, enter your location to begin your search.


Are you a trade or supplier? You can create your listing free at DIYnot Local

 
Sponsored Links
Back
Top