Loft hatch cutting out

Thanks @JobAndKnock so I can cut the middle joist temporarily before installing the ‘trimmer’.. the joist won’t fall down on me considering I’ve effectively cut a piece out the middle of it (in between supporting walls)?
No. You need to temporarily support it before cutting or your ceiling might fail at that point. The temp timbers are taken out afterwards
 
Sponsored Links
Cheers,

Out of interest, did your new insulation make a big difference? I’ve only got 100mm up there at the moment! They will be my next job, to insulate to 275mm ish and board the loft

1930s semi with large side extension
It certainly did in the original side of the house.
The old insulation had collapsed under dust and torching (the mortar from the slates). No felt/membrane under the slates.
Get a decent facemask !! The cheapest Titan vac did a great job on the slate/general dust. Difficult to sweep everything up with a lath ceiling.

I went to 100+200mm for most of it. Some of the old 100mm glass fibre was still OK and was left in place.
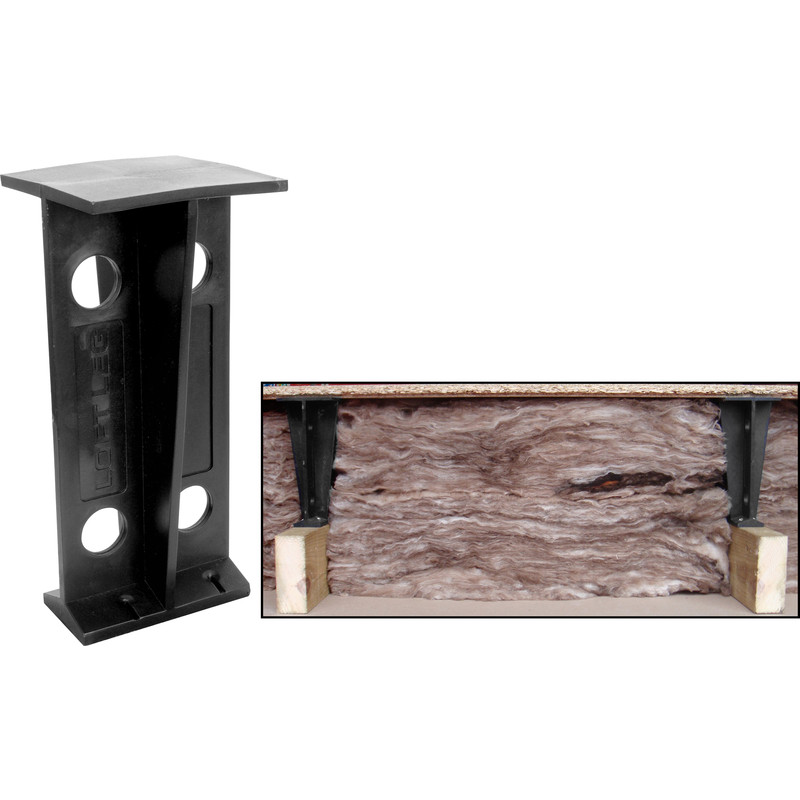
I boarded an area and used 100+170 with Loft Legs (Toolstation) and chipboard (B&Q)
Great

Did you have to use joist stilts to allow greater depth for insulation before boarding over?

The depth of joist isn’t deep enough for 300mm

Cheers
 
Sponsored Links
Great

Did you have to use joist stilts to allow greater depth for insulation before boarding over?

The depth of joist isn’t deep enough for 300mm

Cheers
I used Loft Legs
And

You would use 100mm between the joists and then 170 or 200mm at 90 degrees to the 100mm
 
(@mcprinter Marky is asking what your gas usage is now compared to then)

Don't know TBH.
Also fitted Wiser which may be making a difference as well.

The upstairs room my Mrs uses as a home office is much warmer.
I also fit a new rad and insulate the previously uninsulated bay window.
 
The gap between my joists is 34cm

When I cut the middle joist, the opening for the new hatch will effectively be in between the two joists (at present)

Assuming I just laminate the current joist (with coach bolts) to bring it out to the correct width for the hatch opening
Is it best to do this before installing the ‘trimmers’ the full length of the hatch opening?

Or should I install the trimmers first as above, secure to existing joists as explain by @JobAndKnock, and then build out the joist for the hatch cutout dimension?
 
When I cut the middle joist, the opening for the new hatch will effectively be in between the two joists (at present)

Assuming I just laminate the current joist (with coach bolts) to bring it out to the correct width for the hatch opening
Is it best to do this before installing the ‘trimmers’ the full length of the hatch opening?
Is it best to install a packer and fix the trimmers to it? No. The strength/load bearimg is in the trimmers (BTW no inverted commas), so they need to go in first before adding any packing strips. That way any load is transferred directly from the trimmers to the full length joists either side of the opening. Go the other way and you are transferring the load from the curtailed joists into packing pieces and not the joists, which is not good practice.
 
Last edited by a moderator:
I’m edging closer to cutting out for the new hatch

Here is the hatch from above now the loft has been cleared a bit!

As you look at the pic, the new hatch will run from Left to Right, so I’ll effectively be cutting the joist in the middle

My question for today:

1. Do I do the hole cutout (for new hatch) from the ceiling below or from up in the loft? Or does it make no difference?

2. Before cutting the joists to accommodate new hatch I am running a 4x2 from L to R across the joists, screwed is (as per advice above)
As you can see, there is a stud wall that comes up into loft (just above loft hatch on pix, directly next to white plastic light switch)

Is it ok to brace the joists ABOVE (on pic) th switch- ie. On the opposite side to the peace of timber that runs across joists?

Or is it essential to brace/support the joists as close to the cut as possible?

CBECA144-B16F-45E8-9FA8-744DFF659C51.jpeg


Thanks
 
I'd cut from above so gravity helps rather than hinders. Generally you cut anything so that the cutting direction of the saw blades means they come into contact with the finished face (the thing you look at) first, because when saw teeth emerge from a material they make more of a mess than when they go into it..

..but in this case you'll be putting some decorating trim round the edge of the hole so it doesn't matter if it ends up a bit ragged

Portable power saws like circ saws, recip and jig saws generally cut upwards towards the body of the tool for reasons of stability. If you're using a power saw it would be best to be inside the loft then you're not having to fight gravity to hold it against the ceiling. If you're using a hand saw it'd be beater to cut from below (pushing the teeth up into the finished face) but harder work than being above the work pushing down

Personally I would only use a power saw on this if it was a variable speed recip saw on low speed; the dust generated by aggressive sawing is nasty. Hand saw with a helper holding a running vacuum cleaner pipe end near the moving blade as it emerges from the clean side of the ceiling would be my route

--

6 inches isn't going to make a different to where you screw the piece of wood
 
Last edited:
I'd cut from above so gravity helps rather than hinders. Generally you cut anything so that the cutting direction of the saw blades means they come into contact with the finished face (the thing you look at) first, because when saw teeth emerge from a material they make more of a mess than when they go into it..

..but in this case you'll be putting some decorating trim round the edge of the hole so it doesn't matter if it ends up a bit ragged

Portable power saws like circ saws, recip and jig saws generally cut upwards towards the body of the tool for reasons of stability. If you're using a power saw it would be best to be inside the loft then you're not having to fight gravity to hold it against the ceiling. If you're using a hand saw it'd be beater to cut from below (pushing the teeth up into the finished face) but harder work than being above the work pushing down

Personally I would only use a power saw on this if it was a variable speed recip saw on low speed; the dust generated by aggressive sawing is nasty. Hand saw with a helper holding a running vacuum cleaner pipe end near the moving blade as it emerges from the clean side of the ceiling would be my route

--

6 inches isn't going to make a different to where you screw the piece of wood

Cheers
I was going to use a multi tool, would this be ok do you think? I am on my own so was going to use one hand multi tool and one hand hoover
 
you need straight and square timbers to connect to a buzzy toy will only go to around 32mm before you hit the double thick welded bit
the vibration will find anything loose and on lath and plaster and that can be large sections
would be awkward but a baton both sides clamped or screwed on to give you a guide to cut too
 
Old hand saw and a dust sheet beneath on the floor. Quieter, less mess
 
Last edited by a moderator:
Old hand saw and a dust sheet beneath on the floor. Quieter, less mess
Would you cut from inside the loft then? Just drill a hole to start?

you need straight and square timbers to connect to a buzzy toy will only go to around 32mm before you hit the double thick welded bit
the vibration will find anything loose and on lath and plaster and that can be large sections
would be awkward but a baton both sides clamped or screwed on to give you a guide to cut too

Would a multi tool not cut a fine line so it should avoid damaging nearby bits?
 

DIYnot Local

Staff member

If you need to find a tradesperson to get your job done, please try our local search below, or if you are doing it yourself you can find suppliers local to you.

Select the supplier or trade you require, enter your location to begin your search.


Are you a trade or supplier? You can create your listing free at DIYnot Local

 
Sponsored Links
Back
Top