Shower Tile Advice

Joined
3 Feb 2025
Messages
14
Reaction score
0
Country
United Kingdom
Afternoon All

Need some advice for someone who has never tiled before.

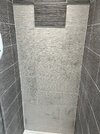
Basically we had a few cracked tiles which caused a water leak. Anyway I removed the old tiles to see they had tiled over the top of the old ones. (It’s a new build say no more) anyway I’ve removed all the damaged tiles and had blood sweat and tears removing the old adhesive but I’m ready.

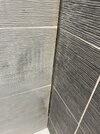
A question I have is the huge gap (picture 2) does this want filling with grout before I lay the tiles over or should I fill it with silicone ?

Any other advice is always welcome.

Thanks
Tom
 

Attachments

  • IMG_0757.jpeg
    IMG_0757.jpeg
    592.5 KB · Views: 39
  • IMG_0756.jpeg
    IMG_0756.jpeg
    530.2 KB · Views: 41
I would fill the right hand gap with grout ( as the adhesive you'll use for the tiling won't stick to silicone ) but id use silicone for the gap along the bottom. From the cleanliness of the first / under tiles you'll have observed that adhesive does not stick well to the front of those tiles. Google ' slurry coat ' for tiles, and put a coat of that on first.
 
As above^ but i'd also consider applying a vertical seal as the gap is quite large.
 
A vertical seal ? Then tile adhesive over the top? Then tile it ? What seal would you use ?
 
Adhesive in the gap then afix the seal to ensure no water can squeeze through. A double failsafe, if you like. It's up to you: some may say grout will be enough.
 
Grout to fill it WILL be enough. Remember, you've got a slurry coat going over the top of that, then adhesive over that, then a tile over that, then silicone over that !
I would make sure though that your tiles cuts on the new load going on are tighter than those in the photo. As the side wall tiles are not particularly flat, some of your new cuts are going to be slightly tapered.
 
Another ‘Tip’ for you ; make life easy for yourself and take off the rest of the tiles at the top…….
1.That way you can use whatever Trowel size you seem fit without worrying about trying to “ tie them in “ ( and get them flat with ) with the ones that are left.
2. You won’t have to think about taking the grout off the ones that are there to get a good fit.
3. You’ll be able to grout the whole lot in a one-y, so it’ll all be the same shade.
4. You’ll feel better with yourself for knowing it’s done properly !
 
Cut a length of trim to size; apply a level bead of silicone and fix into place.
No mess, no fuss. Done.
 
Do you have the same tiles to match? Or are you going for a different tile?
 

DIYnot Local

Staff member

If you need to find a tradesperson to get your job done, please try our local search below, or if you are doing it yourself you can find suppliers local to you.

Select the supplier or trade you require, enter your location to begin your search.


Are you a trade or supplier? You can create your listing free at DIYnot Local

 
Back
Top