Onto the next...
I am getting new flooring put down in my bedroom and as such I will need to strip the existing carpet down to the original floorboards. Whilst I have access, I want to wire a new socket onto the existing ring final and potentially cleanup a few things given that these areas will be inaccessible for a long time.
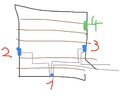
I've attached a quick sketch on the setup. Entrance door is on the bottom right and wires enter into the room under floor from the landing. I've also indicated how joists are running. Socket 1,2 and 3 are existing ones. 1 and 3 are on the ring main and socket 2 is spurred off socket 1. All sockets are currently in the skirting boards, but I will move them into the wall at the same time. The additional socket is planned for location four (to have a socket on each side of the bed). This is a three part question:
1. Should I spur off 3 to connect socket 4? Easy wiring and just one extra cable w/out any JBs. Or should I extend the ring to 4, which means I need to add a JB to extend one leg to go straight to socket 4. This then of course is difficult to reach once the new floor is down. JB for me would be wago221 with matching box, closed with zip ties...
2. Exact location of socket 4 >> there is a bathroom in the adjoining room. The walls are lath and plaster with vertical joists/studs. The location where I was thinking of putting the socket is actually exactly in between the same studs that have the shower mixer installed going out on the other side. This means in between the studs I have water pipes running up to the mixer. I am assuming the best answer here is to put the new socket in the gap space between the studs before the one holding the plumbing parts so they do not co-exist in the same space?
3. Since I have access to the floorboards, was wondering if it makes sense to replace some of the 30 year old cable with fresh T&E? Not sure yet how feasible this is as there are surprisingly not many JBs I could find, so where possible everything has been wired in one run. So I could in theory replace the cable between socket 1 and 2 and the one going to 3, but everything leaving the room is part of a much longer run. Then again is it worth it if there are actually no issues? The only thing I might consider is to add socket 2 correctly to the ring, by just joining two cables next to socket 1, but then again I have an unreachable JB under the floor and I always thought it is good practice to avoid JBs, cable splits etc. if possible.
Any views are greatly appreciated.


